Pilea microphylla, also commonly known as artillery plant, is an annual or short-lived perennial. It’s best recognized by its many pairs of small, fleshy green leaves that give the plant an almost fern-like appearance.
Tiny green flowers appear during the growing season but they aren’t very prominent. However, they do release a burst of yellow pollen, which earned the plant its common name.
Artillery plants grow best in warm conditions and require bright, indirect light, along with moist but well-draining soil.
The artillery plant, also known as pilea microphylla or variegated artillery plant, is a popular houseplant known for its alluring foliage Its oval leaves feature splotches of light green, dark green, and white, creating a stunning visual impact. With the right trimming techniques, you can keep your artillery plant bushy, full, and picture-perfect.
In this complete guide, you’ll learn everything you need to know about trimming an artillery plant. We’ll cover when to trim, what tools to use, how to promote bushiness and fullness, and techniques for maximizing its beauty With these artillery plant pruning tips, you’ll have a thriving specimen overflowing with vibrant variegation in no time.
When Should You Trim an Artillery Plant?
Timing is an important factor when it comes to trimming an artillery plant. Here are the best times to give it a haircut:
- Early spring when new growth emerges. Remove any winter damage and shape the plant.
- Mid-summer to remove unwanted leggy growth and encourage fullness before its growing season ends.
- Fall or winter if the plant is overgrown and encroaching on space. Avoid major trimming though.
The ideal time is when the plant is actively growing in spring and summer. Trimming stimulates new branching and foliage. Avoid pruning in fall and winter since growth slows.
Tools Needed for Trimming an Artillery Plant
Trimming an artillery plant doesn’t require any specialized tools. Here are the basics you’ll need:
- Clean, sharp pruners or scissors
- Spray bottle of water to mist the foliage
- All-purpose potting soil and a container (if repotting)
Make sure your pruners or scissors are sanitized to avoid transmitting diseases. Rubbing alcohol works well for disinfecting.
How to Promote Fullness and Bushiness
The artillery plant grows as an upright, columnar shape when left unpruned. Through strategic trimming, you can transform it into a fuller, bushier plant. Here are some techniques:
-
Pinch off tips: Pinching the tender new growth at the end of the stems triggers branching from that point. Do this routinely to build a bushy framework.
-
Trim leggy growth: Tall, leggy stems can make the plant look bare and lanky. Cut them back to just above a node or leaf set to encourage lower growth.
-
Remove crowded stems: If interior areas appear congested, prune out a few mature stems at the base. This increases air circulation and light penetration.
-
Shape with tip pruning: For a rounded, balanced shape, snip 2-4 inches off the tips of outward facing stems. Repeat every few weeks during growing season.
-
Repot annually: Refresh the soil and provide ample room for root and foliage growth with annual repotting. This fuels bushiness.
Trimming Techniques for Maximizing Beauty
Proper techniques are key when trimming an artillery plant. Follow these tips:
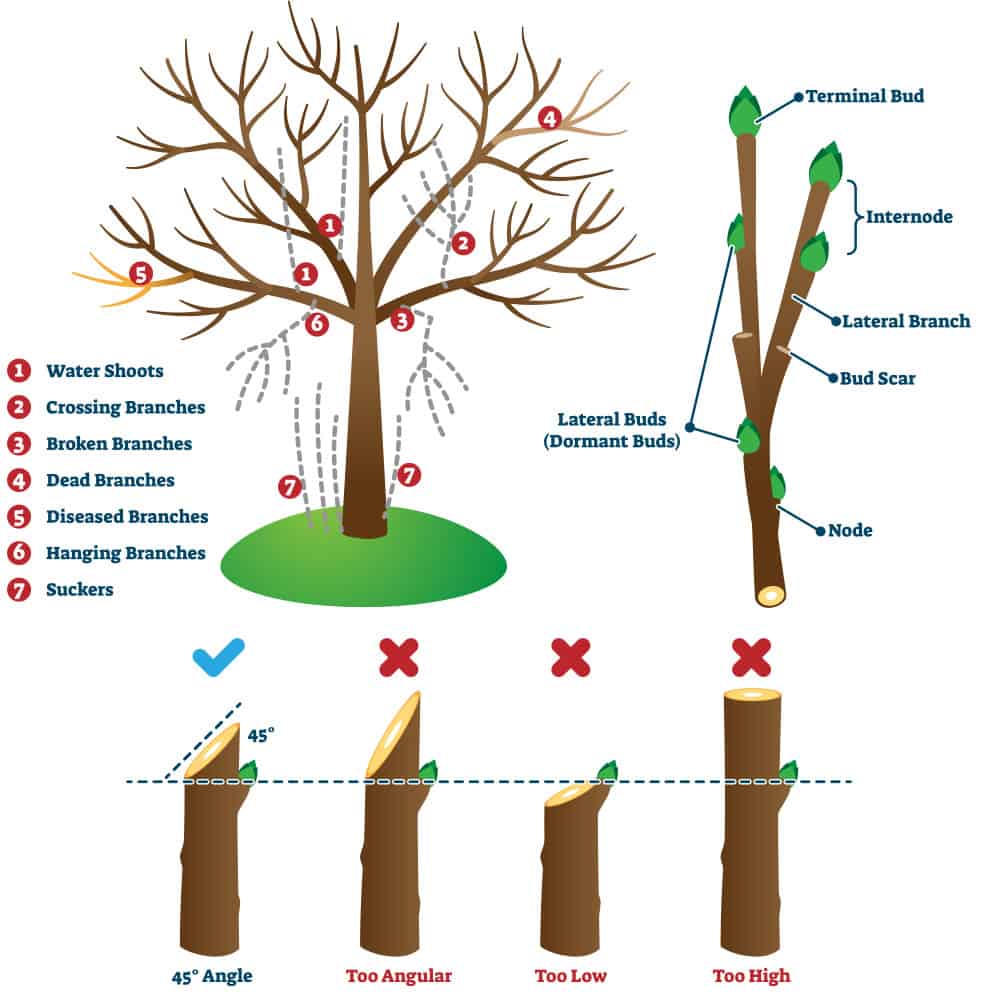
- Always use clean, sharp pruners or scissors to avoid damage.
- Cut stems on an angle to allow water to run off the cut edge.
- Trim just above leaf nodes where new branching will occur.
- Remove spent leaves and stems in one fluid motion.
- Never remove more than 20% of the foliage at once to avoid stress.
- Mist leaves after trimming to wash away debris and reduce trauma.
- Wipe tools with alcohol after each cut to prevent bacterial/viral spread.
- Remove fallen leaves and trim areas to keep the plant and container tidy.
Trim with precision for the most attractive, full artillery plant possible. Check its progress weekly and snip as needed.
What to Avoid When Trimming Artillery Plants
While artillery plants respond well to trimming, there are a few mistakes to avoid:
- Over-trimming – Never remove more than 20% of the plant at once. This can send it into shock.
- Cutting too short – New branches may not grow if you trim down to bare stem. Leave some foliage.
- Pruning in fall/winter – Growth is minimal so focus on spring/summer pruning only.
- Skipping disinfecting – Wipe tools to prevent the spread of diseases.
- Allowing cuttings to remain – Remove and discard all clippings promptly after pruning.
By being mindful of these things to avoid, your pruning will help your artillery plant thrive.
How to Use Trimming to Control Size
The artillery plant grows 18-24 inches tall and wide under ideal conditions. If your plant exceeds the space it inhabits, use trimming to contain its size. Here are some options:
- Prune taller stems halfway to reduce height.
- Shorten the entire plant by a few inches to limit width.
- Thin interior stems to open things up.
- Prune rootball by one-third and repot annually.
- Grow in a smaller container to restrict size. A 6” pot maintains a compact shape.
With persistence and attentive trimming, you can maintain the artillery plant at a size that fits your space beautifully.
Signs Your Artillery Plant Needs Trimming
How do you know when it’s time to break out the pruners? Watch for these signs:
- Overlong, leggy stems with sparse leaves
- Crowded interior growth with poor air circulation
- New leaves much smaller than older leaves
- Stems growing into the edges of the container
- Plants exceeding the desired size for the space
- Presence of dead leaves, stems and flowers
Routine pruning every few weeks when actively growing keeps it attractive. But intervene promptly if you spot these issues.
Interesting Facts About the Artillery Plant
Here are a few more fascinating facts about this unique houseplant:
- Its name comes from the “poptop” seed pods that pop open when mature.
- Native to tropical and subtropical regions of Asia.
- Loves warm, humid conditions with partial sun. Mist frequently.
- Leaves look painted due to variegated patches of color.
- Related to more common Pilea plants like the Pilea peperomioides.
*Contains calcium oxalate crystals which can cause skin irritation. Use caution when handling.
With the proper trimming, the artillery plant shows off its stunning variegated foliage and unique personality in any indoor space.
Summary of Artillery Plant Trimming Tips
Caring for an artillery plant involves paying close attention to its growth habits and pruning needs. Follow these key tips for trimming it to perfection:
- Trim in spring and summer when actively growing using clean pruners and scissors.
- Cut stems above leaf nodes to encourage bushy regrowth.
- Prune leggy growth back to a node and shape for fullness.
- Limit trimming to 20% of foliage. Remove clippings promptly.
- Mist after trimming and wipe tools to prevent disease spread.
- Avoid over pruning, cutting too short, and trimming in fall and winter.
- Use regular trimming to restrict size if plant exceeds space.
- Watch for signs like leggy growth and crowding that indicate it’s time to trim.
With the techniques in this guide, you can have the most beautifully shaped and full artillery plant possible. Let those exquisite variegated leaves take center stage!
Types of Pilea Microphylla
P. microphylla ‘Variegata’: This cultivar of the artillery plant has green-and-white variegated foliage. It has very similar care requirements to the conventional green variety of pilea microphylla, but in especially bright light, the variegation will turn to green and pink, which is particularly attractive.
Water
The artillery plant has moderate watering needs. It will need to be watered regularly, especially during periods of hot, dry weather. But you shouldn’t oversaturate the soil.
To avoid doing so, ensure that the top two inches of soil is dry to the touch before watering again.
The basics of shrub pruning
FAQ
How to prune an Artillery Plant?
How to prune a Pilea plant?
Why is my artillery fern turning brown?
How to prune a plant to make it bushy?