For many years now, I have been growing various vegetables as a hobby in my spare time, which is what ultimately led me to studying horticulture. I find it fascinating to watch as plants grow from seed to fruit and to then finally be able to make use of the literal fruits of my labour. Favourite fruit: Strawberries and cherries Favourite vegetable: Potatoes, tomatoes and garlic
Sadly, root rot often ends the life of our beloved plants. Find out here how to correctly recognise, prevent and treat root rot.
Root rot is a common disease in plants. If the base of the plant begins to look soft and wilted, it can be one of the first signs of root rot. Unfortunately, all plants ranging from small plants in the garden bed to large trees can be affected by root rot. Usually, the root neck or even the whole root system will be affected by this disease and what remains is nothing but a soft, rotten mass.
Why do the plant roots start to rot and die in the first place? In most cases, bacteria and fungi are to be blamed for the plant damage. The exact causes of root rot, how you can recognise it and what to do to treat and prevent this disease will be explained in the following.
Arrow plants, also known as arrowhead plants or syngoniums, are popular houseplants adored for their vibrant arrow-shaped leaves. However, these tropical beauties are susceptible to root and stem rot if overwatered or planted in poorly draining soil. As responsible plant parents, it’s crucial we understand what causes rot in arrow plants and how to prevent it.
In this comprehensive guide we’ll explore the common causes of arrow plant rot signs to watch for, and proactive care tips to keep your arrowhead thriving in peak health. Let’s dive in!
What Causes Rot in Arrow Plants?
Several key factors can lead to devastating rot diseases in arrow plants
Overwatering
Excessive moisture is the number one culprit behind most arrow plant issues. These tropicals prefer consistently moist but not soggy soil. When overwatered waterlogged roots quickly succumb to rot.
Poor Drainage
Without proper drainage, wetness accumulates in the soil and arrow plant roots suffocate. Planting in a pot without holes or dense soil mixes without amendments prevents excess water from draining.
High Humidity
While arrow plants enjoy average household humidity, excessively high humidity encourages fungal and bacterial growth leading to stem and leaf rot diseases.
Compacted Soil
Soil that is too compact prevents proper air circulation around the roots. This oxygen deprivation stresses the roots and makes them prone to rot.
Fungal or Bacterial Infections
Various fungal and bacterial diseases can infect arrow plant roots, stems, and leaves, causing severe rotting. Pathogens spread via water, infected soil, tools, and unsanitary conditions.
Warning Signs of Arrow Plant Rot
Be vigilant for these common symptoms of deadly rot in arrow plants:
- Wilting, drooping, or yellowing leaves
- Blackened or mushy roots, stems, or leaf spots
- Foul, musty odor from potting mix
- Stunted growth
- Premature leaf drop
- White fungal growth on leaves or in soil
- Sudden plant decline or death
Don’t delay treatment at the first signs of trouble! Catching issues early gives your arrow plant the best chance of recovery.
6 Tips to Prevent Arrow Plant Rot
Preventing arrow plant rot starts with proactive care. Here are some key tips:
1. Water Thoroughly Then Allow Soil to Dry
Water arrow plants only when the top inch of soil feels dry. Then give them a good, thorough soak until water drains from the bottom. Always dump out excess water in saucers.
2. Provide Exceptional Drainage
Choose containers with ample drainage holes. Amend dense potting mixes with perlite or orchid bark to improve drainage.
3. Give Arrow Plants Bright, Indirect Light
Low light encourages excess moisture retention in soil and leaf crowns. Help soil dry out faster by giving arrow plants bright, indirect light.
4. Promote Air Circulation
Allow space between arrow plants for air to circulate. Gently blow air on leaves occasionally with a fan. Trim congested growth.
5. Disinfect Tools and Workspace
Sterilize shears, pruners, and work areas between plants. Avoid water splashing between plants.
6. Let Soil Dry Out Extra Before & After Repotting
Root damage from repotting makes plants vulnerable to rot. Allow extra time for the soil to dry thoroughly before and after transplanting arrow plants.
What to Do if Your Arrow Plant Has Rot
If you discover rot, don’t panic! Follow these steps to rescue your plant:
-
Isolate the affected plant to avoid spread.
-
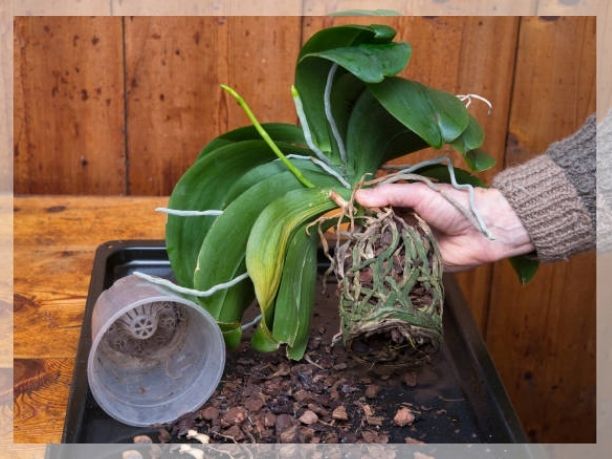
Remove the plant from its pot and wash away soil from roots. Trim off all blackened, mushy roots with sterilized shears.
-
Spray remaining roots and leaves with hydrogen peroxide or neem oil solution.
-
Repot in fresh, sterile potting mix amended with extra perlite for drainage.
-
Move the plant to a location with brighter indirect light and ample air circulation.
-
Allow the soil to dry thoroughly between waterings as the plant recovers. Be vigilant for recurrence of symptoms.
-
Apply organic anti-fungal options such as cinnamon or chamomile tea sprays to protect healing wounds.
While battling rot can be challenging, don’t lose hope! With attentive care and swift intervention at the first sign of problems, you can often nurse affected arrow plants back to full health.
Choosing the Right Arrow Plant Soil
The key to avoiding overwatering issues is planting arrowheads in an exceptionally well-draining potting mix. Here are smart soil choices:
-
Cactus & succulent mix – Fast drainage but retains some moisture. May need amendment with perlite.
-
Orchid potting mixes – Light, airy textures. Often include fir bark, charcoal, perlite.
-
Peat & perlite – A 50/50 peat moss and perlite blend.
-
Homemade mixes – Combine peat, compost, perlite, & sand for custom blends.
-
Commercial aroid mixes – Blended for anthuriums, philodendrons, arrowheads.
Always avoid 100% peat or straight potting soil. Too moisture retentive! Test drainage by watering a sample of moistened mix – excess should flow right through.
Perfect Arrow Plant Watering Best Practices
In addition to soil choice, ideal watering habits prevent wet feet:
-
Water only when the top 1-2” of soil are dry.
-
Water thoroughly until it flows from the drainage holes. Never let pots sit in water.
-
Pour excess water out of saucers promptly after 15 minutes.
-
Allow more time between waterings in cool weather when growth slows.
-
Keep humidity moderate, around 40-60%.
-
Water early in the day to allow leaves to dry before night.
-
Feel soil to gauge moisture, don’t rely on a schedule.
-
If in doubt, wait an extra day or two!
Providing Proper Arrow Plant Light Conditions
While arrow plants tolerate lower light than many houseplants, insufficient light encourages excess moisture retention and rot diseases. Ideal arrow plant light includes:
-
East or west-facing windows (avoid hot midday sun).
-
Bright, ambient indoor rooms with ample windows and skylights.
-
Outdoor shaded locations in warmer months.
-
Arrowhead variegated varieties need brighter light than green to maintain their colors.
-
Rotate plants or move to brighter spaces in winter when light is scarce indoors.
-
Supplement with grow lights if natural light is inadequate.
Promoting Airflow Around Arrow Plants
Great drainage and soil go hand-in-hand with ample airflow to prevent disease-causing moisture buildup:
-
Space arrow plants 1-2 feet apart for air circulation.
-
Use hanging baskets or elevated stands for better airflow.
-
Position floor plants on pebble trays, not solid saucers.
-
Remove congested lower foliage and interior leaves to open the canopy.
-
Gently blow air on arrow plants occasionally with a fan.
-
Avoid crowding arrow plants in enclosed spaces with other tropicals.
With attentive care focused on providing well-draining soil, proper light, ideal watering, and air flow, you can avoid the heartbreak of losing arrow plants to stem and root rot. Be vigilant for early signs of trouble and ready to take corrective action before irreversible damage occurs. With quick response, many affected arrow plants can make full recoveries.
Root rot: possible causes
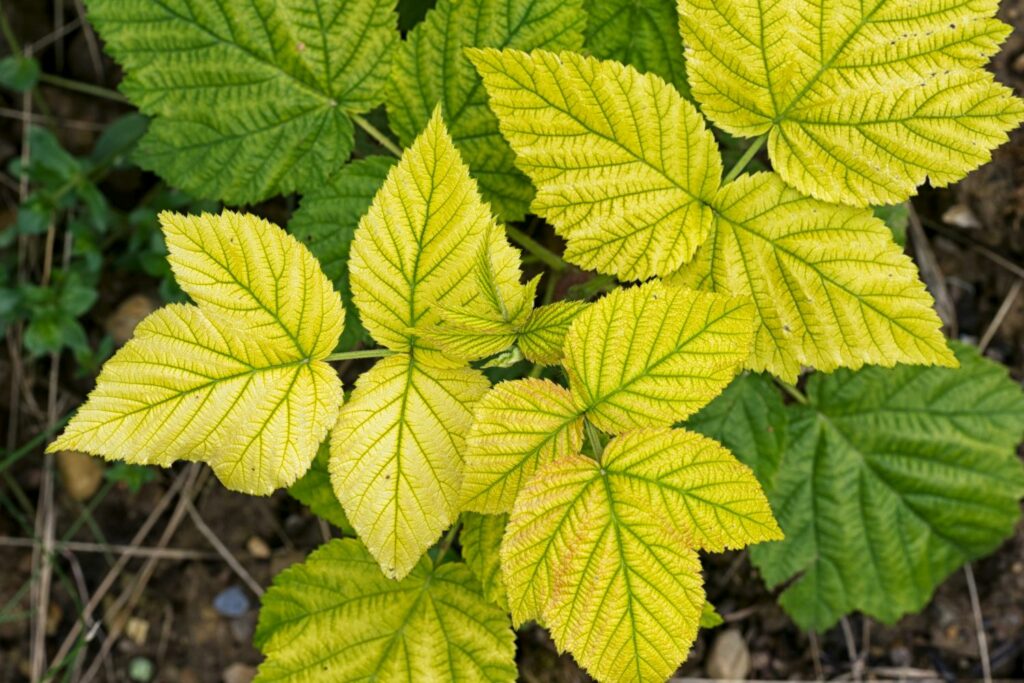
Root fungi are one of the most common pathogens that attack and damage the roots of plants. Above ground, these types of fungi lead to wilting and chlorosis, i.e. the whitening or yellowing of the leaves. Most root rot can be traced back to different species of the common fungus Pythium or the oomycete Phytophthora, but there are many more fungi that cause rotting of the plant’s roots. Other well-known pathogens include Rhizoctonia, Fusarium or Phoma. However, it is often difficult to identify the exact cause of the disease, because the root system is underground, and the parts above ground usually only show symptoms of root rot in later stages of the disease. Here is a list of the most common fungal diseases and their symptoms:
Pythium induced root rot
- The seedlings turn black at the base, rot and fall off
- Roots grow at a slower pace and eventually rot
- Root bark peels off
- Plants wilt, turn yellow and start to rot
- This disease is mostly caused by fungi belonging to the genus Pythium
Blackleg
- Blackleg is caused by the soil-borne fungus Thielaviopsis basicola, also known as Chalara elegans
- Roots turn brown and dry, while the root tips remain white
- Leaves turn yellow and their growth slows down (however they do not die)
- Commonly found in Cyclamen, chrysanthemums, pelargoniums, lettuce (Lactuca sativa), tomatoes (Solanum lycopersicum), legumes and elderberry (Sambucus)
- In carrots (Daucus carota subsp. sativus), this fungus causes rot during storage. The fungus Chalaropsis thielavioides is a common secondary infection in carrots that may occur alongside this disease

Fusarium
- The pathogens invade the plants through root tips or wounds
- They clog the veins of the plant and cause toxic substances to develop
- They cause root rot in spinach (Spinacia) and onions (Allium cepa)
Early blight
- Early blight is often caused by Alternaria species (Alternaria solani or Alternaria alternate cause this disease in potatoes)
- Brown to black spots appear on the leaves, the stem also turns brown
- Dark, caved-in spots start forming on the tubers and the potato tissue underneath loses its colour, hardens and dies off
Black scurf
- Lettuce begins to rot due to Rhizoctonia solani starting at the lower leaves
- Potatoes get stains and form a grey to white coating on the stems and the base can turn brown in the growing process
- Potato tubers become deformed, develop spots and the core tissue dies off (also known as “dry core”)
Pink root
- Caused by various Phoma species
- Roots turn light pink, light purple (violet) or brown
- Leaves change colour and plants with pink root can be pulled out of the ground quite easily
- The species Phoma betae, for example, causes root rot in turnips (Beta) and may also cause decay in storage

Rot caused by Aphanomyces
- Causes root rot in legumes, such as garden beans (Phaseolus vulgaris) or peas (Pisum sativum), or black root in radishes
- The black root in radishes is caused by the fungus Aphanomyces raphani
- Radishes (Raphanus) turn blue to black on the outside and, eventually, the inside rots away
- After Aphanomyces infests the plant, bacteria or Rhizoctonia solani can also infect the diseased plants
Tip 2: Rotate your crops
If root rot occurs in the garden, it is crucial to pay attention to the crop rotation in the following year. Pathogens usually affect only specific crops or crop families. Therefore, make sure to change around the garden occasionally. If a potato plant rots, for instance, avoid planting potatoes in the same place in the following year. In fact, it would be best not to cultivate any members of the Solanaceae family there at all. Following a varied crop rotation and loosening up the soil can prevent root rot.
Root Rot 101 : How to Spot, Treat and PREVENT Root Rot!
How do you fix root rot in an arrowhead plant?
To fix root rot in the arrowhead plant, take it out of its pot and inspect the roots. Prune any decaying roots, spray a fungicide after pruning the damaged roots, and make sure you don’t cause any damage to the healthy ones. Then, repot the plant in a new pot with a fresh potting mix.
How do I prevent root rot?
Prevention is the best option because root rot is hard to treat. Take extra care with the watering of your plants, and hopefully that will be enough for you. Be forewarned that a severe case of root rot cannot be fixed. Once the fungus is established and the damage done, you won’t be able to save the plant.
How do you fix root rot on a tree?
For larger plants, shrubs or trees, it can be a more difficult challenge to fix root rot because you can’t actually move the plant to access the roots. Stop watering until the first 2 inches or more is very dry, and then only water away from the trunk or main stem.
Can root rot be fixed?
Be forewarned that a severe case of root rot cannot be fixed. Once the fungus is established and the damage done, you won’t be able to save the plant. If you catch the problem soon enough, you should be OK. Having to fix root rot in houseplants is a little different than with outside plants. In either case, you should stop watering right away.