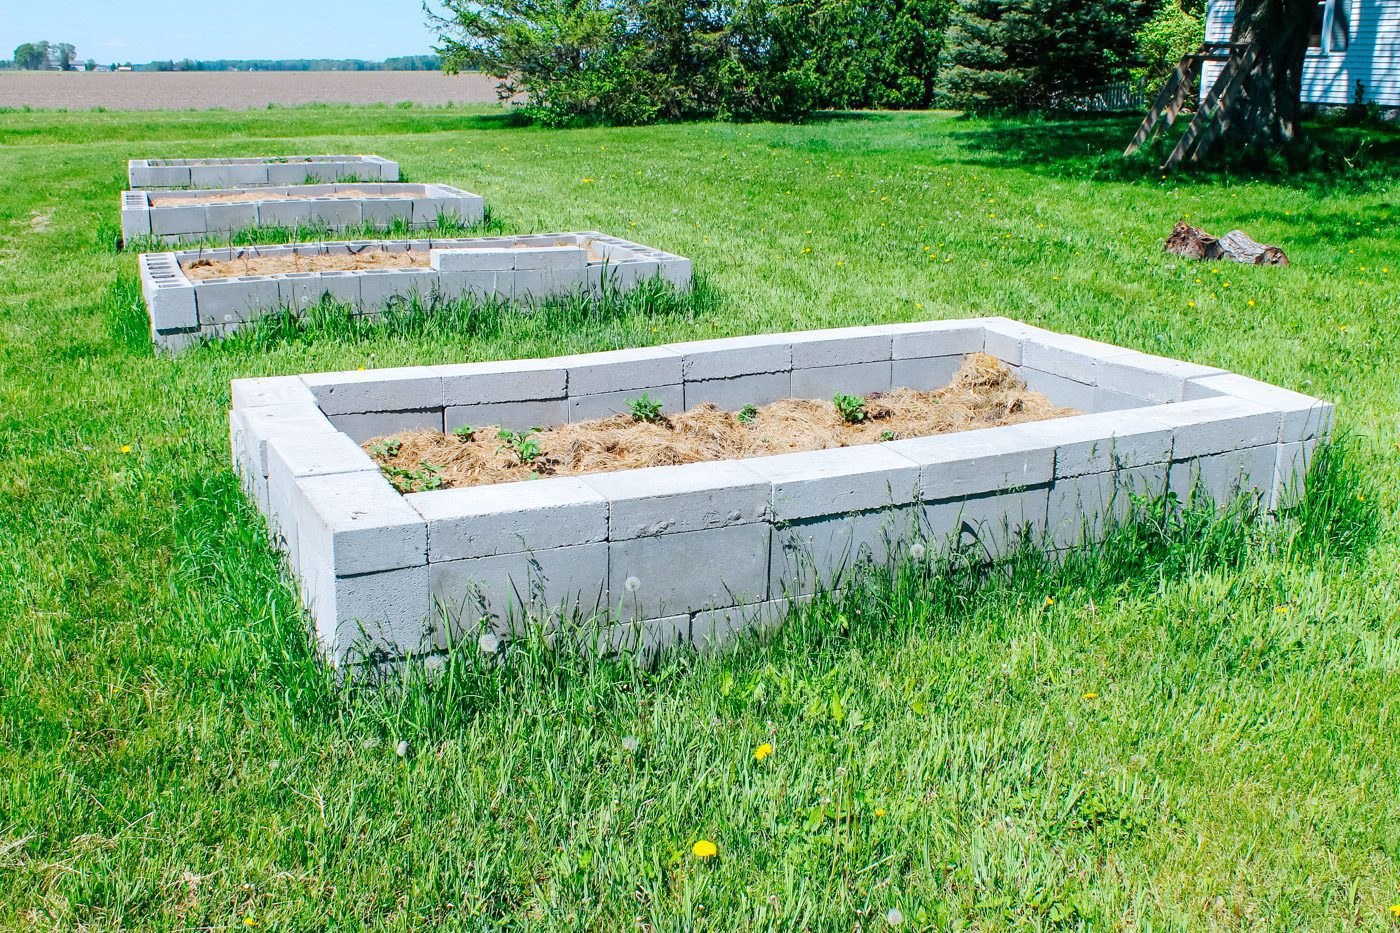
These are actually concrete block garden beds covered in surface bonding cement, but that was too much of a mouthful for a title. Ha!
I wanted to plant some berry plants along our fence line, parallel to our septic lines, but I didn’t want well….poop berries or a ruined septic system, so I needed to come up with a way to contain the berries and keep them the requisite 10 feet away.
Concrete block beds seemed like a good choice, but I didn’t want them to look like concrete blocks. I found this QuikWall product from Quikrete that not only pretties up the blocks a bit but also literally cements them together into a sturdy, permanent structure. It was all a bit of an experiment because the only tutorials I could find when I started this project last year, were for small walls. It made sense though that if this stuff can make walls sturdy then it could handle a foot tall garden bed…And it did!
*I used 19 concrete blocks, 19 caps, and about 1.5 bags of surface bonding cement per bed. I found my concrete blocks from Home Depot for $1.45 a piece.
*I wasn’t able to find QuikWall at my local big box store, although I think some locations carry it, so I ordered it through my local tile shop.
**You want to use a gravel that can be compacted like what is used in driveways. I used granite gravel with “minus” or gravel dust that gets in between the rocks and helps it compact so that when you walk on it, you don’t sink. Do not use pebble gravel or any gravel that has smooth rocks. This will not compact and will create an unsteady base for your blocks.
I put together a video tutorial below that documents what I did. It shows you how the mixture looks being spread on, which is probably the most helpful part. I still recommend reading the written tutorial because there are lot of details that I didn’t include because it would have made the video too long.
I sometimes use the word “cinder” in place of “concrete” when describing these concrete blocks. To a lay person, these terms are often used interchangeably and I wanted to use terms that would be easily recognized. I also used them interchangeably, not knowing there was an important difference, until I shared this post.
Older cinder blocks are made with fly ash and contain chemicals that can be harmful to your health. Newer concrete blocks that you can get at the hardware store do not contain fly ash. They are made of water, stone, and concrete and they are safe for food. If you are using these beds to grow food, please use new concrete blocks.
Concrete raised garden beds are becoming an increasingly popular choice for home gardeners. These sturdy rot-resistant beds made of concrete allow you to grow flowers, herbs vegetables, and more while adding an attractive focal point to your yard.
In this complete guide, we’ll cover everything you need to know about concrete raised beds including:
Benefits of Concrete Raised Beds
There are several key advantages that make concrete great for raised garden beds:
-
Durability – Properly made concrete raised beds can last for decades without rotting or falling apart Concrete stands up well to weather and elemental exposure
-
Weed Prevention – Unlike wooden raised beds, concrete does not allow weeds to sneak in from below or the sides This makes maintenance much easier
-
Customizable Design – Concrete can be poured into any shape or size bed you desire. You can do curved borders, corner planters, rectangles, circles – anything you can build a form for!
-
Decor Potential – Concrete takes paints and stains well, allowing you to customize the color and look. You can also imprint patterns for added visual appeal. This allows your new garden bed to become an eye-catching focal point.
-
Height – Concrete raised beds can be built taller than wooden versions, reducing the need to bend over for gardeners. Heights of 18-24 inches are common.
-
Containment – The solid concrete sides prevent invasive plant roots and seeds from spreading where you don’t want them, keeping the garden contained.
Drawbacks to Consider
While concrete raised beds have many advantages, there are a few potential drawbacks:
-
Higher Initial Cost – Pre-made concrete raised beds can be expensive compared to buying wood and making your own. Making custom concrete beds also requires more in materials.
-
Weight – Once filled with soil, concrete raised beds can be extremely heavy, making them impossible to move later if you alter your garden layout.
-
Soil Warming – The concrete sides conduct warmth away from the soil more than wood or plastic raised beds, meaning soil may stay cooler in early spring.
-
Need for Drainage – Concrete beds must be built with adequate drainage holes, otherwise you risk waterlogging your plants from poor drainage.
Types of Concrete Raised Beds
If you decide to install a concrete raised bed, you’ll need to choose a construction style. Here are some popular options:
-
Pre-cast Concrete Planters – Pre-made concrete beds are available in many garden stores. Simple to install, but limited flexibility.
-
Masonry Block Beds – Stack and adhere concrete masonry blocks to desired dimensions using mortar or bonding cement. Allows custom sizing.
-
Poured Concrete – Build a wooden form, then pour fresh concrete into the frame to create a seamless custom raised bed of your design.
-
Decorative Blocks – Stack creatively shaped blocks like curves, diamonds, hexagons etc. to make beds with added visual appeal. Adhere blocks together.
-
Planter Wall Blocks – Interlock specially designed blocks with lips and grooves to assemble attractive and seamless raised planter walls.
Ideal Size and Layout
When planning your concrete raised bed, keep these size and layout factors in mind:
-
Height – Recommended height is generally 12-24 inches tall. Choose based on your reach and comfort.
-
Width – Limiting beds to 3-4 feet wide makes it easy to reach the center for planting and harvesting without stepping on the soil.
-
Sun Exposure – Position the raised beds in an area receiving at least 6-8 hours of direct sunlight daily for growing vegetables and flowers.
-
Layout – Long rows, squares or rectangles allow for efficient use of space. Leave at least 12-18 inches between beds and walls or fences for access.
-
Number of Beds – Consider how many you can comfortably maintain. Multiple smaller beds provide flexibility for crop rotations.
In most residential gardens, a raised bed around 3 feet wide by 8-10 feet long makes an excellent size for concrete construction.
Building Your Own Concrete Raised Bed
While you can purchase pre-fabricated concrete planters, building your own allows for full customization and cost savings. Here are the basics:
-
Plan the Bed Layout – Decide on shape, position, size and height needed. Sketch plans with measurements.
-
Purchase Materials – Cement, gravel, cinder blocks, lumber for forms, drainage pipes, and decorative accents like tiles.
-
Prepare the Site – Level the soil and dig 12-inch deep trenches for foundations and drainage.
-
Build Forms or Base – Stack cinder blocks or build wooden forms. Level and square everything tightly.
-
Pour Concrete – Pour premixed concrete into forms or blocks. Smooth and level surface. Allow adequate cure time before removing forms.
-
Add Drainage – Drill weep holes near the base to allow drainage and prevent waterlogging plants.
-
Decorate – Stain, tile, or imprint patterns into the concrete sides. Allow curing before filling bed with soil and planting.
Following these steps will allow you to create durable, customized concrete raised beds that will serve as an excellent focal point in your yard for decades to come.
Decorating and Finishing Touches
One of the great aspects of concrete raised beds is you can decorate and finish them to become an impressive yard feature:
-
Stain or Paint Concrete – Choose exterior concrete stains and paints in any color you wish. Darker colors absorb warmth from sunlight.
-
Add Texture – Imprint or stamp patterns like stone, brick, or slate into the wet concrete to mimic other building materials once cured.
-
Incorporate Items – While wet, press decorative tiles, glass, sea shells or stones into the sides of your concrete raised beds.
-
Highlight with Plants – Allow vines or trailing plants to grow along the edges of your concrete raised bed to soften the solid sides.
-
Use as Divider – Place a concrete raised bed along a property line, path, or driveway to create an attractive separation.
-
Pair with Decor Items – Cluster your concrete raised beds with yard art, sculptures, sundials, and urns to create a cohesive theme.
-
Go Modern – For contemporary style, leave basic concrete block beds unfinished in gray. Surround with modern furniture and contrasting metal sculptures.
Let your creativity run wild when decorating your DIY concrete raised garden beds. They are the perfect blank canvas for yard artistry!
Caring for Concrete Raised Beds
Caring for concrete raised beds is easy with just these simple maintenance tips:
-
Watering – Check soil moisture frequently. Water whenever the first few inches become dry. Use drip irrigation or soaker hoses to simplify.
-
Weeding – Pluck weeds as soon as you see them. This is easier than in ground beds thanks to the concrete sides preventing weeds.
-
Fertilizing – Follow planting instructions for feeding specific flowers, herbs or vegetables grown in your raised beds. Use slow release granular fertilizer.
-
Replenishing Mulch – Maintain 2-3 inches of compost or organic mulch on top of the soil to retain moisture and nutrients. Replenish as needed.
-
Tending Plants – Provide supports, pruning, and care as needed for the specific plants grown in each raised bed.
-
Refreshing Soil – Every 2-3 years remove and replace some soil to replenish nutrients that may have depleted over time.
-
Clearing Drains – Use a hose to flush out weep holes if they become clogged with soil and impede drainage.
With just 10-20 minutes of effort per week, you can keep your concrete raised beds looking great and your plants thriving!
What Does a Concrete Raised Bed Cost?
If you add up costs for materials, tools, labor and decor, building your own concrete raised bed typically costs $150-$500 depending on the size. Pre-made concrete planter boxes range from $250 on the low end to $1000+ for intricate designer raised beds.
Here’s a breakdown of costs for a DIY concrete block raised bed:
- Concrete blocks – $1.50 – $2.50 per block
- Gravel base – $20-40
- Mortar or adhesive – $20-40
- Soil mix – $10-20 per cubic foot
- Stain or paint – $30-60
- Tools if needed – $50-150
- Plants – $3-10 each
Total – Around $250 for a 3′ x 8′ raised bed.
You can reduce costs by finding used materials or getting free soil on your property when excavating. Starts from your own plants or friends also lower costs. For most homeowners, the investment easily fits into their garden budget. And a properly built concrete raised bed will provide growing space for decades.
The Lasting Benefits of Concrete Raised Beds
As a versatile, durable, and customizable gardening option, concrete raised beds offer many advantages if you’re willing to make the initial investment. With good construction techniques, they will provide years of handsome form and productive function in your garden.
The initial labor pays off long-term since a properly made concrete raised bed can become a permanent garden feature that may even increase your property value. So consider tapping into the design flexibility and longevity of concrete for your next raised bed project!
Your backyard is the perfect canvas to get creative with decorative concrete raised garden beds. With smart planning and preparation, you can build durable concrete planter boxes tailored specifically for your space and gardening needs. Give your backyard focal point unique style that will last for decades to come. Your plants will thrive while you enjoy the decorative curb appeal.
Step Three: Add a gravel base.
Lay at least 1-2 inches of gravel underneath where the blocks will go, compacting it with a hand tamper and leveling it as you go. For some of my beds on more of an incline, I had to add more like 3-4 inches of gravel.
You will likely have to adjust the amount of gravel you need in the next step, so you don’t have to get too picky about how precisely it’s leveled just yet.
Step Two: Prep the area and remove the grass.
Remove any grass or weeds from the area and start leveling out the ground if you’re on an incline. The gravel that will be added in the next step will help with the leveling a little bit too, so don’t worry if it’s not perfectly level at this point.
If you have rocky soil like I do, then I highly recommend using a pick axe rather than a shovel. It will save you so much time and frustration.
The Best Raised Garden Bed Option for you!
FAQ
Is concrete good for raised beds?
Concrete blocks are perfectly safe to use around raised garden beds (click to learn more) whether you plant an edible garden, shrubs or flowers.
What do you put under a concrete garden bed?
Start filling up your raised bed by adding a filler material, such as gravel, sand, or soil, which can be added to the bottom of the raised bed to help …Jun 22, 2022
Can you make a raised garden with concrete blocks?
I wanted to be able to continue gardening, despite my disabilities, so my sister and I designed these tall raised beds made from concrete blocks. These awesome beds are not only easy to work in, but they have also proven to be incredibly productive.
Is it cheaper to buy or build raised garden beds?
However, a Durable GreenBed kit is useable for 20-25 plus years and stays attractive for just as long. A homemade raised garden bed might be cheaper in the short term, but it will cost you far more time and money in the long run.
How much does a concrete raised garden bed cost?
The cost for a concrete raised garden bed ranges from $250 to $1,000. The best-rated product in concrete raised garden beds is a 7.5 in. x 7.5 in. x 5.5 in. Tan Brown Planter Wall Block (Pack of 24).
What is the best product for concrete raised garden beds?
The 7.5 in. x 7.5 in. x 5.5 in. Tan Brown Planter Wall Block (Pack of 24) is the best-rated product in Concrete Raised Garden Beds. All Concrete Raised Garden Beds can be shipped to you at home.
Can you put a raised garden bed on concrete?
There is a common misconception that putting a raised garden bed on concrete or other hard surfaces will prevent it from draining well. The opposite is actually true, as long as the bed is open on the bottom! A well-built raised garden bed on concrete will actually drain faster than one sitting snugly down within the soil of your yard.
What can you plant in a concrete raised bed?
Plant trailing greenery – Let the concrete bed frame your garden view by training vines or trailing plants along the edges. Ivy, jasmine, vinca, and English ivy all work well. Use as divider – Position a concrete raised bed in your yard as a garden divider or border.
Is concrete a good base for raised beds?
Concrete is a durable, low-maintenance, and semi-porous material that makes an ideal base for raised beds. However, it has the potential to contaminate the garden soil and leach any chemicals on it into your food supply.
Are concrete raised beds maintenance-free?
Concrete raised beds are pretty much maintenance-free, but here are a few tips for keeping them looking their best: With proper installation and care, precast concrete raised beds can provide a lifetime of durable, low-maintenance gardening. Their strength and permanence can save time on annual garden bed preparation.