Irises are beautiful flowering plants that come in a wide variety of colors and sizes. Getting to know the different parts of an iris plant can help you better understand how these gorgeous blooms grow and thrive. In this article, we’ll explore the anatomy of an iris both the flower and the rest of the plant.
The Parts of an Iris Flower
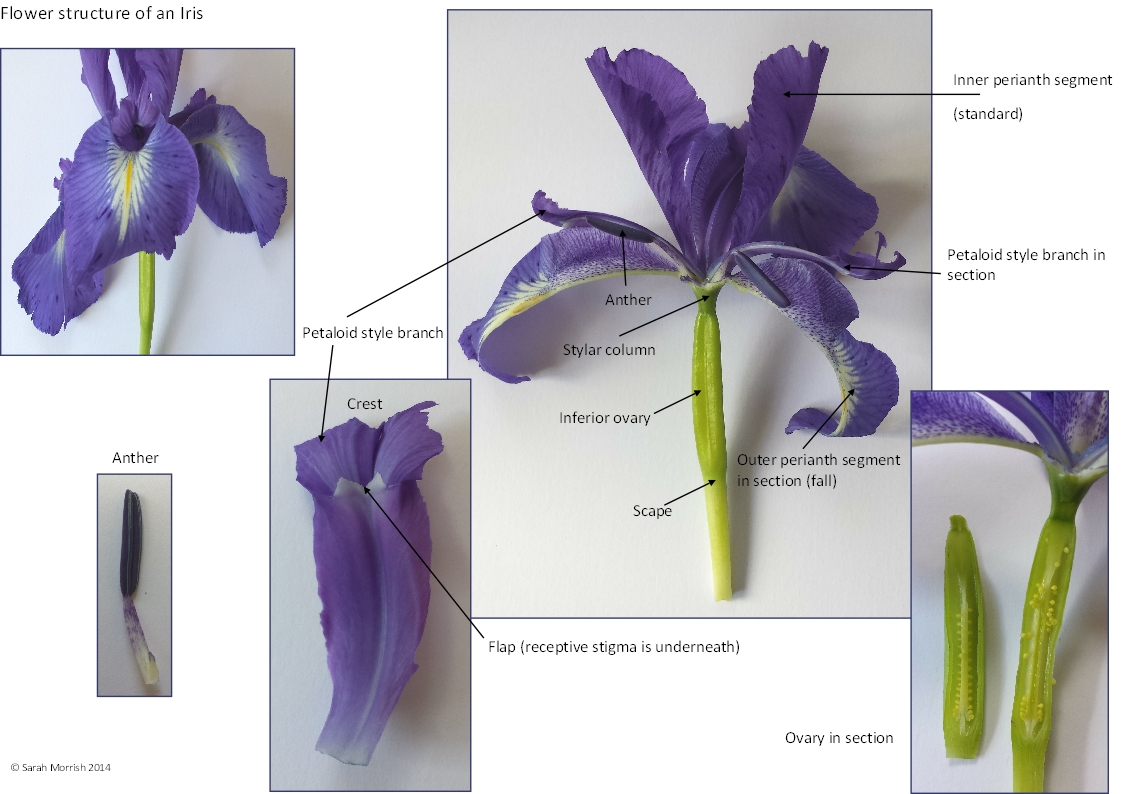
The most recognizable part of the iris plant is undoubtedly the flower. Irises are known for their unique flower shape with three upright “standards” and three drooping “falls.” Here are some of the main elements that make up an iris bloom
-
Perianth: The collective term for all 6 petals (3 standards and 3 falls). Provides protection for the inner reproductive parts.
-
Standards: The 3 upright petals. Usually broad and erect. Inner petals when in bud form.
-
Falls: The 3 lower petals that hang downwards. Outer petals when in bud. Often have lines, dots, or other markings.
-
Beard: A fuzzy strip found on the falls of bearded irises. Crucial for pollination.
-
Style Arms: 3 slender upright petals surrounding the reproductive parts. Look like petals but are actually stigma.
-
Stigma: Located at tip of style arms. Receives pollen grains for fertilization.
-
Stamen: Male reproductive organ made up of anther and filament. Produces and releases pollen.
-
Anther: Pollen-producing part of stamen. Held underneath style arm.
-
Ovary: Base of flower containing ovules (immature seeds). Develops into seed pod after pollination.
-
Perianth Tube: Tubular base where petals are attached to ovary.
There are also some special terms used to describe certain iris flower patterns:
-
Amoena: White or pale standards, falls of any other color.
-
Bicolor: Standards one color, falls another.
-
Bitone: Standards and falls the same color but different shades.
-
Plicata: Dots/stitching around edges, especially on falls.
The Rest of the Iris Plant
Beyond the showy blooms, there are other important parts of an iris plant:
-
Leaves: Long, upright leaves form fan-shaped clusters. Provide energy via photosynthesis.
-
Rhizome: Thick underground stem that stores nutrients and produces roots & shoots.
-
Roots: Absorb water and nutrients from soil. Anchor plant and store food reserves.
-
Flower Stalk: Upright stem that holds flower buds and blooms.
-
Spathes: Specialized leaves protecting flower buds. Often papery or inflated.
-
Bud: Swollen tip of rhizome that develops into a new shoot, root, or flower stalk.
-
Increase: New rhizome growth from a mature parent rhizome. Allows plant to spread.
The rhizome is the most essential part of an iris plant’s anatomy, as it is the major storage organ. New roots, leaves, and flower stems all emerge from buds along the rhizome. The rhizome also lets the plant propagate via “increases” that can be divided.
Key Takeaways on Iris Anatomy
-
Irises have a very specialized flower structure adapted for pollination. Key parts include standards, falls, style arms, and often a beard.
-
The ovary at the base of the flower forms seeds after pollination, while the rhizome below ground stores nutrients for growth.
-
Leaves, roots, and flower stalks emerge from buds along the rhizome. New rhizome “increases” allow the plant to spread.
-
Unique iris flowers patterns like amoena and plicata are created by differences in coloration on the petals.
Getting to recognize the different parts of an iris flower and plant will help you understand how these lovely blooms grow and reproduce. Watching the anatomy in action is part of the fascination of growing your own irises!
Beardless irises are subdivided into six classes:
| Variety | Height | Bloom Time | Comments |
| Spuria, Iris spuria (SPU) | 2 to 5 feet tall | Blooms late-spring to mid-summer | Grows in well-drained soil. Narrow reed-like foliage with blooms in a variety of colors that often resemble orchids. Dislikes being transplanted if the rhizome or roots are allowed to dry out. Attractive in clumps. |
| Siberian, Iris sibirica (SIB) | 2 to 4 feet tall | Late-spring to early-summer bloom | Grows best in wet soil in colder climates. Slender, grass-like leaves and branching stems with 2 to 5 delicate, violet blue, blue, or occasionally white blossoms. Attractive in clumps. |
| Japanese, Iris ensata (JA) | 2 to 4 feet tall | Late summer | Huge blooms that are ruffled or flat in shape in blue, lavender, violet-red, pink, or white. Requires slightly acidic, well-drained soil. |
| Louisiana, Iris ser. Hexagonae (LA | 2 to 5 feet tall | Spring | Also known as swamp iris it grows along the American Gulf Coast in wet, acidic soil. |
| Pacific Coast Natives or Iris ser. californicae (PCN) | 1 to 2 feet tall | Early to late spring | Grows on the Pacific coast of the US and is intolerant of other climates. |
| Species Iris (wild): Iris confusa, I. missouriensis, I. tectorum, I. versicolor | Varied | Late spring | This group includes Blue Flag irises. Useful in wet areas. |
Bearded Iris Planting and Care
Bearded irises are non-native to North America but they do not become aggressive or invasive. They grow in zones 3 to 9. Most varieties grow best in full sun (6+ hours a day) although some do well in partial shade. Optimum pH is 6.5 to 7. Bearded irises tolerate a range of soils from loam to clay but planting sites must be well drained. Bearded irises are planted in the late summer or early fall. Soak the rhizomes and root in water for a few hours before planting. The hole should be 6 to 8-inches deep with a central mound and spaced about 18 inches apart. Place the rhizome on top of the mound so that it is level with the ground and the roots spread out and down. The rhizome must be exposed to the sun to reduce the potential of rot. The top of the rhizome should be barely covered with soil. Water immediately after planting. Do not mulch as it may encourage the rhizomes to rot.
Fertilize lightly with a low nitrogen fertilizer such as 5-10-5-, 5-10-10, or 6-24-24 in fall. Apply fertilizer around the plant, not on the rhizome. Do not over-feed.
Individual flowers should be deadheaded, leaving any unopened buds on the stem. Spent blooms look soggy and unattractive and will form seed pods if left on their stems. Seed pods should be removed. When all the flowers have blossomed, cut the stalk down to where it emerges from the leaves. Do not remove green leaves as they provide nutrition for the plant but they can be cut back to the ground when they turn brown. Cut all foliage down to 1 to 2 inches after a killing frost in the fall and remove all debris from area. Bearded irises are susceptible to rot.
Plants should be divided every 3 to 4 years after flowering (in late July or August) to promote vigorous growth. Cut the leaf fans back to 6 inches (doing this first makes it easier to dig up the plant). Dig up entire clump and rinse off any soil. Inspect rhizomes for signs of rot or iris borer. Discard old, borer-infested, smelly, or mushy rhizomes and save the healthy ones. Separate with a sharp knife that has been dipped into a 1:10 bleach/water solution between cuts or gently break apart healthy rhizomes by hand so that each section has 1-2 leaf fans. Trim roots to 6 inches. Replant immediately in a shallow hole or dry and store them in cool dry place for until ready to replant. Spread roots out horizontally when replanting.
Iris Planting Guide // How to Plant and Divide Bearded Iris Rhizomes // Northlawn Flower Farm
FAQ
What are the parts of an iris plant?
- Falls are the lower three petals of the flower. …
- Standards refer to the upper three petals of the flower. …
- The spathe is found below the petals. …
- The beard is the fluffy ‘caterpillar’ at the top of the falls, giving bearded iris their name.
What month do you cut back irises?
Iris can be cut back anytime just before or after a “killing frost, or if you live in a warmer climate late fall. However, should you find yourself in a position to cut them back now…it’s ok to do so.
What is the fuzzy part of an iris?
Beard: The fuzzy ‘caterpillar’ from which bearded iris get their name. They are found at the base of the falls, tucked in towards the center of the flower. They are also found on the inside of the standards of some species of aril irises.
What are the pods on top of irises?
If the flowers have been pollinated, they will produce seed pods. The pods start out small and green but expand quickly during summer months. When the pods are dry and brown, they split open, and the seeds are probably ripe.