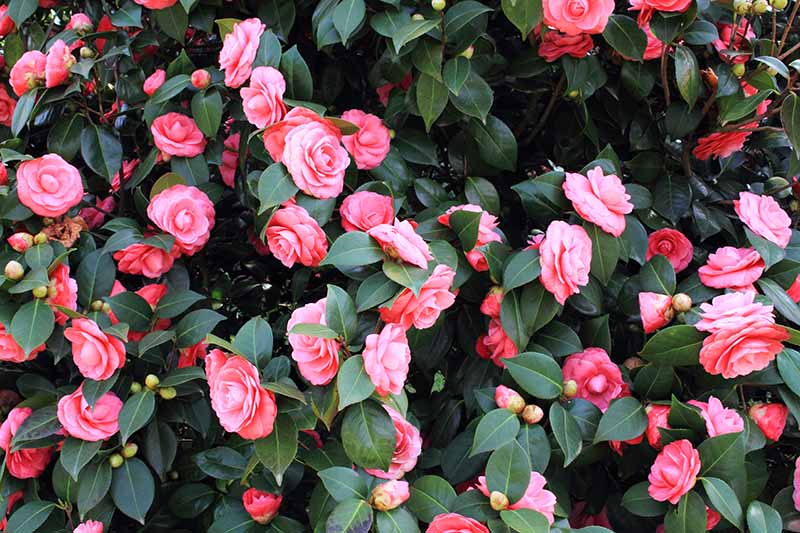
For thousands of years, humans have appreciated the camellia; so much so, in fact, that they’ve been planted in the gardens of nobility, and trusted to grace the grounds of ancient temples, where deities of the Shinto religion were believed to reside amongst the blooms.
Because of this centuries-long love affair, these plants have been bred and crossbred, resulting in thousands of known varieties. When you plant a camellia, you’re not only adding beauty to your garden, but history as well.
We link to vendors to help you find relevant products. If you buy from one of our links, we may earn a commission.
There are numerous reasons that you might want to duplicate your camellia plant. Perhaps you’re interested in starting a tea garden, and you want to use your healthy C. sinensis plant to parent several more, increasing your harvest of leaves.
You may have one stunning specimen whose name you have forgotten, or that you inherited with a property that you purchased, and you want to plant more of the same.
Or, maybe you just want to use the same variety to create a flowering privacy hedge but you really don’t want to spend hundreds of dollars on buying new plants.
Whatever the reason, you can easily propagate more camellias by yourself, at home, from a healthy specimen. But how will you choose which method to use? Let’s talk about that!
Rooting camellia cuttings can seem intimidating for beginner gardeners, but it’s actually a straightforward process that anyone can master with some knowledge and patience. As an avid camellia enthusiast, I’ve learned a lot over the years about the best practices for propagating these beautiful shrubs from cuttings. In this comprehensive guide, I’ll share everything I know to help you successfully root your own camellias at home.
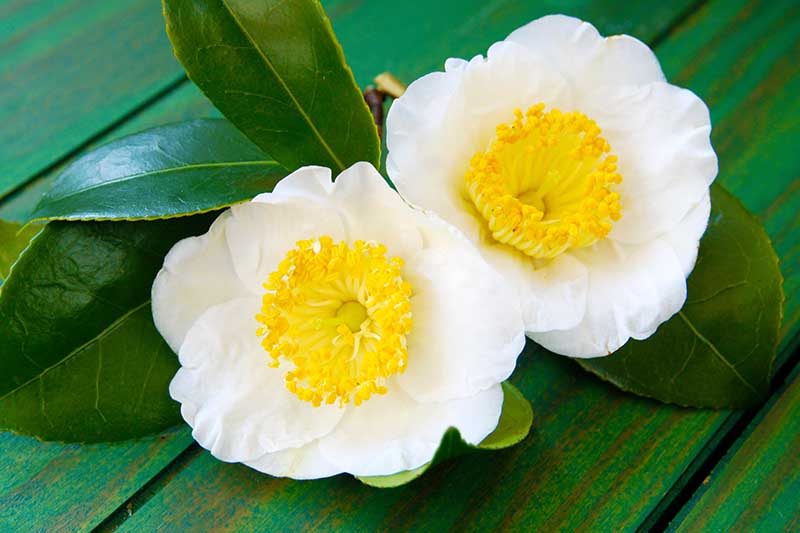
Camellias are a genus of flowering plants native to eastern and southern Asia. There are over 300 recognized species with the two most popular being Camellia japonica and Camellia sasanqua. These shapely evergreen shrubs are prized for their gorgeous blooms glossy foliage, and refined growth habit.
While camellias can be purchased from nurseries, propagating from cuttings allows you to clone your favorite plants and cultivars for free. It also gives you more control over the final plant size and shape With the right methods, rooting success rates can be very high
When to Take Camellia Cuttings
Timing is crucial when taking camellia cuttings for propagation. Early to mid summer is ideal, when new growth has somewhat hardened off but still retains flexibility. I aim for late July through August in my USDA Zone 8b garden.
Take 6-8 inch tip cuttings from healthy stems with no flowers or flower buds present. Make sure to use sharp, sterile pruners to prevent disease transmission. Remove any leaves from the lower third of each cutting.
Preparing the Cuttings
Before sticking your cuttings, it’s important to prepare them for optimal root formation:
-
Make a fresh cut – Recut the base of each stem diagonally or scrape off the outer bark to expose the cambium layer. This creates more surface area for new roots to emerge.
-
Apply rooting hormone – Dip each cutting in a powder or liquid rooting hormone that contains auxin, a plant growth regulator which stimulates rooting. Products containing 0.8% IBA (indolebutyric acid) work very well.
-
Keep cuttings cool – Place prepared cuttings in a ziplock bag with a damp paper towel until you’re ready to stick them. Store in the refrigerator if not rooting immediately.
Selecting the Right Rooting Medium
The rooting medium provides moisture, aeration, and support while the cuttings form callus tissue and new roots. My preferred mix contains:
- 80% aged pine bark fines
- 20% horticultural sand
- 25-40% extra perlite for drainage
Make sure the pH is adjusted to around 6.0 using dolomitic lime if needed. A porous soilless potting mix also works well. I use 10×20 cell packs for smaller leaves and 6×6 cell packs for larger leaves.
Rooting Camellia Cuttings Step-By-Step
Follow these steps for the highest success rooting camellia cuttings:
-
Moisten rooting mix – Water thoroughly before sticking the cuttings so the medium is damp but not saturated. Proper moisture is crucial.
-
Dip stem in hormone – Quickly coat the bottom 1-2 inches of each cutting in rooting hormone gel or powder. Tap off any excess.
-
Stick in medium – Insert each cutting 1-2 inches deep in its own cell, firming the mix gently around the stem.
-
Mist & provide humidity – Mist the cuttings daily or place the tray in a humid propagation tent. Humidity must be very high.
-
Provide gentle bottom heat – Maintain a soil temperature of 70-75°F. This greatly speeds up root formation.
-
Shield from direct sun – Filtered light is ideal. Avoid direct hot sunlight which can overheat the tender leaves.
-
Keep moist, not soaked – Check soil moisture daily. Water just enough to keep mix consistently damp but not saturated.
Patient Aftercare is Key
Rooting camellia cuttings takes diligence and patience. Properly cared for, most varieties will root within 8-12 weeks. To ensure success:
-
Inspect cuttings daily and remove any rotted stems immediately.
-
Apply a broad spectrum fungicide drench if disease appears.
-
Allow the cuttings to remain undisturbed while roots fully develop.
-
Resist the urge to tug or dig up cuttings to check root progress.
-
Once rooted, pot up individually and grow on in a lightly shaded nursery area.
Frequently Asked Questions About Rooting Camellias
What time of year is best for taking camellia cuttings?
Early to mid summer is optimal, when new growth has hardened off but still has some flexibility. Late July through August is ideal timing in most climates.
How long should camellia cuttings be?
Take 6-8 inch tip cuttings from healthy new growth. Remove any flowers and lower leaves. Recut the base diagonally before sticking.
What should I dip the cuttings in before rooting?
Use a rooting hormone containing 0.8% IBA (indolebutyric acid). Quickly dip the lower 1-2 inches to stimulate root formation.
What rooting medium works best?
A mix of 80% aged pine bark, 20% sand, and 25-40% extra perlite provides an ideal balance of moisture retention and drainage.
Is bottom heat required for rooting camellia cuttings?
Bottom heat of 70-75°F significantly speeds up rooting. However, cuttings can be rooted without it if kept at ambient room temperatures.
How long does it take for camellia cuttings to root?
With proper care, most varieties will root in 8-12 weeks. Be patient and leave the cuttings undisturbed while new roots form.
What are signs that the cuttings have rooted successfully?
Look for new white roots emerging from the drain holes and lower stem. Resist the urge to tug or dig up cuttings to check roots.
How do I care for newly rooted camellia cuttings?
Once well rooted, pot up the young plants in individual containers using a well-draining soilless potting mix. Grow them on in a lightly shaded nursery area.
Why propagate camellias from cuttings vs. other methods?
Cuttings produce genetically identical clones of the mother plant. This preserves special cultivars and hybrids that may not come true from seeds.
Final Thoughts
Propagating camellias from stem cuttings is very rewarding. Follow this guide and you’ll have gorgeous new plants in no time. Patience and diligent care is required, but the results are well worth it. Root a few cultivars to expand your collection or share with fellow camellia-loving friends. Enjoy!

Which Method Is Best?
The method you should use to propagate your camellia plant depends on the result you hope to achieve. Some methods will produce better results than others.
Because they have been crossbred for thousands of years, growing from seed is not the best choice if you want to duplicate a particular specimen.
Camellias grown from seed tend to result in different colors or blossom types, or may produce plants with a very different growth habit than that of the parent. Resulting plants can also be infertile and may fail to bloom.
Plant growers generally prefer to propagate camellias through grafting. This is the process of matching a cutting from a plant with desired characteristics to root stock of a hardy variety, and allowing the two to grow together.
Grafting is especially common in camellias, roses, and fruit trees, since these plants have very specific characteristics that growers prefer to be passed on, such as certain blossom forms, colors, or fruit.
You can sometimes tell if the shrub you’ve got has been grown by grafting, even in a more mature specimen, by checking for callusing. More mature plant grafts may no longer be identifiable.
At the base of the trunk, typically just above ground level, you may be able to see a section that has a definite ridge or raised “seam” where the scion, or cutting from a parent plant, was joined in union with the root stock.
Grafted plants are also best propagated by rooting cuttings, or by grafting, layering, or air layering, as these methods best preserve the characteristics of the parent plant.
So, where do we begin? Let’s take a look at the six top methods next.
There are quite a few methods of propagation out there in the plant world.
For our purposes, we’re going to focus on tried and true practices known to produce the best results for camellias specifically.
These six methods are used by plant nurseries, commercial growers, and home gardeners alike.
If your intention is specifically to grow plants that resemble the parent, such as for a uniform hedge, consider one of the other growing methods listed below.
But If your interest is in merely trying your hand at growing a camellia from seed, and you’re unconcerned about replicating characteristics of the parent plant, then this is a perfectly reasonable starting point.
In fact, many of the varieties that exist today were developed from specimens grown from seed, with unique results. Camellia seeds present potentially infinite possibilities. What mystery does that little seed hold?
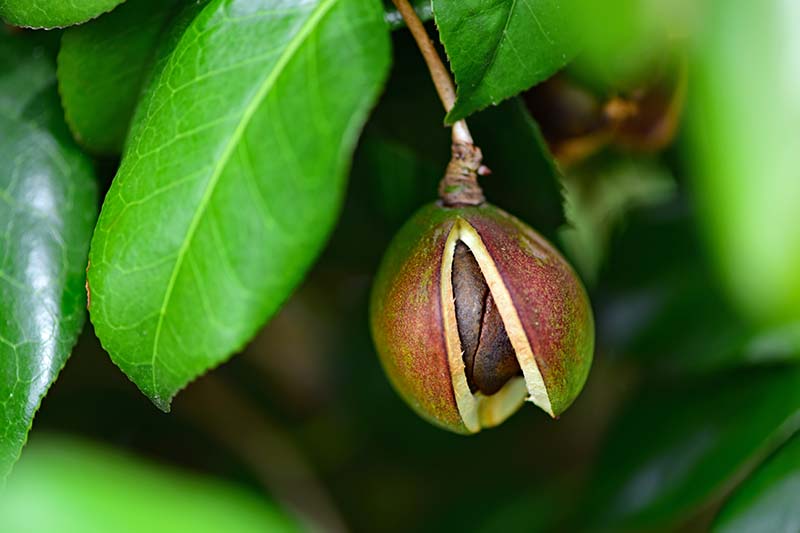
In late winter and spring, when blooming has stopped for the season, you may notice round, green seed pods about the size of a large grape or a small apricot forming on the branches.
The pods will start to form after flowers have been pollinated. By fall or winter, they may darken in color and split open, exposing dark brown to black seeds on the interior.
Keep in mind that different species produce seeds of varying sizes and colors, and they all ripen at different times.
Pods of the C. japonica species tend to ripen sooner than those of other species, sometimes in mid to late summer.
Do not force the pods open before they naturally split, as the seeds on the inside will not be viable. If you are concerned that the seeds may be lost when the pods open, tie a piece of pantyhose or garden cloth loosely around the pod to catch the seeds.
Another method of passive harvesting is to use mesh barrier bags to catch seeds in your absence, such as these, available from Amazon.
After the pods have begun to split on their own, you may need to break or cut some pieces of the outer hull off to free all of the seeds.
Over time, this will happen naturally, but there’s no harm in helping them along after seeds are ripe.
Harvest seeds and immediately prepare them for planting by scarifying the seed coat. Rub the seed with an abrasive material such as sandpaper, or create a small nick in the seed coat with a sharp knife.
Scarifying can aid in water absorption, which may speed up germination. Scarified seeds should be soaked in warm water for about twelve hours. If seeds dry out, they may lose viability.
If you’re not able to plant the seeds within a few hours after harvest, place them in a handful of dampened peat moss inside a plastic bag in the refrigerator, and leave them there until you’re ready to plant them.
Observe that each seed has an “eye,” or a small depression, on one end. This is the place where the root will emerge, so you need to plant the seed with the eye facing downward.
The planting medium should be comprised of one part soil or compost mixed with one part peat moss and one part silica sand or perlite.
Plant seeds half an inch deep in starter cells and water well. Keep soil slightly damp, but not wet, while you wait for germination.
Place pots in a warm area. A lidded plastic storage tote can be used, acting as a greenhouse to provide optimum sprouting conditions.
A seed starting tray with a lid works as well, and you can find them at Home Depot.
After seedlings have emerged, be sure that they receive eight to 10 hours of indirect sunlight, and continue to keep the soil moist but not wet.
Alternatively, seeds can be direct-sown at the planting site.
Check out our guide to growing camellia to learn how to choose the best spot and how to care for your plants. Seeds that are direct-sown may not germinate until spring.
Plan to transplant container-grown seedlings to their new home after they have sprouted the first set of true leaves.
If you’re planning to grow camellias in containers, gently turn the seedling and soil out of the pot and shake it off to expose the roots. Use pruning shears to cut the end off of the taproot, which is the longest, thickest root in the system.
Cutting the taproot will encourage the formation of a denser, more fibrous root ball that is more suitable for container growing.
Camellias may be propagated by rooting stem cuttings in much the same manner as one would do for other broadleaf shrubs, such as azaleas or roses. Taking cuttings is the fastest method of propagation.
Begin by preparing potting medium with one part potting soil or compost, and one part perlite or coarse silica sand.
You can either start individual cuttings in their own containers or fit several into a larger pot, providing you space them at least two inches apart. Containers should be four to six inches deep to allow space for the roots to develop.
Cut a branch from the existing camellia that shows new growth, which is typically present in early spring. New growth roots more easily than cuttings taken from dormant plants.
Separate the side branches from the main branch by cutting them apart between the main branch and the first leaf node. You should end up with several small branches of about four inches in length that have at least a few leaves each.
Remove the lower leaves so only the two leaves at the end of the stem remain. Dip the cut end into rooting hormone powder, and push the cuttings into the planting medium two to three inches deep.
There is no need to compact the planting medium by pressing as you would with a seed or transplanted seedling, as looser soil is better for rooting purposes. Mist with water to dampen.
Place the potted cuttings in a clear, lidded plastic storage tote and store in a warm place that receives indirect sunlight. If you have access to a greenhouse or a warm, humid place that is sheltered and has good sunlight, those are good alternatives.
You can also wrap each cutting and individual pot in their entirety with a plastic bag, keeping the bag sealed to keep in warmth and humidity.
Check for moisture daily and mist with water if the planting medium feels dry. Cuttings that dry out will most likely not take root.
It can take two to three months for roots to develop. Watch for signs of the first bud developing on each cutting as this is a sign that the plants are becoming established.
Despite your best efforts, it’s possible that some cuttings may not take root. When buds have formed, gently remove plants from the pot and transplant into individual eight- or 10-inch pots using potting medium as recommended above.
Growth is a good indicator that the cuttings are becoming established, meaning they’re rooting and taking up water and nutrients on their own.
When new sets of leaves are forming and the roots have begun to extend to the edge of the container, plants can be transplanted a final time to their permanent home.
Note that the end of the taproot should be trimmed with garden shears if plants will be grown in containers.
When the taproot is cut, the root system will become more fibrous with a wide spread, needing less depth than it would if it were growing in the ground.
Camellias may drop seed in the garden or landscape when seed pods split open. The pods of different species will mature at different times throughout the year.
These seeds may sprout and begin to grow near the parent plant and can be transplanted to a new location or container.
Locate the volunteer seedlings and dig them up carefully, as the taproots can run fairly deep, depending on how established they are.
If you’re planning to transplant to a container, prepare a pot that is about twice the size of the root system with a planting medium mix of one part potting soil or compost, and one part perlite or coarse silica sand.
You may also want to include some of the material that the plant was growing in, such as rotting leaves or mulch, to keep the nutrients those are providing available post-transplant.
Snip off the end of the taproot with garden shears if you plan to keep the plants in containers, to encourage the formation of a more fibrous root system. If you’ll be transplanting to a new in-ground location, you can skip this step.
Place the seedling in a hole you’ve dug that’s about twice the width and the same depth as the root system at the in-ground site, backfilling lightly and pressing the soil down gently with your hands.
Keep in mind that camellias do not like to be buried deeply and the roots should be kept near ground level.
Water the plants to settle them into their new location but be sure not to drown them, as camellias do not enjoy soggy roots.
If the plants will remain in containers, place them in a location with indirect sunlight or partial shade. Water plants to settle, but be sure that excess water drains off well.
Grafting will produce a camellia that has the same features as the parent, and will generally reduce the time it takes for a new plant to begin blooming in comparison to other methods.
It can take quite some time for a grafted camellia to become established, however, so plan to wait a few months before you see results.
In late winter to early spring, choose a rootstock plant that has a stem one-half inch to one inch in diameter. Use sharp pruning shears to cut the trunk off at about four to six inches in length.
The cut should slope at an angle of about 45 degrees from one side to the other. Use a sharp knife to trim the cut so it’s as smooth as possible. On the higher side of the cut, use the knife to make a vertical slot about two inches in length.
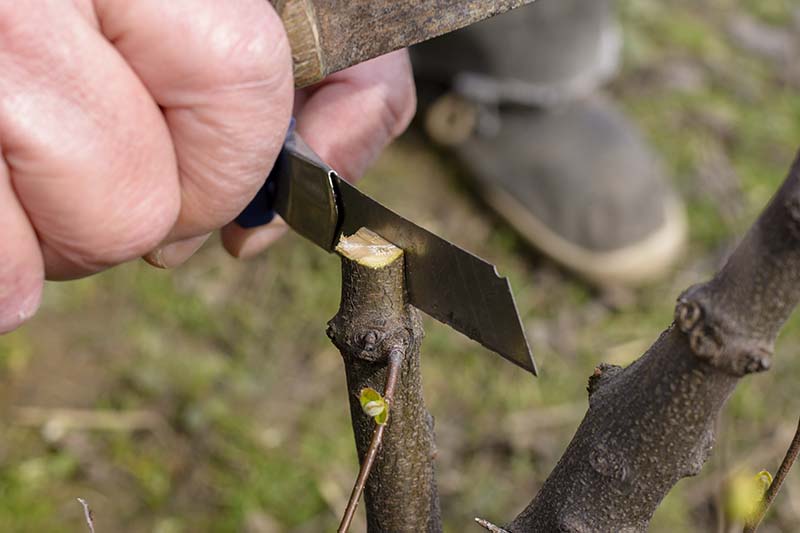
If you have difficulty making the slit with the knife, use a rubber mallet to gently tap it to the desired length. Be sure to tap gently, as you don’t want to split the trunk too deeply or break part of it off.
Next, choose a healthy branch of the camellia plant you wish to propagate, and cut a segment of about three to six inches in length. This cutting, or scion, should have at least one bud and a few leaves present.
Trim the end of the cutting into a wedged angle to fit the slot. Use the knife to carefully open the slot you made on the rootstock, and slide the scion into the slot with gentle pressure.
Grafting wax, such as Treekote, available from Amazon, can be applied if desired.
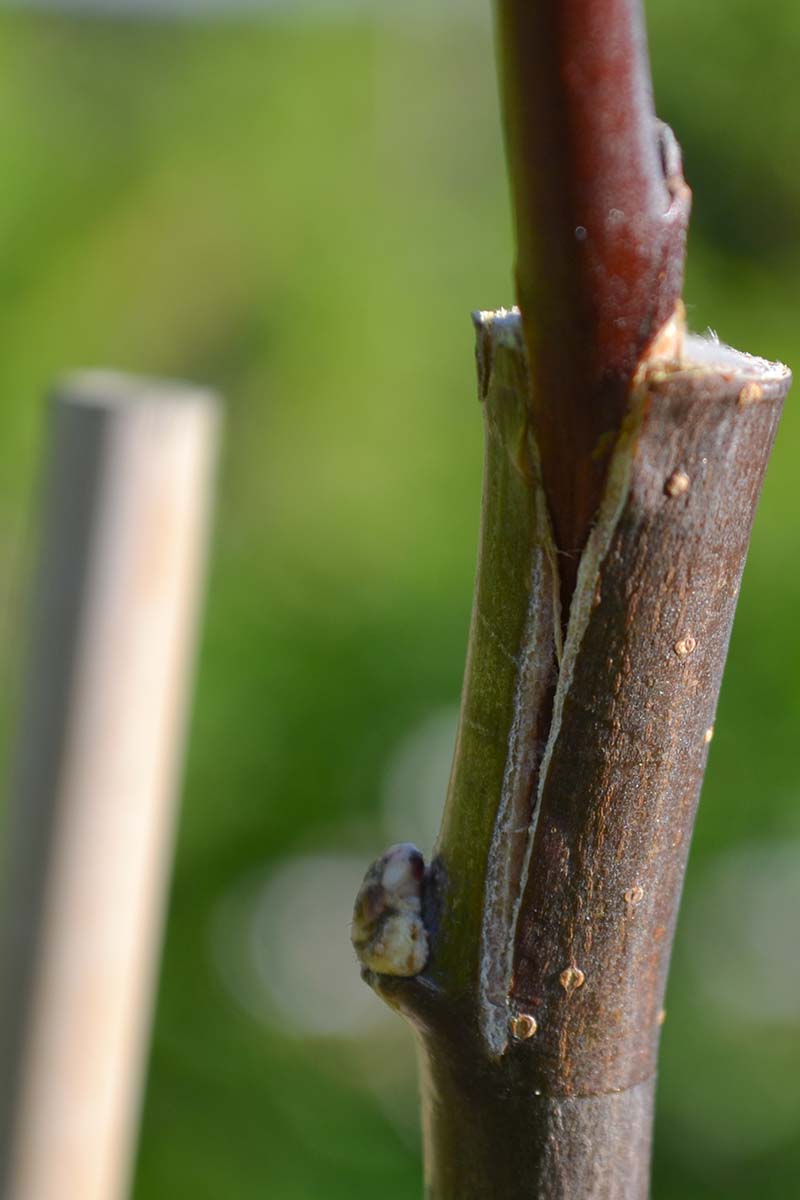
Be sure that the cambium layer – the part of the interior of the branch that is bright green, just under the bark – lines up at the union of the scion and the stem of the rootstock. If this layer does not align on both, the graft will fail.
Wrap the graft site with black electrical tape, garden cloth, or an elastic band to hold it firmly in place. Mound a layer of coarse, damp sand around the base of the rootstock to help maintain moisture and heal the graft.
The graft should be completely enclosed in a container or cloche, such as a milk jug with the top cut off or a glass jar, to maintain warmth and humidity. Be sure to seat the container in the damp sand firmly.
Keep the container in place until the graft shows signs of callusing, which is when the plants begin to grow together. This process can take two to three months. Once the site appears to have knit together, remove the container gradually and keep the grafted plant shaded as new growth forms.
If the graft shows signs of wilt when the container is removed, re-cover the plant and try again a few additional times. It is crucial to protect the plant from intense sunlight until it is more established.
Plants that will remain in a container can be left as they are and placed in a location with partial shade or indirect sunlight.
If you plan to transplant to an in-ground location, prepare the planting site by digging a hole about twice as wide and as deep as the root system of the potted plant.
Start by backfilling a bit with a small mound of soil at the bottom of the hole to prevent the roots from being buried too deeply. Place the plant in the hole and backfill with soil, gently compacting it with your hands.
The top of the root system should be at ground level. Water well to settle but be sure excess water drains off, as camellias do not like to sit in water. Poor drainage can lead to root rot.
Camellias can also be propagated easily without taking cuttings first, using a method called layering. With this method, you will encourage roots to form on a branch while it is still attached to the parent.
This method generally works well because the branch will be rooted in the same growing conditions as the parent. The best time of the year for layering is in the spring when plants are actively growing.
Choose a healthy branch of about 18 to 24 inches that shows new growth, which will be easier to root. The branch should be long enough to be bent down to reach the ground.
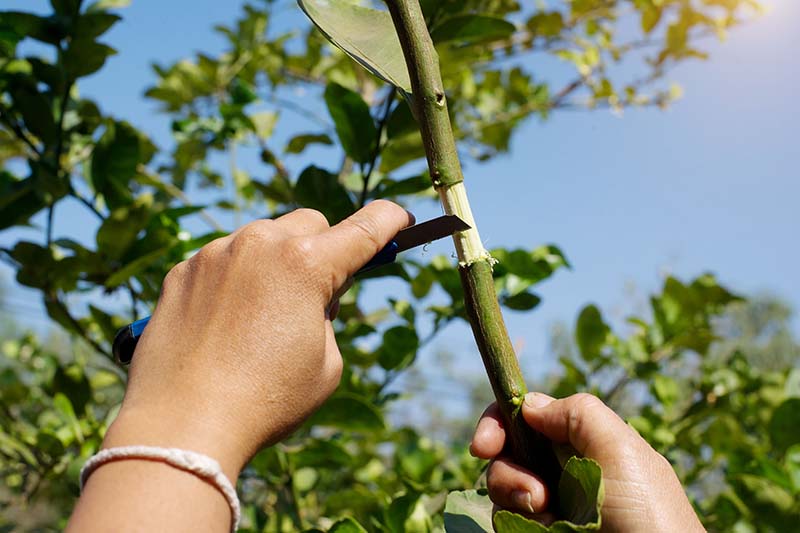
With a sharp knife, carefully make a slit all the way around the circumference of the branch where you plan to cut it free from the parent after it roots.
About one inch below that slit, make another slit all the way around, and remove the ring of bark between the two.
Scrape off any of the bright green cambium left on the branch at the site. Dust the exposed portion with powdered rooting hormone.
Bend the branch down to the ground and mound the soil to cover the exposed portion, or use a wire or rock to hold the branch in place. This method works best if the branch is lying against soil rather than on top of grass.
Once roots develop, the branch can then be cut from the parent and the roots can be dug from the ground, and then the plant can be moved to its new location.
Choose a place with similar growing conditions to those where the parent is growing, with indirect sunlight or partial shade.
Prepare a hole a few inches wider and the same depth as the root system, and add leaf mulch or compost to increase the available nutrients. Place the new plant in the hole, being sure not to bury the roots too deeply.
Backfill the remaining space with soil and press it gently with your hands to compact it, then water to settle it in.
If you plan to pot up the cutting and keep it in a container, prepare a pot twice as wide and deep as the root system and add enough potting mix to raise the top of the roots, where they’re connected to the plant, to soil surface level.
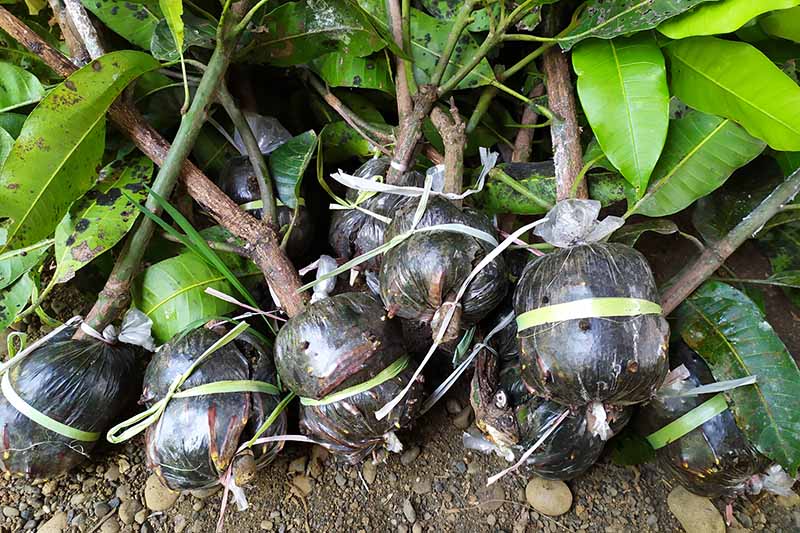
Air layering is essentially the same method as layering described above, but with a couple of key differences.
In the springtime, prepare a branch that is 18 to 24 inches in length in exactly the same fashion as with layering above, by choosing a healthy branch and removing a ring of bark from it.
Dust the exposed portion of the branch with powdered rooting hormone.
Wet two handfuls of sphagnum moss and place them on a piece of medium-weight plastic wrap. Wrap the plastic around the branch at the place where the bark has been stripped.
Damp soil can be used in lieu of moss, but be aware that this can be messier if you have to open the pouch to check for rooting and moisture.
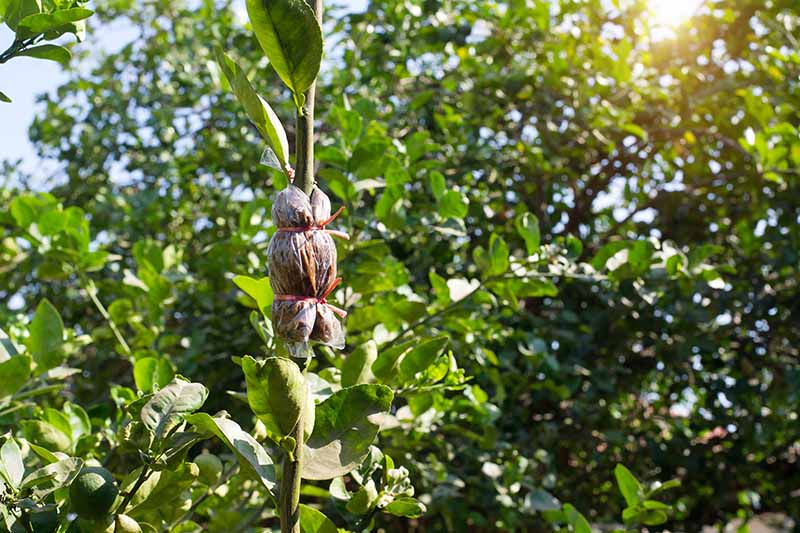
Secure the plastic wrap in place with black electrical tape, or use two twist ties to secure the ends on the branch. Cover with aluminum foil if birds or other wildlife may disturb the site.
Alternatively, you can use a reusable layering device to make the process easier, such as this air layering kit that’s available on Amazon.
About once a week, check to make sure the medium inside the pouch is still moist. Add a few eye droppers full of water to maintain moisture levels, as this is important during the rooting process.
It can take two to three months for roots to develop, so check periodically by gently feeling the pouch for a change in firmness. Root formation will make the moss or soil inside feel more firm.
If using, you can also remove the foil and observe the moss through the plastic for signs of roots breaking through. If you’re using a reusable layering device, do a visual check for roots every few weeks.
Once roots are visible, the branch can be cut from the parent and planted at the chosen planting site.
Be sure to choose a location with partial shade or indirect sunlight, and prepare a hole about twice as wide and as deep as the root system.
Place the plant in the hole, keeping the roots close to ground level, as camellias do not like to be buried too deeply (I cannot emphasize this enough!).
After seating the roots, backfill the remaining space with soil around the root system, gently pressing down to firm and compact the soil with your hands. Water well to settle, but be sure not to leave the roots in standing water.
- Choose seeds to propagate camellias only when cloning the parent plant is not the desired result.
- Start with cuttings, layering, air layering, or grafting for plants that will share the characteristics of the parent plant.
- With all propagation methods, maintaining proper moisture levels is extremely important.
- Give plants adequate time to form strong roots before transplanting, which can take several weeks to a few months.