Shirts with long front tie strings are super trendy right now. While the loose, dangling strings look chic, they can also feel a bit awkward. If you’ve got a top with extra long front ties, you may be wondering what to actually do with those long strings.
There’s clever and creative ways to style and tie up excessively long front shirt strings rather than just leaving them hanging haphazardly. Tying the strings in different positions creates a more polished, put-together look. The good news is maximizing your long tie tops is easy once you know a few simple tying techniques.
In this article, I’ll walk through different methods for tying shirts with overlong front strings. Follow these tips to elevate your style.
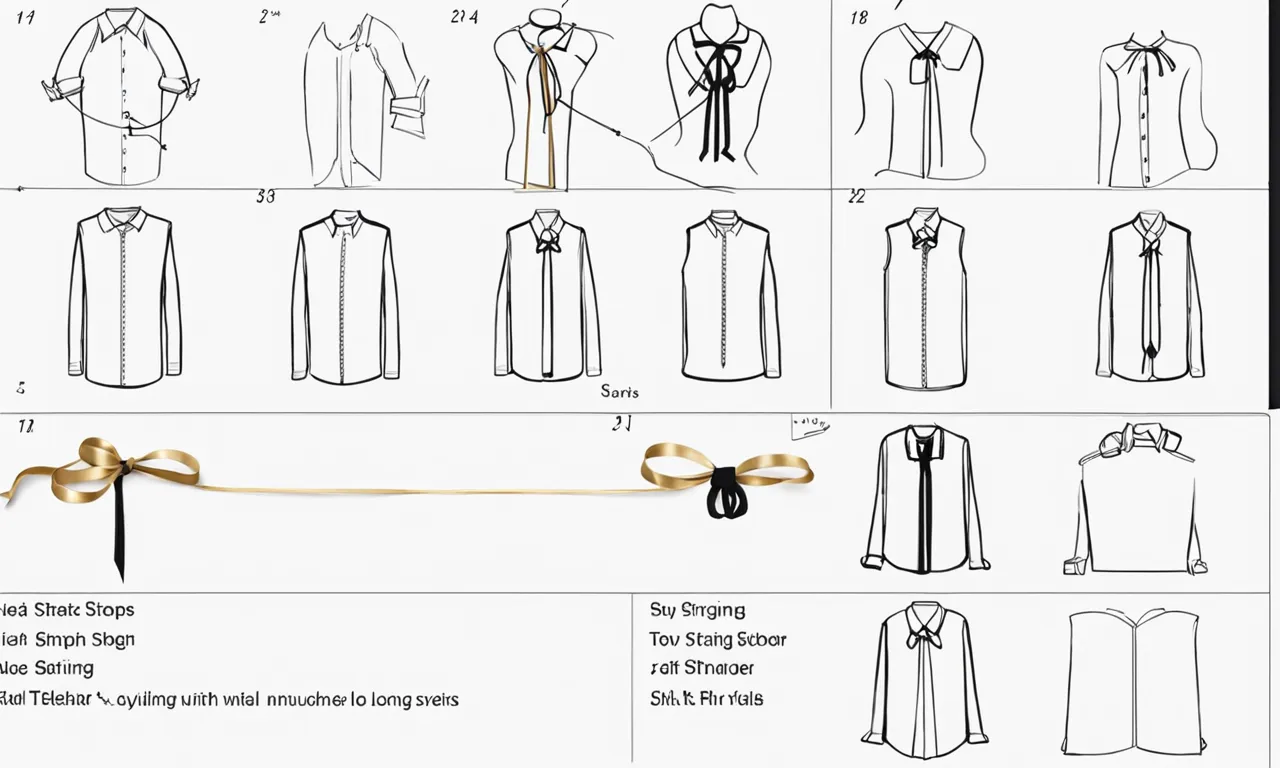
Know Your Long String Tying Options
Long string tops offer versatility since you can use those lengthy ties in so many ways. Get to know these basic tying positions:
- Standard mid-chest tie
- Off-center tie
- Crossover tie in front
- Tie around the back
- Tie on the side
- Tie in a bow
- Tie in a knot
- Tuck up underneath the shirt
Experiment by tying your long strings in different spots to create distinct looks. The tying placement paired with how tight, loose or messy you tie the strings allows customization for your personal style.
Tying Tips for Each Position
Now that you’re acquainted with the range of long string tying possibilities let’s get into specifics on how to execute each option stylishly.
Standard Mid-Chest Tie
The basic approach is tying the two string ends together at mid-chest level This balances out the proportions
- Pull both string ends even in length and tie in a bow or knot at chest level
- Make sure shirt is straight before tying to center correctly
- Bow tie creates a cute preppy vibe, knot tie is more casual
Fashionable Off-Center Tie
For an edgy asymmetric look, tie your shirt strings off to one side rather than middle.
- Tie strings higher on one side, below breast on the other side
- Looks great tied on upper left or right corner of shirt
- Adds visual interest to plain tank tops
Crossover Tie
Make your long ties the focal point by crisscrossing them.
- Cross left string over right and tie together
- Creates a wrap look flattering for all figures
- Change up crossing direction for variation
Back Tie
If you want strings out of the way, tie them together at back of shirt.
- Pull ties to the back and knot or bow them just below neckline
- Keeps string length from dangling
- Good for active situations
Side Tie
Tying your overlong strings on one hip creates an athletic vibe.
- Knot or bow ties together on left or right hip
- Pair with high waisted jeans or shorts
- Great for exercise outfits
Tie in a Knot
Knotting the strings adds casual flair.
- Tie strings together in simple knot
- Adjust knot tightness for different draping
- For night out, do loose knot low on hips
Tie in a Bow
Tying a bow is a quick way to look polished with minimal effort.
- Bow leaves shorter ends, so pick where those will fall
- Best on wider strap shirts
- Cinch tight bow for a classy style
Tuck Strings Underneath
If you want to conceal the strings altogether, tuck them into shirt.
- Pull strings below shirt and across front
- Works well with oversized and cropped shirts
- Keeps all focus on shirt design itself
Top Tips for Style Success
Use these pro long tie string tips:
- Pick tying spot that flatters your body type. Side tie works well for pear shape figures.
- Make knots and bows tight and centered for a neat look.
- For casual vibe, a loose messy knot or bow has effortless appeal.
- Get creative – do a lace up criss cross down the front.
- If shirt is oversized, cinch ties tight to create shape.
- Tie an eye-catching bow using different color strings.
- Avoid asymmetry by tying both side strings same distance down.
Unleash Your Inner Stylist with Long Tie Shirts
Now that you’re a pro at tying tops with extra long front strings, you can rock these trendy shirts with confidence. Ditch the awkwardly dangling ties for a polished put together look. With the right tying tricks, your long string tops will go from shapeless to chic.
Show off your personal flair by playing with the different tying placements and techniques. Whether you’re ready for girls’ night out or tackling mom duties, creatively styling your shirts creates an effortlessly cute vibe. So embrace the long tie trend and unleash your inner stylist!
StepsSection 1 of 3:
- 1 Front knot At the bottom center of the shirt, along the hemline, bring your index finger and thumb together to make an “O” shape. Slide the hem of your shirt through the O until the fit is snug around your waist. Tighten your thumb against the fabric, then wrap the tail around your index and middle fingers to form a loop. Pull the tail through the loop, then tug on it to tighten the knot.[1]
- Tuck the tail end under the knot to hide it, if you like.
- Use a baggy or oversized T-shirt. The longer and looser the shirt is, the more fabric you will have to work with. This will make tying the knot easier!
- Styling tip: Consider wrapping a scarf or bandana around your knot. Let the ends hang loose for some flair, or keep wrapping until the whole knot is hidden by the scarf.
- 2 Smooth front knot You may have seen this T-shirt knot hack on TikTok recently. To make a knot that looks less “knotty,” cross your arms in front of your body and grab some fabric from the hemline of your shirt in both hands, keeping 2 fingers on both hands inside the shirt. Uncross your arms so that the bunches of fabric are pulled into an “X” shape. Twist the “X” so that the bunches cross a second time.[2]
- Then, use your fingers inside the shirt to “open” the bottom bunch of fabric and pull it over the twist and the upper bunch of fabric.
- The result is a “smooth”-looking layer of fabric on top of your knot.
Advertisement
- 3 “Bunny ears” knot Gather two sections of your shirt along the bottom hemline in front of each of your hips, one section in each hand. Cross the left “bunny ear” over the right one, then pull it under and up through the gap—just like tying a pair of shoes. Pull on both “ears” to tighten the knot.
- 4 Back knot For this style, you’ll use the same process as a front knot—just in the back! Gather the T-shirt material along the hemline and bring it through the “O” shape made by your thumb and pointer finger. Then, tie your knot against your lower back. Yes, it’s a bit trickier working behind your back, but you’ll get the hang of it with a little practice![3]
- 5 Side knot Like the back knot, this is another variation on a classic front knot. Choose either hip and gather some fabric along the hemline just in front. Make an “O” with your index finger and thumb and pull the excess fabric through. Tie off the knot and you’re good to go![4]
- Styling tip: For a more playful variation, try making 2 smaller knots on each side. This makes it easier to adjust the height of your hemline—the higher the knots, the more cropped the shirt will look.
- Belt loop variation: Instead of tying the gathered shirt material, feed it through the belt loop of your pants on that side, pointed toward your back. Then, bring the “tail” of material forward and tuck it into your pants near the front. This creates a classy knot feature right along the top line of your pants.
- 6 Rubber band “knot” (no tying required) Gather the fabric along your hemline in one hand, like you’re going to do a front knot. Instead of tying the knot, though, just tighten a small rubber band or hair tie around the gathered fabric, right up against your body. Tuck the loose “tail” of fabric and the rubber band up and under your shirt.[5]
- You can do this knot in the front, to the side, or in the back.
- Styling tip: After adding the rubber band, tie your favorite silk scarf over top of it. Tuck the shirt fabric “tail,” the rubber band, and the knot of the scarf under your shirt, leaving the ends of the scarf hanging down. This adds a nice pop of color and visual interest to your look!
- 7 Ruffled front (visible knot) Do a “bunny ears” knot here, but instead of gathering the material along the hemline, go part way up the shirt. Gather the two “ears” just about at the bottom of your ribcage on one side, then tie them off as normal. This higher knot causes the fabric to ripple out from an off-center spot in the front of the shirt.[6]
- This one definitely works best with a loose shirt made of a stretchy material. It’s harder to gather the “ears” higher up on the shirt than along the hemline.
- 8 Ruffled front (hidden knot) Make an “O” shape with your thumb and index finger, then put your hand under your shirt, against your stomach to one side of your belly button. Put your other hand under your shirt and use it to pull some fabric through the “O” until the fit is snug. Tighten your fingers around the fabric, then wrap a rubber band or hair tie around it, right up against your fingers. Let go of the fabric when you are done.[7]
- The tighter you make the shirt, the further up from the hem youll need to go. You dont want the “tail” (the material you pulled through the “O”) to hang down below your hemline.
- 9 Pretzel knot The pretzel knot works great for oversized shirts that you want to hit just above your waist. Grab the bottom of your shirt by the sides with both hands (if it’s extra long, roll up the shirt a little bit first). Bring both sides to the center and cross one end over the other like you’re starting a knot. Place one of the ends through the loop you just made, then pull both ends in opposite directions to tighten the knot.[8]
- Leave the ends out or tuck them inside the knot for a more polished look.
- 10 Criss-cross shirt tie (no tying) This tucked-in look makes it look like your shirt is knotted when it actually requires no tying at all! Like with the pretzel knot, start by crossing your arms in front of you and grabbing both sides of your shirt at the bottom. Then, cross the sides over and simply tuck the ends underneath your shirt. Ta-da!
- If you’re struggling to keep the “knot” in place, try rolling the bottom of your shirt once or twice to help secure it.
- This works best with fairly baggy T-shirts. More fitted shirts with less excess fabric will tug and pull at the “knot.”
- 11 Crop top knot It’s easy to turn a baggy T-shirt into a cute crop top with a simple front knot! First, roll up your shirt from the bottom and stop when you get to the length you want for your crop top. Then, gather the excess fabric in front and tie a front knot or use a hair tie to secure it in a knot or tail.[9] You can leave the knot showing front, or you can tuck it underneath your shirt (or into a sports bra) to hide it.
- You can make your crop top as low or high as you like! Generally, it looks best if the crop is just above your waist or higher.
- 12 Open-back tuck and knot This is a great style to keep your back cool during the hot summer months. First, tuck the back of your T-shirt upward under your bra strap. You may need to fold the fabric once (or a few times) to get it to lay smoothly. Gather the loose fabric in the front and knot it on one side (like a side knot). Loosely tuck in the front of the shirt for an effortlessly chic look.
- Or, if it’s really hot out, make a front knot instead of a side knot and tuck it into your bra to make a crop top!
Advertisement Section 2 of 3:
Expert Q&ASearch
- Question What bottoms go best with a tied off button up? Kalee Hewlett Consultant Kalee Hewlett is a Celebrity Stylist & Confidence Coach with almost two decades of experience helping clients build confidence and ‘dress for success. She works with her clients to transform their sense of self from the inside out’ by merging her expertise in consulting with Neuro-Linguistic Programming. Kalee’s work is rooted in science, style, and the understanding that ‘identity is destiny. She uses her own methodology and Style To Success Strategy to create positive identity shifts. Kalee is a fashion TV host and appears regularly on QVC UK sharing her fashion expertise. She also was appointed as the head judge and host of Fashion One Network’s 6-part TV show Design Genius.’ Kalee Hewlett Consultant Expert Answer If youre tying the front of the shirt, Im a big fan of teaming that look up with high-waisted jeans or denim shorts.
- Question What if I want to look more relaxed? Kalee Hewlett Consultant Kalee Hewlett is a Celebrity Stylist & Confidence Coach with almost two decades of experience helping clients build confidence and ‘dress for success. She works with her clients to transform their sense of self from the inside out’ by merging her expertise in consulting with Neuro-Linguistic Programming. Kalee’s work is rooted in science, style, and the understanding that ‘identity is destiny. She uses her own methodology and Style To Success Strategy to create positive identity shifts. Kalee is a fashion TV host and appears regularly on QVC UK sharing her fashion expertise. She also was appointed as the head judge and host of Fashion One Network’s 6-part TV show Design Genius.’ Kalee Hewlett Consultant Expert Answer For a more relaxed look, you can do a French tuck by tucking one side of your shirt into your pants and letting the other side hang loose.
- Question How would I incorporate this into a more summery look? Kalee Hewlett Consultant Kalee Hewlett is a Celebrity Stylist & Confidence Coach with almost two decades of experience helping clients build confidence and ‘dress for success. She works with her clients to transform their sense of self from the inside out’ by merging her expertise in consulting with Neuro-Linguistic Programming. Kalee’s work is rooted in science, style, and the understanding that ‘identity is destiny. She uses her own methodology and Style To Success Strategy to create positive identity shifts. Kalee is a fashion TV host and appears regularly on QVC UK sharing her fashion expertise. She also was appointed as the head judge and host of Fashion One Network’s 6-part TV show Design Genius.’ Kalee Hewlett Consultant Expert Answer Wear a strapless bra and pull the neckline of the shirt down over the shoulders. Thats a super cute, playful look that works best in warmer weather. This works best with wide-leg palazzo pants or maxi skirts.
Easiest Way to Tie a Perfect Square Knot in Seconds HENKAA
FAQ
How to tie a shirt with long strings by the neck?

To tie a shirt with long strings at the neck, you can either tie a simple knot or a bow. For a simple knot, cross the strings, wrap one around the other, and pull it through the loop.
Can you tie knots on a T-shirt?
They will not work as well on fitted shirts. Modify your t-shirt for an even more unique touch by tie-dying or stenciling it. Do not leave the knots in the shirt for more than 1 day, otherwise the shirt material may stretch out permanently or wrinkle.
How do you tie a shirt without a button?
Start by unbuttoning your shirt from the bottom up until you get to the point where you want your shirt to end. Then, begin tieing a knot but make sure the side without any buttons is on top. Once you’ve tied one knot, tie a double knot with the side without any buttons on top again.
How do you tie a T-shirt?
Here’s one of the simplest methods. Step 1: Pull the bottom side part of your t-shirt out. Step 3: Pull the tail out and cap over the knot. Step 1: Pull the bottom side part of your t-shirt out. Step 3: Pull the tail out and cap over knot. You got yourself a look! Tie a side-knot with colored hair elastics!
Should you tie a tie in front of a T-shirt?
Tying a knot in the front, side, or back of a baggy T-shirt is a quick and easy way to personalize a casual look. Or, if you’re putting together a more professional ensemble, an elegant tie in front is a low-effort way to look chic and polished. Whichever look you’re going for, we’ve got you covered!
How do you tie a gathered shirt?
Belt loop variation: Instead of tying the gathered shirt material, feed it through the belt loop of your pants on that side, pointed toward your back. Then, bring the “tail” of material forward and tuck it into your pants near the front. This creates a classy knot feature right along the top line of your pants.
How do you tie a rubber band on a shirt?
Rubber band “knot” (no tying required) Gather the fabric along your hemline in one hand, like you’re going to do a front knot. Instead of tying the knot, though, just tighten a small rubber band or hair tie around the gathered fabric, right up against your body. Tuck the loose “tail” of fabric and the rubber band up and under your shirt.