Blue oyster mushrooms are one of the most popular gourmet mushrooms for home cultivation. Their mild sweet flavor and meaty texture make them a versatile ingredient to add to many dishes. Even better blue oysters are quite easy to grow yourself at home with minimal equipment using inexpensive materials.
In this comprehensive guide, we’ll cover everything you need to know to start growing delicious blue oyster mushrooms right in your own home.
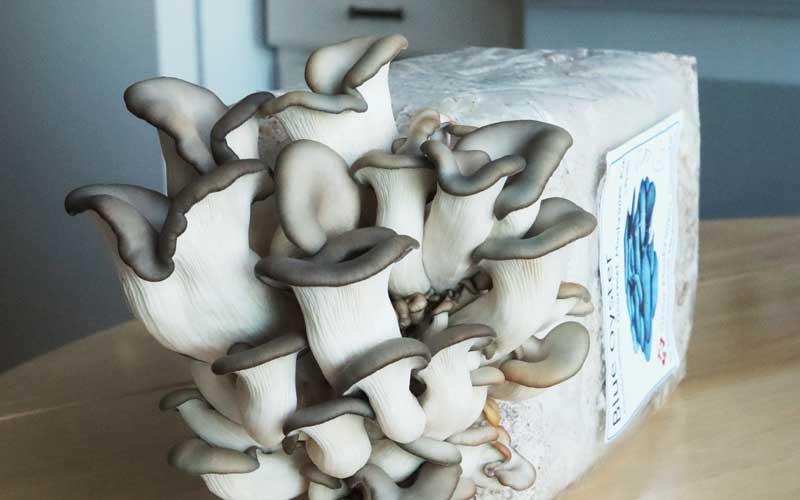
Blue oyster mushrooms (Pleurotus ostreatus) are a cold-loving mushroom native to North America, Europe, and Asia. They get their name from their deep blue-gray caps that resemble oyster shells. The caps grow in dense clusters of overlapping individual mushroom fruits.
These mushrooms have a mild slightly sweet taste and firm meaty texture when cooked. Nutritionally, they are low in calories but high in B vitamins, vitamin D, antioxidants, and protein.
A key reason blue oysters are a top choice for beginners is their vigorous growth rate and resistance to common mushroom diseases. They are straightforward to grow using a variety of different methods.
Choosing a Growing Method
One of the great things about blue oyster mushrooms is their versatility when it comes to cultivation techniques. Here are some of the most popular ways to grow them at home:
-
Indoor Mushroom Grow Kits: All-in-one kits contain a pre-inoculated growing medium like sawdust or straw. Just open, mist, and harvest. Very beginner friendly.
-
Fruiting Blocks: Inoculate sterile hardwood blocks then grow in a humidity tent, Martha tent, or even a buckets or totes.
-
Bagged Substrates: Inject mushroom grain spawn into grow bags filled with pasteurized straw or hardwood pellets.
-
Outdoor Logs Inoculate fresh logs with plug spawn. Grow in shaded, moist areas
-
Garden Beds: Mix grain spawn into wood chip beds or mushroom compost. Maintain moisture.
-
Monotubs: Layer spawn and substrate in trays. Requires more equipment and maintenance.
No matter which growing method you choose, the key requirements are stable humidity, moderate temperatures, and adequate fresh air exchange once pinning begins.
Step-by-Step Growing Instructions
Follow this simple process for cultivating blue oyster mushrooms:
1. Select a Growing Method
Consider your space, budget, and skill level. For beginners, a simple mushroom grow kit is a good starting point. You can advance to more hands-on techniques like monotubs or log cultivation once you gain some experience.
2. Obtain Mushroom Spawn
Purchase blue oyster mushroom spawn such as grain spawn, sawdust spawn, or plug spawn from a reputable supplier. Never collect wild mushroom spores or tissue to grow.
3. Prepare Growing Medium
Pasteurize bulk substrates like straw to kill contaminants. Sterilize hardwood for fruiting blocks. Kits come with pre-colonized media.
4. Introduce Spawn to Medium
Mix spawn throughout the bulk substrate according to your chosen growing technique. For kits, simply open and mist per instructions.
5. Allow Mycelium to Colonize
Incubate growing medium in darkness at 60-75°F and 50-75% humidity. Let the white mycelium fully colonize the substrate. This takes 1-4 weeks.
6. Initiate Fruiting Conditions
Increase fresh air exchange, humidity, and light to trigger mushroom formation. Mist substrate and pins daily to maintain 85-95% humidity.
7. Harvest Mushrooms
Pick mushrooms when the caps first start to flatten out but are still curled at the edges. Store fresh in the fridge up to a week.
Tips for Growing Success
Here are some best practices to help ensure bountiful blue oyster harvests:
-
Sterilize everything contacting the grow medium to prevent contamination.
-
Avoid over-handling grow bags or containers once colonization is underway.
-
Provide plenty of air circulation and exchange. Blue oysters are sensitive to high CO2.
-
Pick mushrooms at a young age for best texture and shelf life. Older mushrooms sporulate heavily.
-
Give substrates a cold water soak between flushes to rehydrate and stimulate additional harvests.
Enjoying Your Homegrown Mushrooms
Once you get the basics down, blue oyster mushrooms will provide a steady supply of crunchy, flavorful mushrooms. They’re easy to cook with and lend themselves well to many dishes and cuisines.
Cultivating nutrient-rich edible mushrooms is extremely rewarding and sustainable. In no time, you’ll be hooked on growing gourmet mushrooms at home! The blue oyster mushroom is the perfect entry point for beginning your mushroom growing adventures.
How To Grow Mushrooms in a Bucket
FAQ
Are blue oyster mushrooms easy to grow?
Oyster mushrooms are some of the easiest to grow. They are relatively resilient to contamination, and can grow well on a variety of substrates. As mentioned earlier, the biggest challenge is ensuring you get enough fresh air to the fruits.
What is the best substrate for blue oysters?
Oyster mushrooms can grow on a variety of things including wood logs, cottonseed hulls, corn cobs or office paper, but in North America, cereal straws are the substrate of choice (wheat and oat straw do particularly well).
Is it safe to grow oyster mushrooms at home?
Yes, it is generally safe to grow oyster mushrooms at home, provided you follow proper guidelines for cultivation. Here are some key points to consider: Materials: Use clean, suitable substrates like straw, sawdust, or coffee grounds. Ensure they are free from contaminants.
What part of blue oyster mushroom is edible?
Both the stems and caps of oyster mushrooms are edible. Oyster mushrooms grow on trees, and there may be a small piece of harder stem where the cluster attaches to the tree. This is typically removed before mushrooms are packaged.