With the hauntings of Halloween now in our rearview mirror, the shift to the holiday mindset is well underway. The store shelves have switched from candy and costumes to garlands and greenery, and the desire to deck our halls is growing ever more pressing. And, of course, along with wreaths, holly, and mistletoe, comes another holiday plant we just can’t get enough of at this time of year—amaryllis.
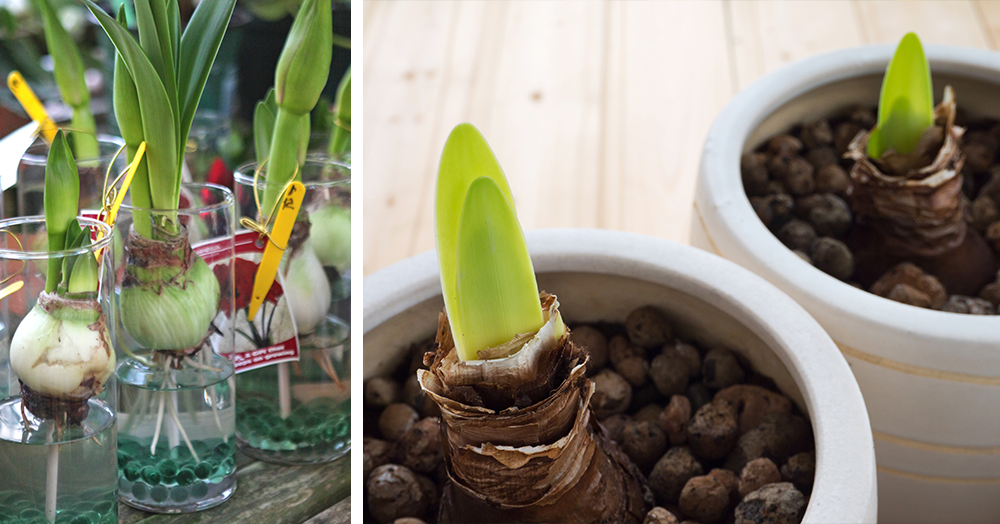
Amaryllis bulbs are popular for their large, showy flowers that bloom in the middle of winter. Traditionally grown in pots of soil, did you know you can also grow amaryllis bulbs in water?
Hydroponically growing bulbs like amaryllis in water is an easy and fun way to force them to bloom. While they may not last as long as soil-grown bulbs, the trade-off is worth it for quick, effortless flowers in the dreary winter months.
In this comprehensive guide, we will cover everything you need to know about growing amaryllis bulbs in water. From selecting bulbs to proper care, these tips will help you enjoy a stunning amaryllis bloom indoors with minimal fuss.
Overview of Growing Amaryllis in Water
Growing amaryllis bulbs in water, also known as forcing bulbs, allows the roots to develop in water instead of soil. This tricks the bulb into blooming outside of its natural season.
While water-grown amaryllis bulbs don’t last as long, they still provide gorgeous flowers over the winter when little else is blooming. The bulb itself cannot survive long-term in just water but it’s a great temporary solution for easy indoor blooms.
Benefits of Forcing Amaryllis Bulbs in Water
Here are some of the biggest advantages to hydroponically growing amaryllis bulbs:
- Requires no potting soil or drainage – avoids messy soil spills
- Allows you to display bulbs in clear, decorative vases
- Roots and plant growth can be easily observed through the water
- Doesn’t require transplanting bulb from water to soil after blooming
- Makes a great gift presentation that’s easy for recipients to enjoy
Tips for Successfully Growing Amaryllis in Water
Follow these tips for the best results with hydroponic amaryllis bulbs:
- Select a large, firm, healthy bulb free of damage or mold
- Trim off any old, dry roots before placing in water
- Keep water level just below the bulb base to prevent rot
- Provide bright, indirect light from a southern or western window
- Rotate vase daily to keep flower stalks growing upright
- Change water weekly to prevent bacterial growth
- Enjoy the blooms, then discard bulb after flowering
Step-by-Step Guide to Planting Amaryllis Bulbs in Water
Growing amaryllis in water only requires a few simple supplies. Here’s what you’ll need:
Supplies:
- Amaryllis bulb
- Clear glass vase or jar, at least 5 inches deep
- River rocks, marbles, or pebbles for support
- Fresh room temperature water
- Floral snips (optional)
Steps:
-
Prepare the vase: Select a glass vase or jar that allows ample room for roots. It should be at least 5 inches deep. Clear glass lets you see the roots.
-
Add support layer: Add 3-4 inches of small rocks, marbles or pebbles to create a base for the bulb.
-
Trim roots (optional): Trim any dried or damaged roots with floral snips. Keep healthy white roots.
-
Position the bulb: Place the bulb root-side down on the pebbles, with roots reaching the water.
-
Add water: Fill with water to just below the bulb’s base, avoiding submerging the bulb.
-
Display in sunlight: Place in a warm spot with bright, indirect light near a sunny window. Enjoy watching growth!
Caring for Amaryllis Grown in Water
Caring for amaryllis bulbs in water takes a bit more diligence than soil-grown bulbs:
- Check water level daily, add more as needed to submerge roots
- Change water weekly to maintain freshness
- Turn vase daily to prevent flower stalks from leaning
- Provide bright sunlight from a southern or western window
- Remove faded blooms to encourage more flowers
- Discard bulb after flowering since it won’t rebloom in water
The bulb can’t survive long-term in just water. But the beautiful blooms make it worth it!
Troubleshooting Common Problems with Amaryllis Grown in Water
Here are some potential problems and solutions with hydroponic amaryllis bulbs:
-
Rotting: Discard bulb if base or roots are mushy, foul smelling or blackened. Keep bulb above water level.
-
Slimy water: Change water weekly and trim dead roots. Provide good sunlight and cool temps.
-
Leggy growth: Turn vase daily and maximize sunlight exposure from a sunny window.
-
Tip over: Use a wider vase or add support stones around bulb.
-
Slow to bloom: Ensure 1/3 of bulb is above water and provide warm temps and ample sunlight.
While growing amaryllis in water has some drawbacks compared to soil, it’s an easy way to enjoy quick winter blooms. Follow these tips and enjoy the striking flowers!
Creative Vessels for Growing Amaryllis in Water
Part of the fun is selecting a beautiful vessel to display the amaryllis bulb and roots. Here are some creative ideas:
- Clear glass vases, cylinders, and hurricane lamps
- Glass bowls, jars, decanters, and terrariums
- Decorative bulb vases or flower frog vases
- Large glass water jugs, apothecary jars, or urns
- Open terrariums or glass cloches
- Clear acrylic boxes or cylinders
Look for interesting glass containers at home decor stores or thrift shops to showcase your amaryllis. The visible roots and blooms make a stunning display!
Enjoy the Spectacular Blooms of Amaryllis Grown in Water
Growing amaryllis bulbs in water is an easy winter project that yields eye-catching indoor flowers. With just a few simple supplies and proper care, you can have beautiful blooms in water.
While they won’t last forever like soil-grown bulbs, it’s a fun way to force quick blooms during the winter months. The gorgeous flowers and visible roots make amaryllis in water an entertaining endeavor.
Brighten up your home or gift these easy-care bulbs to delight others with the spectacular blooms of amaryllis grown hydroponically in water!
How to Plant Amaryllis in Water
While amaryllis bulbs are traditionally best grown in pots of soil, they can also be grown quite easily in just about any vase for a minimal, modern look that requires very little care. Here’s how to plant an amaryllis bulb in water:
You’ll need:
- A clear vase or glass container – wide enough to fit your amaryllis bulb
- Some pebbles, gravel, stones, seashells, or marbles – whichever you prefer to fit your aesthetic
- Water
To begin, you’ll want to make sure that your vase or container is clean and free from any harmful bacteria that could prevent your amaryllis bulb from blooming as enthusiastically as possible. Wash the vase out with soap and rinse thoroughly. Depending on where you got them from, you may also want to rinse your pebbles, gravel, stones, seashells, or marbles.
Once everything is clean, pour about 3-4 inches of pebbles, stones, gravel, seashells, or marbles into the vase or container, filling it to about ¾ of the way full. Then, take your amaryllis bulb and center it on top with the pointy end up, and add a few more pebbles, stones, gravel, seashells, or marbles around it to keep it stable. Don’t cover the bulb entirely—only use as much as it takes to keep the bulb upright.
With your amaryllis bulb now stable, you can begin adding the water, which will trigger it to bloom. Pour the water into the vase until the water line is just below the bulb, but not touching it. This is where having a clear container is critical. We want the roots to be able to reach the water and bring it up to the bulb. But, if the bulb itself becomes submerged at all, we run the risk of causing it to rot. So, always make sure your water line falls just below your bulb to keep that from happening.
And that’s it! With just a few pebbles and some water, you can consider your amaryllis bulb planted—no dirt under the fingernails required.
The Attraction of the Amazing Amaryllis
When the weather outside is frightful, and our flourishing gardens have faded away, we find ourselves craving more color than just the holiday greenery in our homes—which is why amaryllis bulbs have grown in popularity. Their amazing ability to grow well indoors throughout the cold winter months has earned them quite a reputation amongst green and black thumbs alike, making them one of the most popular gifting plants around!
Of course, their ease of care isn’t the only thing that makes amaryllis bulbs so incredibly popular, both as gifts and holiday houseplants. They’re also unbelievably beautiful! With dazzling, star-shaped blooms that come in a sensational spectrum of colors, they’re a captivating way to bring color to your home when the world is coated in white. Best of all—with the right care, they can even last for years (which is more than can be said about that gift card you were thinking of getting instead)!
How to Grow Amaryllis Over Water // How To Rebloom An Amaryllis That Was Grown In Water
FAQ
Can amaryllis grow in just water?
Amaryllis Bulbs and Water
Although most amaryllis bulbs are forced indoors using soil, they can also be easily rooted and grown in water too. The main thing to keep in mind when growing amaryllis in water is not to let the bulb itself come in contact with the water, as this will promote rot.
Can an amaryllis bulb grow without soil?
You can grow your amaryllis bulb in just about any container: it can be large or small, it can be a container with or without drainage holes, and you can even choose to grow your bulb with or without soil.
What to do with amaryllis after it blooms in water?
After the flowers have faded, cut off the stems to within an inch of the top of the bulb. If you grew the bulb in water rather than soil, transfer it to a pot filled with moist growing mix (making sure the top 1/3 of the bulb is exposed).
How do I save my amaryllis bulb for next year?
-
1. Post-Bloom Care:After the amaryllis blooms have faded, cut off the flower stalks to prevent seed formation and conserve energy.
-
2. Leaf Management:Allow the leaves to die back naturally; don’t cut them off, as they continue to feed the bulb.
-
Longfield Gardenshttps://www.longfield-gardens.comWhat to Do with Amaryllis Bulbs After They Bloom – Longfield GardensAfter the flowers have faded, cut off the stems to within an inch of the top of the bulb. If you grew the bulb in water rather than soil, transfer it to a pot f…

-
-
3. Inducing Dormancy:Place the potted bulb in a cool, dark, and dry place (like a garage or basement) for 6-12 weeks to induce dormancy. The ideal temperature range is between 50 and 60°F (10-15°C).
-
Longfield Gardenshttps://www.longfield-gardens.comWhat to Do with Amaryllis Bulbs After They Bloom – Longfield GardensAfter the flowers have faded, cut off the stems to within an inch of the top of the bulb. If you grew the bulb in water rather than soil, transfer it to a pot f…
-
Wagner Greenhouseshttps://www.wagnergreenhouses.comAmaryllis Bulb Storage | How to Store Amaryllis | Wagners
-
-
4. Re-Emergence and Re-potting:After the dormancy period, remove the bulb from its pot and carefully remove any dried leaves. Repot the bulb in fresh potting mix, ensuring the top third of the bulb is exposed.
-
Longfield Gardenshttps://www.longfield-gardens.comWhat to Do with Amaryllis Bulbs After They Bloom – Longfield GardensAfter the flowers have faded, cut off the stems to within an inch of the top of the bulb. If you grew the bulb in water rather than soil, transfer it to a pot f…
-
-
5. Post-Dormancy Care:Place the repotted amaryllis in a bright location, preferably near a southern or western window, and water lightly until new growth appears.
-
6. Watering and Fertilizing:Once new growth is visible, water regularly and fertilize monthly with a balanced, all-purpose houseplant fertilizer.
-
7. Outdoor Placement (Optional):In the spring, once the danger of frost has passed, you can move the amaryllis outdoors to a partially shaded location.
-
8. Indoor Return:Before the first fall frost, bring the amaryllis indoors to its cool, dark resting place for its next dormancy period.
How do Amaryllis grow?
Amaryllis grow from bulbs, which are nutrient-rich vessels that already contain everything that they need to set them on their way to blooming. Thus, all they still require is water and light. How to grow amaryllis in water? How to grow amaryllis in water? First, prepare a container or vase that’s larger than the amaryllis bulb itself.
How to grow amaryllis bulbs in water?
Now let’s look at the simple process for growing amaryllis bulbs in water. Here are the supplies you’ll need: Select a glass vase, cylinder, or jar that allows ample room for roots to develop. The vessel should be at least 5 inches deep but doesn’t need to be overly large. Clear glass lets you observe the roots, but colored glass works too.
How do you grow Amaryllis in a vase?
Place the amaryllis bulb root-side down on top of the pebbles in the vase. The roots should reach down into the water but the bulb base shouldn’t touch the water. Slowly pour room temperature water into the vase. Fill until the water level reaches just below the bottom of the bulb, being careful not to submerge any part of the bulb.
How do you care for an Amaryllis bulb?
Fill with tepid water – Fill the vase with room temperature water until it’s just below the bottom of the bulb. Make sure your bulb is not submerged. Place your vase in a sunny location – Move the vase to a warm and sunny location and wait for your amaryllis bulb to start growing. Refresh the water weekly to keep it clean and topped off.
Can amaryllis bulbs grow hydroponically?
Follow these tips to help your amaryllis bulbs thrive hydroponically: Now let’s look at the simple process for growing amaryllis bulbs in water. Here are the supplies you’ll need: Select a glass vase, cylinder, or jar that allows ample room for roots to develop.
Can Amaryllis grow without soil?
While the original habitat of amaryllises was mostly tropical, they’ve become a winter favourite in North America because they grow fast, bloom indoors, and need very little care. Amaryllis bulbs can even grow without soil, and waxed amaryllis bulbs can grow without soil or water! What to do with amaryllis after it blooms in water?