This is an amazingly strong crop! It has been many years since weve seen such great Green Cabbage. All our seeds are sourced from certified organic suppliers.
Vitamins A, B, C, E and K Calcium, Iron, Magnesium, Phosphorus, Potassium, Zinc Carotene, Chlorophyll, Amino Acids, Trace Elements Antioxidants Protein: 20-25%
The amount of Cabbage Sprouts – Green Cabbage produced by 1 unit of Seed. For Example 2:1 means that 1 pound of Seed will produce 2 pounds of Sprouts or whatever crop you are growing. You do not have to grow them all at once of course, unless you wish to =:-D
The time it takes to grow a finished 3 – 6 days, or other crop (Micro-Greens, Grass, Greens) from a dry Seed. Note: This “finished” Sprout is our preference. you may grow them for as long as you want! In fact, we suggest that you taste them at every rinse to discover when you like them best.
Cabbage sprouts are a delightful sign of bountiful harvests to come. As gardeners await the lush heads of homegrown cabbages, spotting the first sprouts brings satisfaction and anticipation But what exactly do cabbage sprouts look like? Recognizing their unique features is key to ensuring thriving cabbage patches.
This guide takes an in-depth look at cabbage sprouts, their growth stages, and how to identify them correctly Read on for insights into nurturing these tiny seedlings on their journey to become robust, flavorful cabbages.
Overview of Cabbage Sprouts
Cabbage sprouts refer to the early seedling stage after cabbage seeds germinate. They are the first growth to emerge before developing into mature cabbage plants.
Correctly identifying sprouts enables optimal care tailored to their growth needs It also helps differentiate them from weeds to keep gardens healthy.
Knowing cabbage sprout characteristics provides valuable insights into their progress and vigor. Their appearance promises the supple cabbage heads to come.
What Do Cabbage Sprouts Look Like? Key Visual Features
Cabbage sprouts showcase telltale visual features that set them apart. These include:
-
Cotyledons: The first leaves to appear are called cotyledons or seed leaves. They are round and smooth-edged without the lobes of mature leaves. Cotyledons are typically brighter green.
-
True leaves: Following cotyledons, true serrated, lobed leaves emerge. These resemble mature cabbage foliage in shape and waxy texture. True leaves are darker green with more defined structure.
-
Color variations: Sprouts display a range of green hues from light to vibrant that signals health.
-
Textural changes: Leaves feel increasingly sturdy and crisp as sprouts mature.
-
Compact growth: Sprouts form tight rosettes, starting small (1-2 inches) then expanding outward as they develop.
Stages of Cabbage Sprout Growth
Cabbage sprouts undergo an incredible transformation as they journey from seed to robust plant. Key stages include:
-
Germination: Seeds swell, split open and sprouts emerge with cotyledons.
-
Seedling stage: True leaves appear and roots form to anchor the plant.
-
Transition stage: Foliage multiplies, expanding in height and girth to establish the cabbage head.
Various factors like temperature, nutrients and pest protection influence sprout development. Optimizing these is vital for vigorous cabbage growth.
Caring for Cabbage Sprouts
Nurturing cabbage sprouts with attentive care enables them to flourish into healthy cabbages. Key aspects include:
-
Ideal conditions: Sprouts thrive in cool temperatures (60-70°F) and full sun to partial shade. Maintain slightly acidic soil (pH 6.5-6.8).
-
Water and nutrients: Keep soil consistently moist, about 1.5 inches of water weekly. Use a balanced fertilizer at planting and throughout growth.
-
Pest protection: Guard against pests like cabbage worms using row covers or organic pesticides. Practice crop rotation.
-
Thinning and transplanting: Thin crowded sprouts, leaving the strongest. Transplant at 3-4 true leaves, spacing 12-24 inches apart.
With an understanding of cabbage sprout appearance and care, gardeners can revel in nurturing these greens from seed to harvest. Stay tuned for more cabbage growing tips!
How to Grow Green Cabbage Sprouts
- Soak 3 Tbs. of seed in cool water for 4-12 hours.
- Drain off soak water. Do not ever soak again.
- Rinse thoroughly.
- Drain Thoroughly.
- Rinse and Drain with cool water every 8-12 hours.
- On day 3, move your Sprouter to indirect sunlight.
- Continue to Rinse and Drain every 8-12 hours.
- Harvest on day 5 or 6, when the leaves are open and most of them are green.
- De-Hull your crop if you like, before Refrigerating.
Dry Cabbage awaits Soaking.
12 hours later… Soaked, Rinsed and Drained thoroughly.
12 hours later… another Rinse/Drain cycle.Remember to be Thorough – especially in your Draining.
12 hours later… another Rinse/Drain cycle.
12 hours later… another Rinse/Drain cycle.
12 hours later… another Rinse/Drain cycle.
12 hours later… another Rinse/Drain cycle.
12 hours later… another Rinse/Drain cycle.
12 hours later… another Rinse/Drain cycle.
12 hours later… another Rinse/Drain cycle.
12 hours later… another Rinse/Drain cycle. Remember to Drain especially thoroughly, unless you are using a De-Huller – in which case thorough will do.
12 hours later…. Harvest Time!
Yields approximately 3 Cups (1/2 lb.) of Sprouts
Prep 3 Tablespoons of seed* then transfer (if necessary) into a bowl or into your Sprouter. Add 2-3 times as much cool (60°-70°) water. Mix seeds up to assure even water contact for all. Note: brassicas tend to float. Try to sink those that do by knocking them down with your fingers. It isnt a big deal but it is a good habit.
Allow seeds to Soak for 6-12 hours. Empty the seeds into your sprouter (if necessary). Drain off the soak water. You may water plants or use it in stock if you like – it has nutrients in it. Rinse thoroughly with cool (60°-70°) water. Drain thoroughly!
Set your Sprouter anywhere out of direct sunlight and at room temperature (70° is optimal) between Rinses. This is where your sprouts do their growing. We use a counter top – in the corner of our kitchen, but where the sprouter wont get knocked over by cats, dogs, kids or us. We dont mind the indirect sunlight or the 150 watts of incandescent light, because light just does not matter much. A plant can only perform photosynthesis when it has leaves. Until a plant has leaves, light has little if any effect. Sprouts also happen to like air-circulation, so dont hide your sprouts. This will be plenty of light when the sprouts are ready for it.
Rinse and Drain again every 8-12 hours for 3 days. As long as you grow you have to keep the sprouts happy!
Always be sure to Drain very thoroughly. The most common cause of inferior sprouts is inadequate drainage. Most sprouters look like they will not hold water, but even the best designed device does, so pay special attention to this step.
Note: These wonderful little brassica plants have a unique root structure. Brassicas will show microscopic roots starting around day 3. They are called root hairs and are most visible just before Rinsing when the sprouts are at their driest. When you Rinse, the root hairs will collapse back against the main root. These root hairs impress many people as mold – but they are not. Now you know!
Greening On the 4th day relocate your sprouts if necessary. If youve been keeping them away from light, move them. Avoid direct sun – it can cook your sprouts. Indirect sunlight is best but virtually any light will do. Experiment – you will be amazed at how little light sprouts require to green up. Photosynthesis is a marvel!
Continue to Rinse and Drain every 8-12 hours. As long as you grow you have to keep the sprouts happy.
Finishing Your sprouts will be done during day 5 or 6. The majority of sprouts will have open leaves which will be green if you exposed them to light.
De-Hull Before your final Rinse; remove the seed hulls. Brassica sprout hulls are quite large (relative to the seed and sprout) and they hold a lot of water (which can dramatically lessen the shelf life of your sprouts), so we remove them Thusly:
Transfer the sprouts to a big (at least 2 times the volume of your sprouter) pot or bowl, fill with cool water, loosen the sprout mass and agitate with your hand. Skim the hulls off the surface and compost them. Return the sprouts to your sprouter for their Rinse and Drain. You can also use our Dehuller (a small salad spinner with an excellent design that minimizes the sprouts that escape in the dehulling process). Thats the short course – here is the full lesson. Better yet, here is a video on de-hulling.
Harvest If you Dehulled with our Dehuller, or used a salad spinner after dehulling in a bowl, you can go right to refrigeration. If not… Your sprouts are done 8-12 hours after your final Rinse. After the De-Hulling and the final Rinse we need to Drain very thoroughly and let our sprouts dry a bit. If we minimize the surface moisture of our sprouts they store much better in refrigeration, so we let them sit for 8-12 hours….
Refrigerate Transfer the sprout crop to a plastic bag or the sealed container of your choice. We have Produce Storage Bags that will extend shelf life substantially.
* If using Sproutpeoples Single Harvest Pack – use the whole bag. It will produce a crop of approximately 8 ounces.
These seeds yield approximately 5:1 – which means the sprouts will weigh 5 times as much as the seed you start with, but, they will increase even more in volume – so dont start with more than 3.5 Tablespoons per quart/litre of sprouter capacity.
Micro-Greens Note:
You can also grow Cabbage as a Micro-Green as described on our Cabbage Patch page.
Cabbage is a small – mostly round seed which produces a mild Brassica flavored sprout. Easy to grow and very tasty, especially if you like Cabbage. Our Green Cabbage produces a typically shaped, Green Brassica leaf. Our Green Cabbage is now from a source which is certified organic.
Note: Canadian and US researchers have found that Brassicas contain antioxidants such as sulfurophane. Cabbage is a Brassica. Our current lot of Green Cabbage produces lovely sprouts, but with a slightly lower yield than last year. Seed Shelf Life:
Cabbage Sprouts
FAQ
How does cabbage look when it sprouts?
The majority of sprouts will have open leaves which will be green if you exposed them to light.
How long does cabbage take to sprout?
Are cabbage sprouts edible?
Germinated seeds, also known as sprouts, are ground germinated seeds prepared for eating or for planting. Sprouts are an easier way to eat healthy, being a natural source of vitamins and also very easy to digest thanks to the sprouting process.
Are Brussels sprouts just baby cabbages?
Brussels sprouts are members of the cabbage family and they look like it, too. In fact, many people call them little cabbages.
What are cabbage sprouts?
Cabbage sprouts are cabbage seeds that have started to grow. They have a stalk and a base and resemble other types of sprouts, such as alfalfa sprouts. The sprouts can grow into full-blown cabbages and are often the same sprouts that farmers and other growers use to plant and grow cabbages.
What do cabbage sprouts look like?
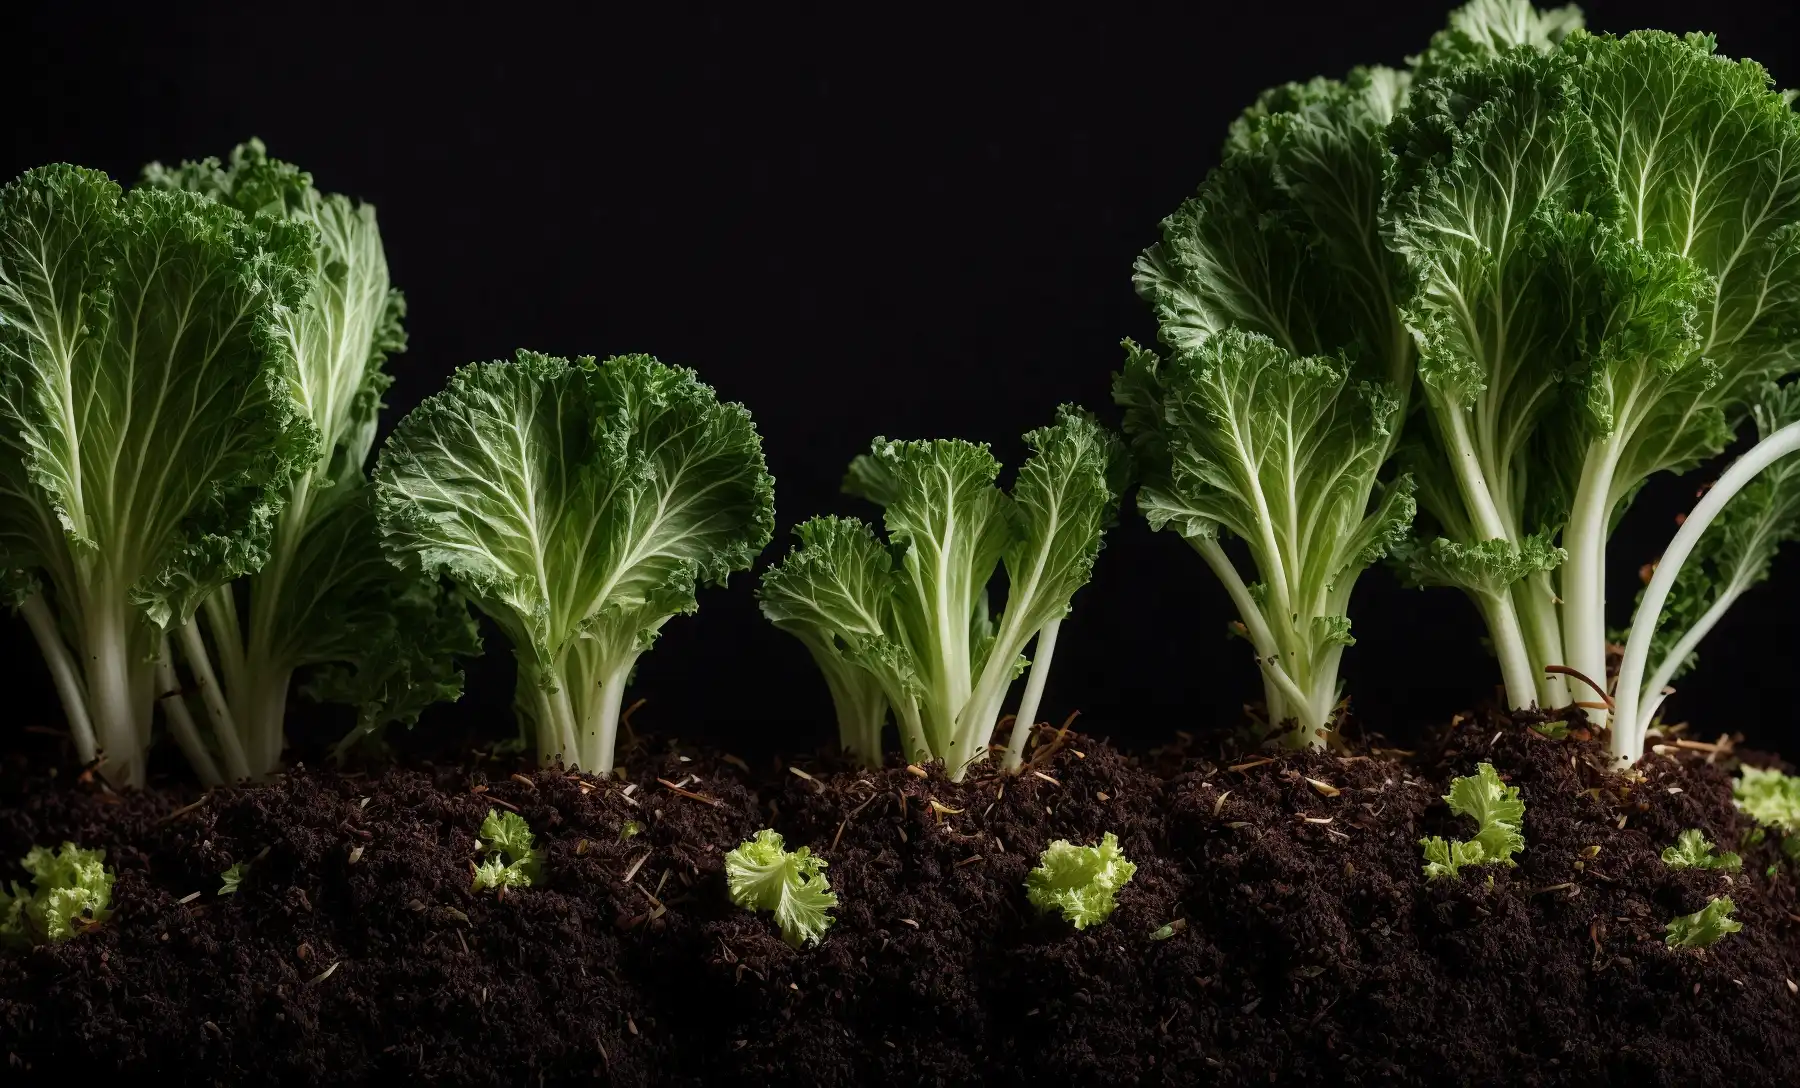
As the cabbage sprouts continue growing over the next few weeks, their appearance changes dramatically. More leaves emerge that gradually become larger, thicker, and ruffled around the edges. The leaves are oval with delicate wrinkling and a blue-green tint. They grow alternately up the lengthening stem in a loose spiral pattern.
How do you know if cabbage sprouts are healthy?
Whether starting a home garden or growing microgreens, identifying cabbage sprouts early ensures strong, healthy plants. These tiny sprouts look different from mature cabbage heads, and their early growth stage is often mistaken for other seedlings like broccoli or mustard.
What do cabbage leaves look like?
These leaves are a lighter green color than mature cabbage foliage. The sprouts look like tiny green plants at this point, usually around 1⁄2 – 1 inch tall. After the cotyledons emerge, cabbage sprouts enter the seedling stage. The first set of true leaves will develop next to the cotyledons. These new leaves are small, smooth, and rounded.
When do cabbage sprouts grow?
The sprouts take on a more open, loose look at this stage. When 6 weeks old, cabbage sprouts are around 5-7 inches tall. The stems and leaves thicken as the plants mature and may start to resemble miniature cabbages. Given enough time and care, cabbage sprouts will eventually form heads and mature into adult cabbages.
What is the difference between Broccoli sprouts and cabbage sprouts?
Unlike broccoli sprouts, which have a rapid growth rate and a slightly thicker stem, cabbage sprouts grow more moderately with a slender and upright form. Their early-stage appearance is defined by a smooth texture, symmetrical leaf arrangement, and a mild green color that gradually deepens as the plant matures. Red Cabbage