When you purchase through links on our site, we may earn an affiliate commission. Here’s how it works.
It seems as if every gardener worth their salt is learning how to take cuttings at the moment, and who better to show us the way than gardening guru Monty Don?
One of our favourite ever garden ideas, learning how to take cuttings isnt just calming and meditative: when done well, it can also result in a backyard filled with blousy blooms, delicious edimentals, and plenty more covetable plants… for free!
Every gardener worth their salt needs a good, clean pair of secateurs to hand – and this gorgeous set was developed in conjunction with Kews horticultural team, resulting in an officially licensed tool which is used and recommended by Kew Gardens. What could be better, eh?
Hydrangeas are beautiful flowering shrubs that come in a variety of colors like pink blue purple, white, and red. With their lush flower heads, hydrangeas make a stunning addition to any outdoor space. Many gardeners wish to have the same hydrangea plants year after year or want more plants just like their existing hydrangeas. Fortunately, hydrangeas are quite easy to propagate from cuttings. In this article, we’ll look at how to take hydrangea cuttings following the techniques of renowned British gardener Monty Don.
Why Take Cuttings from Hydrangeas
Taking cuttings from parent hydrangea plants is an easy, cost-effective way to get more of these gorgeous shrubs Buying new hydrangea plants can be expensive, but taking cuttings allows you to increase your stock for free Cuttings produce genetically identical new shrubs, so you know they will have the same desirable traits like flower color, bloom time, and size as the parent plant. Taking cuttings also allows you to clone particularly robust or beautiful individual plants.
When to Take Hydrangea Cuttings
The key to success when rooting hydrangea cuttings is timing. Cuttings taken in early to mid summer, when shoots are semi-ripe, have the best chance of developing strong root systems. According to Monty Don, semi-ripe cuttings are “flexible, snap cleanly when bent, and the wounded surface feels moist and green inside.” Avoid taking cuttings in fall when plants go dormant. Spring cuttings can work but may take longer to develop roots.
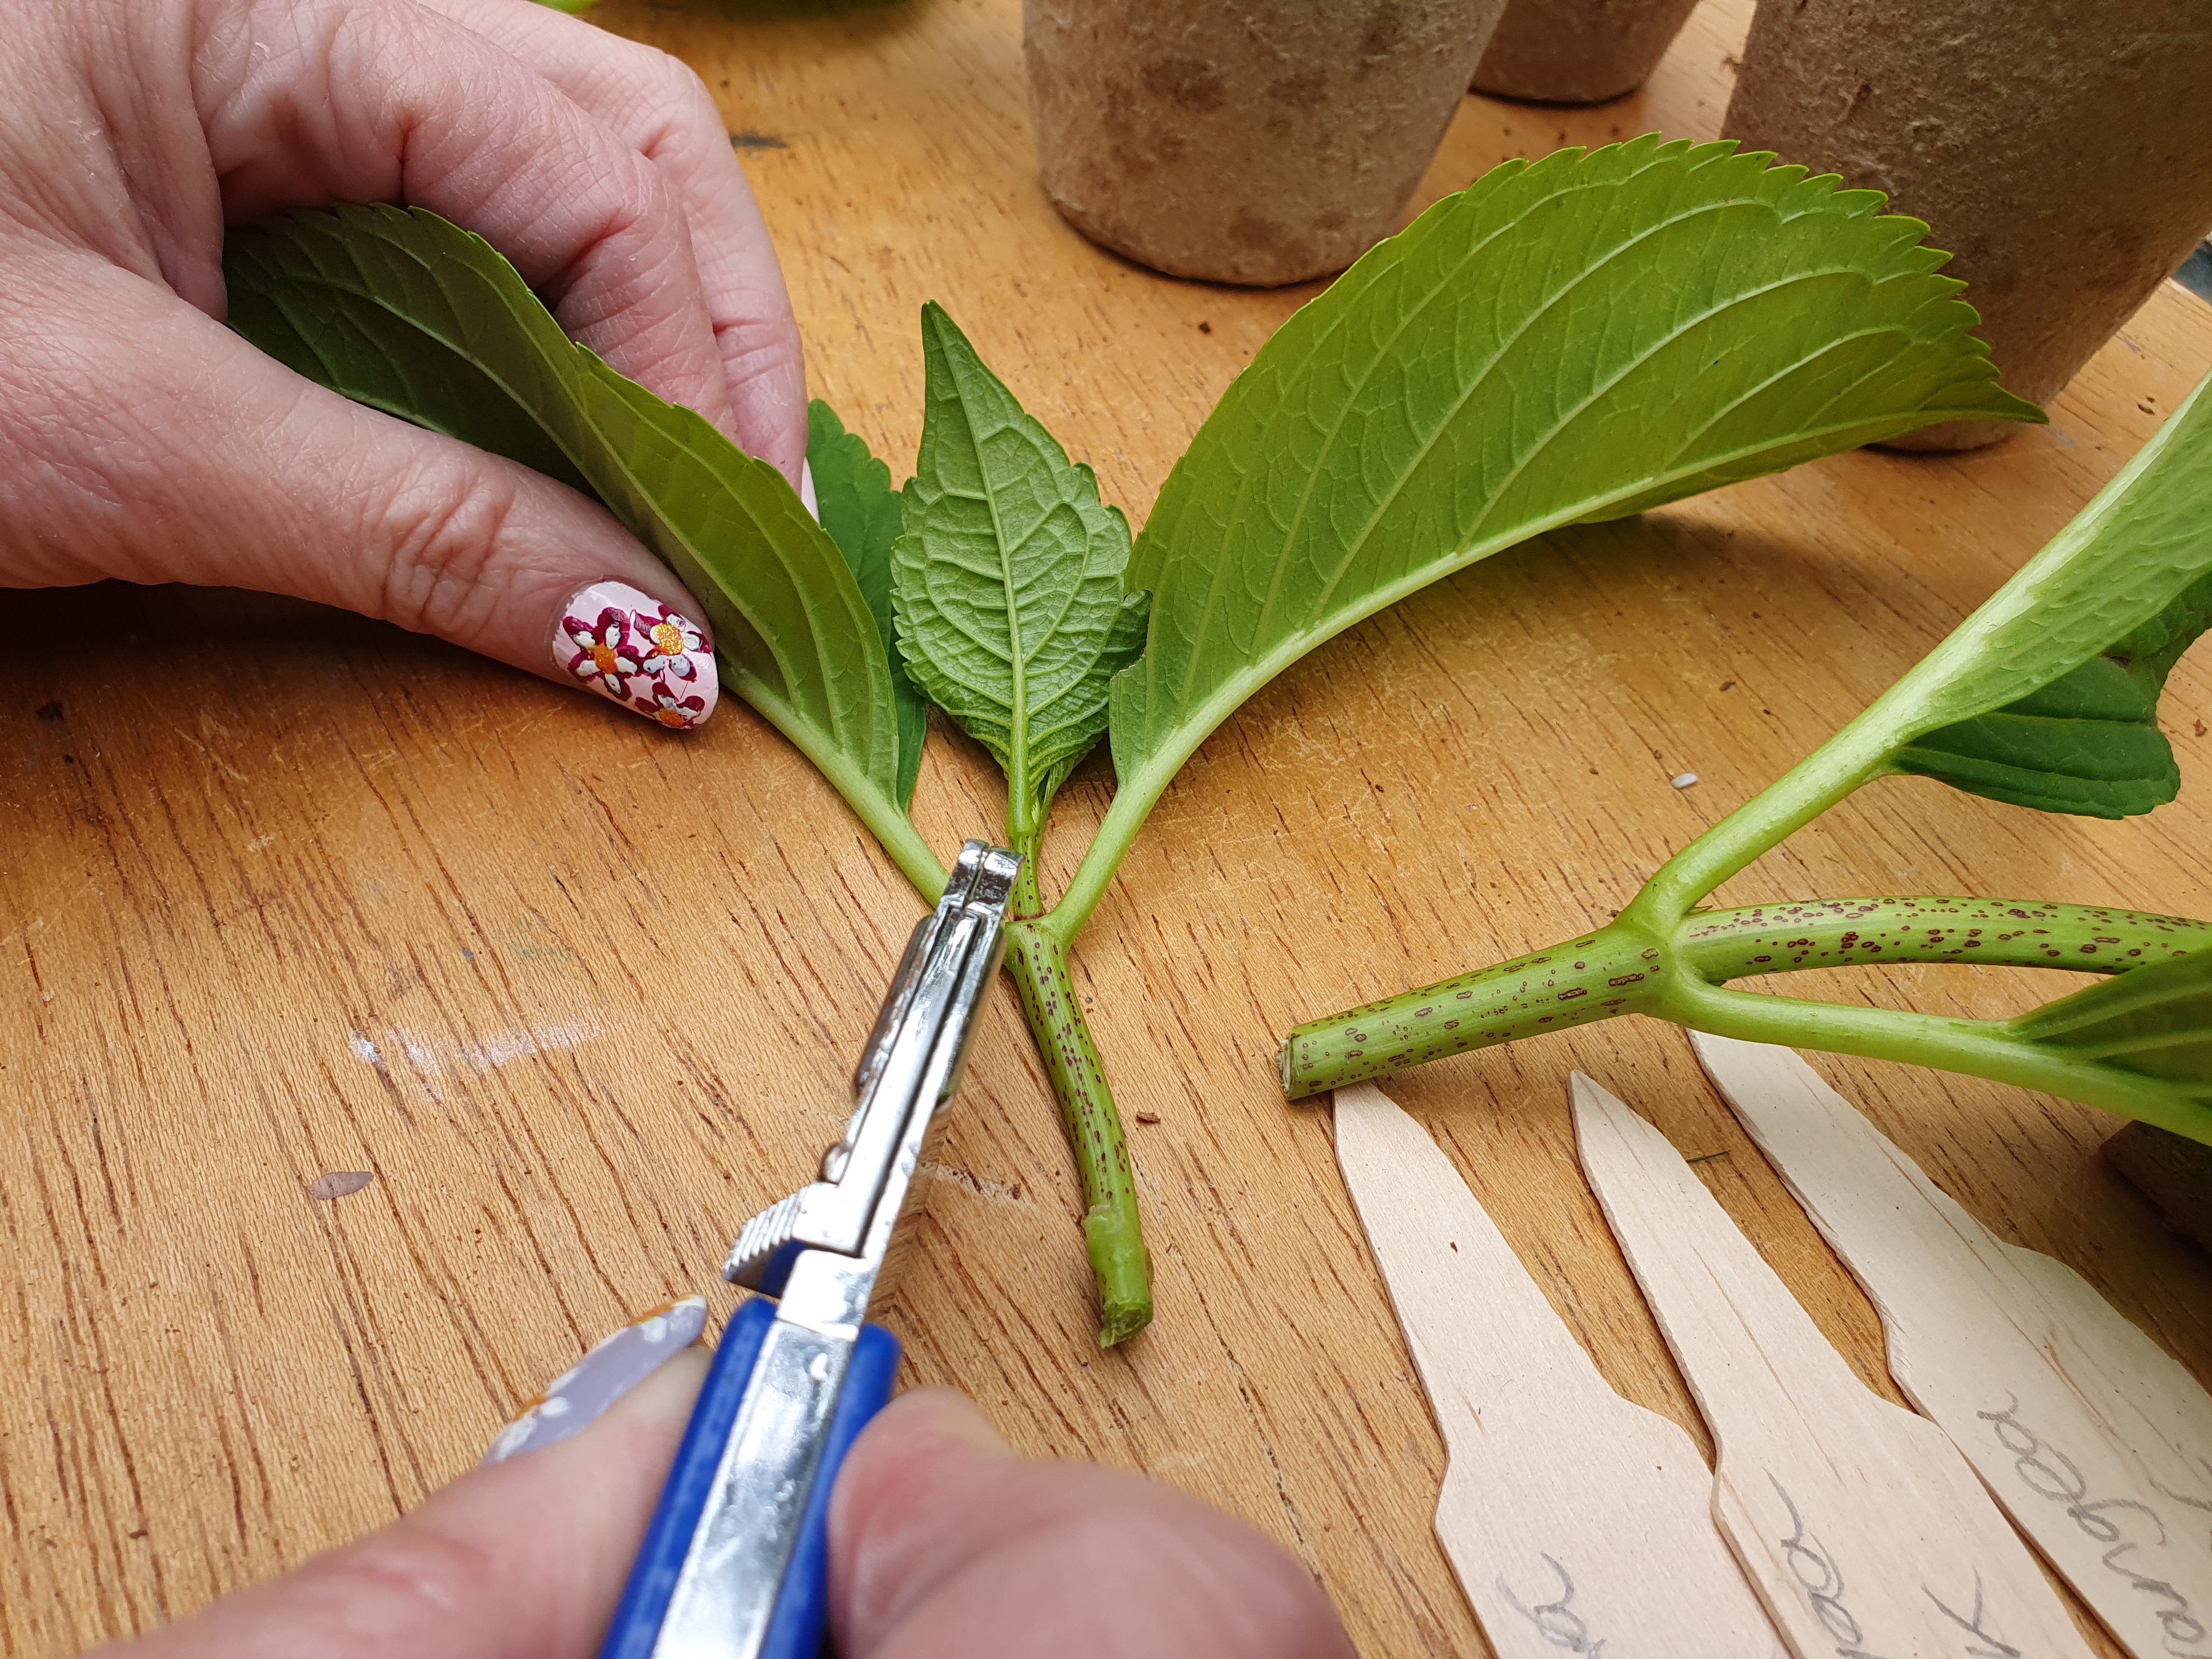
Choosing the Right Hydrangea Cuttings
Select shoots around 4-6 inches long that grew in the current season The stems should be sturdy but not limp Remove the leaves from the lower half of each stem, leaving a few leaves at the top. This helps the cutting conserve energy for root production rather than sustaining unnecessary foliage. Make a straight cut just below a set of leaves at the base using clean, sharp pruners. Cut right above a set of leaves at the tip. Take multiple cuttings from different parts of the plant to maximize your chances of success.
Rooting Hydrangea Cuttings
Gather Supplies
- Clean pruners or scissors
- Propagation/cutting medium like perlite, vermiculite, peat moss, or sand
- Small pots, trays, or other containers
- Clear plastic bags
- Rooting hormone (optional)
Prepare the Cuttings
- Use pruners to trim each cutting to 4-6 inches below a leaf node.
- Carefully remove the leaves from the lower half of the stem.
- Dip the cut end in rooting hormone if desired. This encourages root growth but isn’t essential.
Plant in Medium
- Fill pots/trays with cutting medium like perlite or peat so it’s damp but not soaked.
- Poke a small hole and insert each cutting.
- Gently firm the medium around the stems.
Provide High Humidity
- Place the potted cuttings in a clear plastic bag and seal it. This creates a greenhouse environment.
- Put the bag in a shady spot sheltered from direct sun.
Wait for Roots
- Check for root development in 6-8 weeks. Gently tug on cuttings to feel for resistance from roots.
- When roots form, transplant cuttings into pots using potting mix amended with compost.
With proper timing and care, the vast majority of hydrangea cuttings will successfully take root. Soon you’ll have beautiful new hydrangea plants to brighten your garden!
Common Mistakes When Taking Hydrangea Cuttings
Taking cuttings might seem straightforward, but there are some critical mistakes that can prevent them from developing roots. Here are some common errors to avoid:
-
Taking cuttings too late in fall – Hydrangeas won’t root well once they enter dormancy. Take cuttings by mid summer.
-
Not removing enough leaves – Leaving too many leaves demands energy that should go toward new roots.
-
Exposing cuttings to full sun – Direct sun will dry out and kill unrooted cuttings. Keep them shaded.
-
Letting cuttings wilt – Dryness spells doom for tender new cuttings. Keep them consistently moist.
-
Not providing high humidity – Hydrangea cuttings require very humid conditions to support rooting.
-
Allowing the medium to dry out – The rooting medium must stay damp, not soggy or bone dry.
With attention to proper timing, careful cutting selection, and ideal rooting conditions, you can propagate gorgeous new hydrangeas from cuttings successfully. Taking cuttings from existing plants allows you to inexpensively expand your garden with more of your favorite hydrangea varieties. Follow Monty Don’s best practices for taking cuttings, and you’ll watch your plant collection blossom!
Select a strong and healthy plant
When it comes to taking cuttings over the summer, you will ideally be looking for woody plants – and healthy woody plants at that.
Always choose healthy, strong, straight growth free from any flowers or flower buds, says Monty Don.
Not sure which woody plants are best suited to the process? Christopher suggests the following…
It is also worth ticking off a few of your herb garden ideas with some woody herbs, too, adds Christopher.
Think rosemary, thyme, and sage, to name just three.
What you will need
Make sure you gather everything you need before you get started, because (as anyone who knows how to take cuttings will tell you) you need to work quickly once you begin.
- A healthy plant (ideally one of your own, although you could absolutely ask someone to trim a few stems from theirs. Just dont go around snipping at your neighbours plants without asking, please…)
- A sharp knife/pair of secateurs
- A clean container
- A plant mister
- Peat free compost (try using Sylva Grow Peat Free)
- Hormone rooting gel or powder (optional)
- Individual 10cm pots
Once you have all of the equipment you need, check your calendar and block out a morning (or two).
It is best to take cuttings in the morning whilst the plant is full of moisture, says Monty Don, but in practice, it is something is best done as and when you are minded to do it. ( credit: Getty)
Basically, you want to set to work when its early, your workspace is cool and shady, your secateurs are almost frighteningly sharp, and your plant of choice looks healthy as can be.
Then, and only then, should you begin tackling the steps on this list…
Monty Don Demonstrates How to do Hardwood Cuttings with Roses in the Autumn…
FAQ
What is the best time of year to take hydrangea cuttings?
Hydrangeas can be easily propagated from semi-ripe cuttings, taken in late summer.Mar 25, 2024
How to take root cuttings?

To propagate plants using root cuttings, carefully remove sections of healthy roots, cut them into manageable lengths, and plant them in a well-draining medium. Ensure the cuttings are planted with the correct orientation (cut end up for most species) and keep the medium moist.