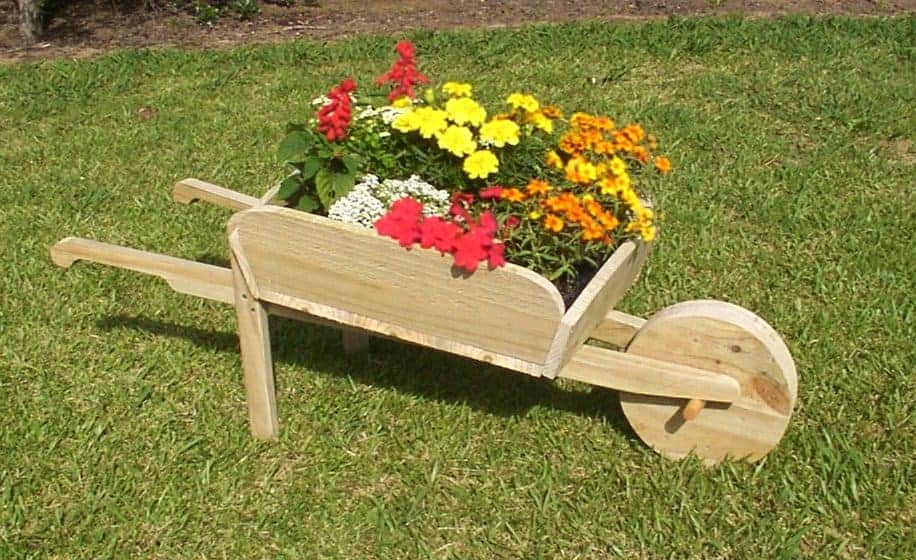
A handmade wooden wheelbarrow overflowing with flowers and greenery makes a charming addition to any outdoor space. Wheelbarrow planters look great on porches patios decks, and in gardens. The rustic, old-fashioned style gives a nostalgic feel. Luckily, with the right diy wooden wheelbarrow planter plans, making your own is easy, fun, and budget-friendly.
Benefits of Building Your Own Wooden Wheelbarrow Planter
Some key advantages of making your own wooden wheelbarrow planter include
-
Customization – You can stain, paint, or finish the wood however you like to match your style and outdoor decor
-
Cost savings – Purchasing a pre-made wooden wheelbarrow planter can be expensive. Doing it yourself with scrap wood or inexpensive lumber brings down the price significantly.
-
Satisfaction – It’s rewarding to build something beautiful with your own two hands. These make great weekend projects.
-
Durability – Wooden wheelbarrows you make yourself will likely hold up better over time than mass-produced versions. You can use weather-resistant woods and high-quality materials.
Choosing the Right DIY Wheelbarrow Planter Plans
Many free and paid diy wooden wheelbarrow planter plans can be found online. When selecting which design to use, consider:
- Your skill level
- Tools and materials required
- Time commitment
- Size and dimensions
- Wheelbarrow style
Simpler, beginner plans utilize basic tools like drills, saws, sanders, and staple guns to construct the wheelbarrow planter box and attach pre-made wheels. More advanced plans involve building wheels from scratch, using spokes, and more meticulous construction.
Make sure to use weather-resistant wood like cedar, redwood, cypress, or treated pine. Outdoor-rated wood glue, screws, and finishes are also a must.
Step-By-Step Instructions for Building Your Own
While each set of diy wooden wheelbarrow planter plans will vary, the general construction process goes like this:
-
Gather tools, materials, and cut lumber to size according to measurements.
-
Build the wheelbarrow tub. This is the main planting box. Involves cutting boards, joining with glue and screws, and attaching corner braces for support.
-
Create the undercarriage. Cut and assemble the legs and bottom supports that will hold up the wheelbarrow tub.
-
Add the wheel(s). For advanced designs, construct spokes and rim from wood. For simpler versions, attach a pre-made metal or plastic wheel using an axle bolt.
-
Join the wheelbarrow tub and undercarriage. Measure carefully so the tub sits level on the legs/supports.
-
Attach handles to the sides or front of the tub. Cut and shape according to your chosen plans.
-
Apply weatherproof finish. Paint, stain, or sealer. Allow time to dry completely.
-
Fill with soil and plants, and enjoy your handmade wooden wheelbarrow planter!
Inspiring Designs and DIY Plans
Many splendid wooden wheelbarrow planters can be crafted using free online diy plans. Here are some top sources:
MyOutdoorPlans offers a thorough, step-by-step guide for constructing a charming wooden wheelbarrow planter complete with a slatted wood wheel. Their plans include measurements, materials lists, color photos, and tips.
BobsPlans provides instructions for building two different wooden wheelbarrow planter styles. One features a basic heart-shaped double wheel. The other is a more intricate design with a wooden spoked wheel.
HouseGrail showcases seven unique DIY wooden wheelbarrow planters, including an easy makeover of a vintage metal wheelbarrow. The post has complete free plans from other sites.
For a rustic look, Instructables uses reclaimed pallet wood to construct an charming weathered wheelbarrow planted with succulents.
Tips for Success Building Your Own
Follow these tips for the best results on your homemade wooden wheelbarrow planter project:
-
Review plans thoroughly before starting. Have all materials and cuts prepared ahead of time.
-
Follow safety precautions – wear gloves and goggles when using power tools.
-
Measure carefully and double-check alignment before screwing pieces together.
-
Clamp pieces when gluing to ensure a tight bond as the glue dries.
-
Apply primer before painting for better adhesion. Use an outdoor enamel spray paint.
-
Consider adding drainage holes to the bottom of the wheelbarrow tub.
-
Line the planter with landscape fabric or plastic sheeting before filling with soil to prevent rotting.
-
Seal any untreated wood with an outdoor sealant annually to prevent weathering.
-
Plant trailing flowers, herbs, or vines that will gracefully drape over the sides as they grow.
With the right free diy wooden wheelbarrow planter plans, a Saturday, some simple tools, and a bit of elbow grease, you can create a spectacular wheelbarrow planter for your yard. Get creative choosing colors and plantings. Build it yourself and save money while enjoying a fun project – then sit back and admire the fruits of your labor. Your homemade wheelbarrow planter will be an envy-inducing treasure bringing joy for years to come.
Step Making the tray base
- Place the two handle/support rails [A] on an even surface so that the front ends (axle end) are 75mm (3″) apart (or a width that is slightly more than the thickness of the wheel), and the handle ends are 400mm (16″) apart overall.
- The tray base is made out of three 150mm x 25mm (1″ x 6″) boards [E] that are 400mm (16″) long.
- Place the three tray base boards [E] side-by-side on top of the two handle/support rails [A], forming a rectangle 400mm (16″) x 450mm (18″).
- Refer to the plan drawing for position and fix them to the handle/support rails [A] with 50mm (2″) stainless steel screws.
The materials list and cutting list
Below is the shopping list. It would pay to add a bit extra to the wood tally to allow for any wastage. It does not matter whether the wood you use is sawn (rough) or dressed (smooth), as long as it is suitable for outside use. When cutting the lengths, always cut the longest lengths first to minimize waste.
| MATERIAL | USED FOR | AMOUNT |
| 50mm x 25mm (1″ x 2″) stock | handles and legs | 3.3m (11ft) |
| 150mm x 25mm (1″ x 6″) stock | tray and wheel | 5.2m (17ft) |
| 50mm (2″) stainless steel screws | tray and legs | 40 of |
| approximately 25mm (1″) diameter round wood, pipe or similar | axle | 225mm (9″) |
| saddle clips or U bolts | fixing axle to support rail | 2 of |
| Glue | wheel | as needed |
Cut all the pieces to the lengths given below and then refer to the plan drawings on the following page for the shape dimensions – and then cut (shape) the pieces accordingly.
All the pieces can be cut from 50mm x 25mm (1″ x 2″) and 150mm x 25mm (1″ x 6″) boards.
Cut the following to the given lengths:
[A] From 50mm x 25mm (1″ x 2″) stock, cut 2 pieces 1175mm (47″) long for the handle/support rail pieces.
[D] From 50mm x 25mm (1″ x 2″) stock, cut 2 pieces 400mm (16″) long for the legs.
[B] From 150mm x 25mm (1″ x 6″) stock, cut 2 pieces 450mm (18″) long for the end tray panels.
[C] From 150mm x 25mm (1″ x 6″) stock, cut 2 pieces 513mm 20 1/2″ long for the side tray panels.
[E] From 150mm x 25mm (1″ x 6″) stock, cut 3 pieces 400mm (16″) long for the tray base,
and from 150mm x 25mm (1″ x 6″) stock, cut 6 pieces 300mm (12″) long for the wheel.
Then mark and cut (shape) the pieces as shown in the plan drawings on the following page.
Make a rustic wheelbarrow garden planter. Easy DIY weekend project.
FAQ
How to line a wheelbarrow planter?
- Step 1: Choose Your Liner Material. The first step is to decide on the type of liner you’ll use. …
- Step 2: Measure Your Planter. …
- Step 3: Cut the Liner. …
- Step 4: Position the Liner. …
- Step 5: Secure the Liner. …
- Step 6: Pierce the Liner for Drainage. …
- Step 7: Add Your Soil and Plants.
What can I plant in my old wheelbarrow?
Turning an old wheelbarrow into a beautiful rustic planter is a fun, creative way to upcycle and grow a portable garden of flowers, herbs, and bush-style edibles.
Can I plant flowers in a rusty wheelbarrow?
So easy to visualize as a planter, wheelbarrows can simply be filled with soil and planted with annual flowers or succulents. Here, you’ll see many examples of each way and every way to plant up a vintage wheelbarrow for the garden. My rusty wheelbarrow filled with sunny yellow petunias.
What materials are needed to make a wheelbarrow?
Raw Materials
A wheelbarrow consists of a tray or bed composed of steel, wood, or plastic. A steel brace attaches this bed to steel support legs and to a steel or plastic wheel, with a rubber tire around it. In two- or four-wheeled models, the wheels may be similar to bicycle tires, complete with inner tubes.
Can You Make your own wheelbarrow planter?
With our free plans, you can build your own wooden wheelbarrow planter that looks like an antique but you can easily make it yourself! What a great addition to any flower garden or landscape! With some good potting soil, a little fertilizer and water you can have flowers overflowing the sides of these beautiful planters.
What tools do you need to build a wheelbarrow planter?
As well, some of the wheelbarrow planter plans, require a woodworking shop that is outfitted with a good selection of stationary power tools such as a table saw, jointer and thickness planer. These wheelbarrow planter plans are for the novice to expert woodworker. Also see: planter, benches with planters and window box planter plans.
How do you make a wheelbarrow planter box?
Cut boards to size for the long front, back and side pieces. Assemble into a rectangular box using screws. Cut boards to fit the width and length of the planter box walls. Nail or screw into bottom of side boards. For full wheelbarrow shapes, cut boards to length for handles and attach to planter box sides. Sand entire planter box smooth.
Can you build your own wheelbarrow?
However, there are some simpler plans that involve building your own wheelbarrow as well. Usually, the more intricate the wheelbarrow is, the more difficult it will be to build. On the other hand, using an old wheelbarrow is often extremely simple.
Can You stain a wheelbarrow planter?
There are a lot of tools and materials involved, so it is best for those that have some experience building things. With that said, there is no stain called for in this plan, but we do recommend one. The planter is just made out of regular wood, so it may rot if left outside without some sort of paint or sealant. 2. Spoked Wheelbarrow Planter
How to install a wooden wheelbarrow?
In order to get a professional result, we recommend you to drill pilot holes and to insert 1 1/4″ finishing nails. Add waterproof glue to the joints, in order to enhance the rigidity of the wooden wheelbarrow. Always align the components at both ends before locking them together, if you want to get a neat look.