Sewing your own grow bags is so simple! Learn to sew an easy grow bag out of any material of your choosing. Know how to sew a straight line? You can do this!
This post contains affiliate links, which means I make a small commission at no extra cost to you. See my full disclosure here.
It’s my goal at our new property to grow as much of our own food as possible. Part of my plan to achieve this includes perennials like berry bushes. I picked up several dormant blueberry, blackberry, raspberry, and strawberry plants the other day. Eventually, I’ll plant these out near our new home. I didn’t want to plant them in the ground here because I want to take them with us when we leave.
Until then, I needed some kind of container to plant them in. Pots are expensive, especially when you consider how many I would need. I really didn’t want to spend money on a planter that would be so temporary. I needed to work with what I already had. Enter the grow bag.
Because I used cotton fabric that I already had on hand, this project didn’t cost me any more money. Yay for free! Cotton is biodegradable, so this isn’t a long-term solution, but it’s perfect for the temporary planters I was looking for. If you’re looking for a longer-lasting material, I suggest using a quality landscape fabric instead. If you follow this tutorial, then you can use any fabric that suits your needs.
UPDATE: I ended up using these planters for a full growing season. The cotton fabric did the job for the length of time I needed them, but they were ready to be tossed out at the end of the season. Would I make these again in a pinch? Absolutely! Just keep in mind that if the planters need to be moved frequently or last longer than a single growing season, you should look for sturdier material than I used. The directions will stay the same.
Hey garden lovers! I’ve been experimenting with grow bags for my plants lately, and I’m super excited to share everything I’ve learned about making these awesome fabric containers. Whether you’re tight on space or just want a cheaper alternative to expensive pots, DIY grow bags are gonna be your new best friend!
Why Make Your Own Grow Bags?
Before we dive into the how-to here’s why I’m obsessed with grow bags
- Super affordable – You can make several bags for the price of one store-bought container
- Space-saving – They fold flat for storage when not in use
- Excellent drainage – The fabric naturally allows excess water to seep out
- Better root health – Plants “air prune” their roots instead of getting rootbound
- Portable – Lightweight and easy to move around
- Versatile – Great for vegetables, flowers, herbs – pretty much anything!
Materials You’ll Need
Here’s your shopping list
- Landscape fabric (polypropylene, 2-3 oz weight)
- Heavy-duty outdoor polyester thread
- Sewing machine
- Scissors
- Ruler
- Straight pins or clips
- Sewing pencil/marker
- Optional: 1-inch webbing for handles
Pro tip: Get your landscape fabric from a home improvement store rather than online – way cheaper!
Size Guide for Different Plants
Here’s what size to make your bags for different plants
| Size | Fabric Pieces | Final Dimensions | Best For |
|---|---|---|---|
| Mini | 9″ x 9″ | 6″ diameter, 8″ tall | Seedlings, herbs |
| Small | 12″ x 12″ | 8″ diameter, 10″ tall | Small flowers, lettuce |
| Medium | 18″ x 18″ | 12″ diameter, 12″ tall | Tomatoes, peppers |
| Large | 27″ x 36″ | 17″ x 18″ x 18″ | Multiple plants |
| XL | 36″ x 36″ | 20″ x 20″ x 14″ | Large vegetables |
Step-by-Step Instructions
1. Cut Your Fabric
- Cut 4 identical pieces according to your chosen size
- Keep them square for best results – rectangular pieces get floppy!
2. Basic Assembly
- Stack all 4 pieces together
- Pin and sew Side A with 1/2 inch seam allowance
- Pin and sew Side B
- Rotate and align seams A & B
- Sew bottom seam
3. Creating the Base
- Mark center points between seams
- Draw and sew bottom seams to create corners
- DON’T cut off corner triangles – they help with moisture retention
4. Finishing Touches
- Turn bag right side out
- Fold and stitch top edge (about 1-2 inches)
- Optional: Add handles using webbing
My personal tip: I like double-layering the fabric – makes the bags sturdier and helps retain moisture better!
Tips for Success
- Don’t iron the fabric – it’ll melt! Just smooth with your hands
- Clean your machine’s bobbin area frequently – this fabric creates lots of fuzz
- Start with a small bag to practice before making bigger ones
- For hot climates, consider making bags 3-4 layers thick
What Can You Grow?
I’ve successfully grown:
- Salad greens
- Herbs
- Tomatoes
- Peppers
- Flowers
- Carrots
- Onions
- Leeks
Common Mistakes to Avoid
- Using rectangular pieces instead of squares
- Making bags too big without proper support
- Skipping the double-layer construction
- Cutting off corner triangles
- Using regular thread instead of outdoor thread
Cost Breakdown
For a medium-sized bag:
- Landscape fabric: ~$0.50
- Thread: ~$0.20
- Optional webbing: ~$1.39
Total: Under $2.10! Way cheaper than store-bought ones that cost $15-20!
Making your own grow bags is seriously rewarding and budget-friendly! I’ve made dozens now and keep finding new uses for them. They’re perfect for both beginners and experienced gardeners.
P.S. Don’t worry if your first bag isn’t perfect – mine sure wasn’t! The plants don’t mind a few wonky stitches!

Let’s sew a grow bag!
Fold your fabric with right sides together and sew along what is now the longer edge with a 1/2″ seam allowance.

Fold the top of the tube down to meet the bottom edge, matching the raw edges together. The right side of the fabric will now be facing out and it should still be a tube. If you are using a patterned fabric, the pattern will be upside down.

Make sure the seam is lined up with itself and is on one side. Mine is on the left. Pin all of the bottom raw edges together and sew them with a 1/2″ seam.

Refold it so that the side seam is in the center.

Flip the bottom flap up so that the bottom is exposed and pin the layers in place.

Mark the center of the bottom seam and bring the corners at the top and bottom to meet it. Draw lines where the folds are created and sew across them.
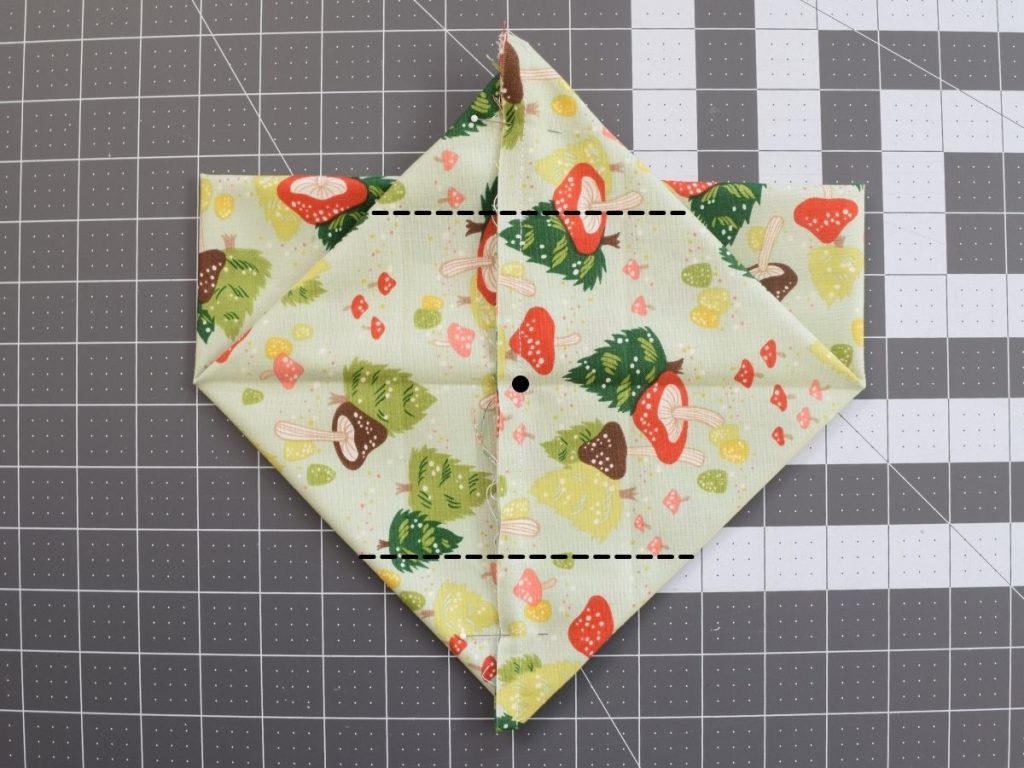
Turn your grow bag right side out. I didn’t trim the flaps, I just left them there to add a little more structure to the bottom of the bag.

Now you can fill it up with soil and plant your seedlings!
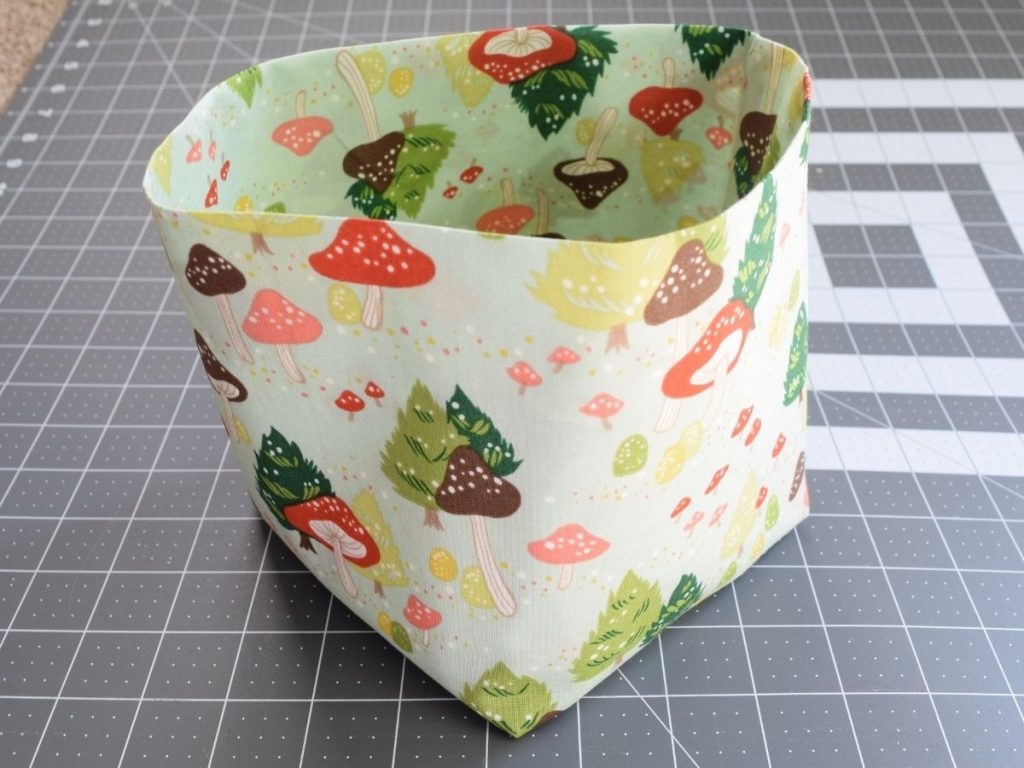
Aren’t they cute? They’ll look even cuter when the plants start to fill out.

Now get sewing! You’ll have a handful whipped up in just a few minutes. It goes even faster if you sew them in assembly line fashion.
Here’s what you’ll need for one grow bag
I made two sizes of bags, a large size for the berry bushes and a small size for the strawberries.
1 yard of fabric. Mine measured about 36″ x 42″.
1- 18″ x 21″ fat quarter. If you’re unfamiliar with the term, a fat quarter is just a quarter of a yard of fabric. It’s cut like this from a full yard.

If your fat quarter ends up a few inches off either way, that’s OK. It won’t affect the final result. Fabric widths vary between manufacturers. The instructions are the same for whatever size you choose to make, so tailor your bag to your needs.
How to Make Grow Bags (Easy Pattern, Any Size)
FAQ
What material is best for grow bags?
The best material for grow bags is heavy-duty landscape fabric, which is typically made from polypropylene. The material is typically food-grade, free of anything harmful and long-lasting. Another common landscape fabric material is polyethylene, which is basically recycled plastic bottles.
What can I make grow bags out of?
I was able to move it around, the bottom also stayed intact. So, the 100% polyester premium craft felt is my official recommendation for DIY felt grow bags.
What to put in the bottom of a grow bag?
Place a thin layer of rocks or sticks at the bottom of your grow bag to ensure good drainage. Fill your grow bag nearly to the top with your soil, leaving about four inches at the top. Layer two inches of compost on top of the soil.
How do you prepare a grow bag?
Preparing the Grow Bag
Add a drainage layer: Place a layer of gravel or broken clay pots at the bottom of the grow bag to improve drainage. Add potting mix: Fill the grow bag with high-quality potting mix, preferably a mix of garden soil, compost, and cocopeat or perlite for better aeration.