Make an attractive border for a concrete walkway or patio using brick pavers set on a bed of gravel and sand. With a solid gravel base, a brick border will last for the life of your house.
For this project, you’ll need bricks, compactable gravel for the base, washed sand, and plastic paver edging to hold the bricks in place. If you’re lucky enough to have a full-service landscape supplier in your area, you can order all your materials there. Otherwise, look for pavers and plastic paver edging at home centers, garden centers or brickyards, and gravel at a landscape supplier or at a sand and gravel quarry. Don’t forget to ask about delivery charges.
Clay pavers have a rich, authentic look, but cement pavers are a little less expensive. Both types are durable and long lasting. Most pavers are 4 x 8 in. and about 2-1/4 in. thick, but other sizes are available. Measure the total linear feet of edging you plan to install and multiply by 3 to arrive at the number of 4-in.-wide paver bricks you’ll need. The plastic paver edging is necessary to keep the bricks from drifting. Use the total linear feet of the border to order edging. You’ll also need enough 10-in.-long spikes to install one every 12 in. Plus: Check out these unexpected materials used for landscape borders.
To ensure that the bricks remain stable and won’t tip when you wheel a lawn mower over them, the new compacted base should be 6 in. wider than the brick and extend 6 in. below the bottom of the brick. This means you’ll dig a 14 in. wide by 8-in. deep trench for typical paver bricks. To determine how much gravel you’ll need for this size trench, grab your calculator and multiply the linear feet of the trench by .02. The result is the number of cubic yards of gravel needed. Order gravel that ranges in size from 3/4 in. down to a powder (called 3/4-in.-minus). For our project, which was a total of 60 linear feet, we ordered 1-1/4 cu. yds. of 3/4-minus crushed limestone. Have the gravel dumped on the driveway where it’s easier to shovel up. You’ll also need a 1-in. layer of sand under the bricks. It’s usually cheaper and easier to simply order bags of sand rather than have a small quantity delivered. Divide the linear feet of the border by 5 to determine how many 50-lb. bags of sand you’ll need.
We rented a sod cutter to slice a neat layer of grass from along the edge of the sidewalk, but a flat shovel will also work. In addition to a shovel and rake, you’ll need a wheelbarrow, tamper and some scraps of lumber and basic carpentry tools to construct the screeds. If your sidewalk is straight and you only have a few bricks to cut, you can use a diamond blade mounted in a circular saw to cut the bricks. If your sidewalk is curved or you anticipate a lot of cutting, rent a brick saw.
We installed a deep compacted gravel base under the bricks. You could save a lot of work by simply digging a small trench and laying the bricks right on the soil, but you’d probably have to realign them every summer. The method we show takes longer initially but guarantees a long-lasting job that’ll look great for decades.
Concrete walkways are a practical and affordable option for creating paths and patios around your home However, plain concrete can look a bit drab and boring after a while An easy way to spruce up a concrete walkway is by adding an attractive brick border along the edges. Not only does a brick border add visual interest, color, and texture, but it also helps define the boundaries of the walkway.
In this article, we’ll walk through the steps for adding brick borders to dress up your existing concrete paths. With the right materials and techniques, you can complete this project over a weekend. Once finished, you’ll love the instant curb appeal and elegance a brick border brings to your concrete walkways.
Planning Your Brick Border
Before digging in, take some time to plan out your brick border project. Here are a few tips
-
Measure the total linear feet of edges along your concrete walkway where you want to install the brick border. This will allow you to calculate the quantity of bricks and other materials needed.
-
Choose your bricks. Clay bricks offer an authentic, classic look while concrete bricks cost a bit less. Both types are durable. Standard brick size is 4 x 8 inches.
-
Allow extra width for a gravel base under the bricks to prevent shifting. A 14 inch wide by 8 inch deep trench is typical.
-
Mark the layout with spray paint or flour so you can visualize how it will look. Curve the borderlines around landscaping features.
-
Contact your utility companies to locate any buried lines before digging.
Gather Your Materials
You’ll need the following supplies to add a brick border to a concrete walkway:
-
Bricks – Calculate linear feet x 3 to determine quantity needed. Allow extras.
-
Gravel – Compactable gravel for the base. About 6 inches wider than the bricks.
-
Sand – Washed concrete sand to level the base. About 1 inch deeper than brick thickness.
-
Plastic edging – Helps secure bricks and prevent shifting.
-
Spikes – To anchor the plastic edging. Place every 12 inches.
-
Shovel, rake, tamper – For digging and leveling the gravel base.
-
Wood scraps – To build screed guides for leveling the base.
-
Brick saw – For cutting pavers around curves (rent if needed).
Prepare the Gravel Base
A properly prepared gravel base is crucial for keeping the brick border stable for the long-term. Here’s how to do it:
-
Dig a 14” wide by 8” deep trench along the edges of the concrete walkway. Dispose of excess soil.
-
Fill the trench with compactable gravel in two 3” layers. Tamp each layer thoroughly.
-
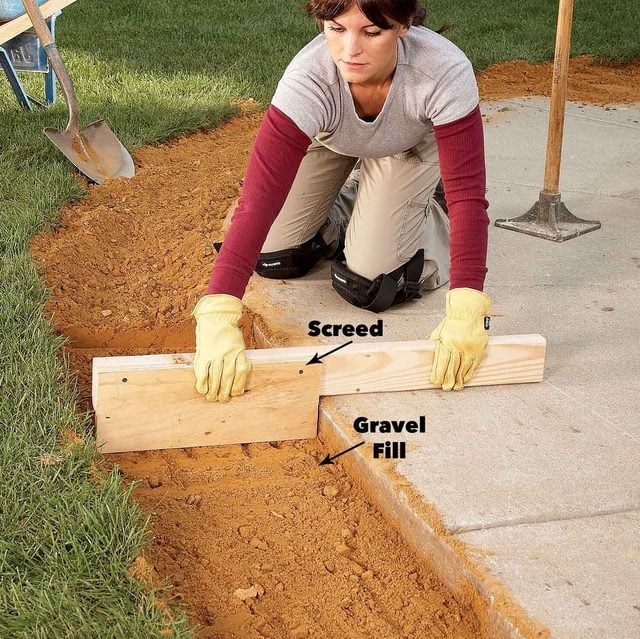
Screed the gravel flat and smooth using a guide board, 3.5” below walkway edge.
-
Compact the gravel again until solid. The level will drop slightly.
-
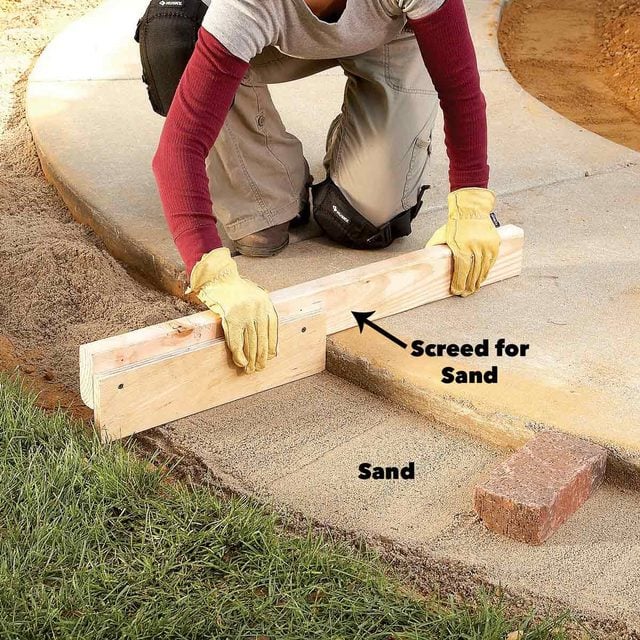
Add a 1” layer of sand. Dampen and screed flat.
The tamped gravel and screeded sand will provide a firm base to prevent the brick border from shifting once installed.
Install the Brick Border
With the base prepared, you’re ready to install the brick border:
-
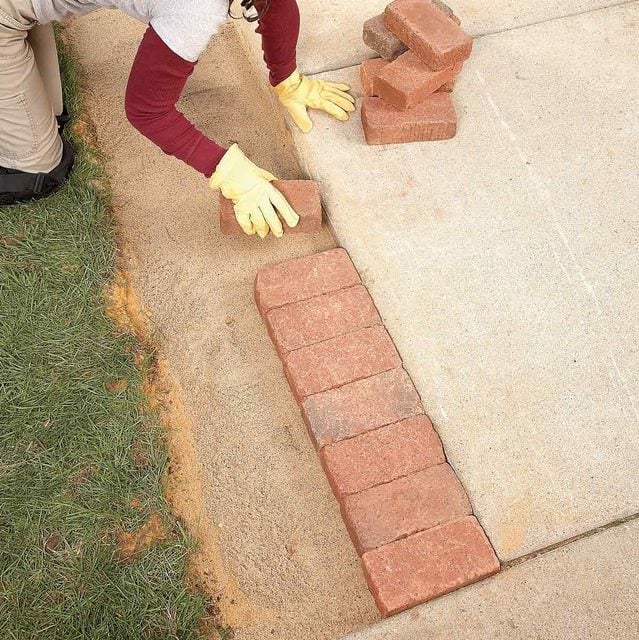
Place the bricks on the screeded sand, leaving a small gap to the walkway edge.
-
Use a brick saw to cut any custom shapes needed to fit around curves.
-
Place bricks end-to-end. Estimate gaps and cut as needed for tight fit.
-
Press plastic edging into place along the back of the bricks. Anchor with spikes.
-
Tamp bricks to embed into sand until flush with walkway edge.
-
Sweep sand into the brick joints. Tamp again to settle.
-
Backfill behind edging with soil. Compact lightly and slope smoothly.
-
Make any final cuts for a tight fit. Complete by setting and trimming sod behind border.
Finishing Touches
The final step is to apply some finishing touches:
-
Sweep away any leftover sand or debris from brick surface.
-
Use a concrete bonding agent to secure loose joint sand.
-
Consider sealing the bricks to enhance color and prevent stains.
-
Plant flowers, ground cover or decorative grasses along the inside edge.
-
Add lighting, such as low-voltage landscape lights, to illuminate path at night.
-
Enjoy your newly spruced up concrete walkway!
With proper planning and preparation, you can install an elegant brick border along your concrete walkway in a weekend. The upgrade instantly provides visual interest, clearly defines the path’s boundaries, and adds a touch of class. Every time you use your walkway, you’ll appreciate the beauty and charm of your new brick border. Over time, the weathering of the bricks will only add more character. Your neighbors are sure to notice and admire this simple yet dramatic improvement that lifts your walkway from drab to fab.

Sign Up For Our Newsletter Step 3
 Family Handyman
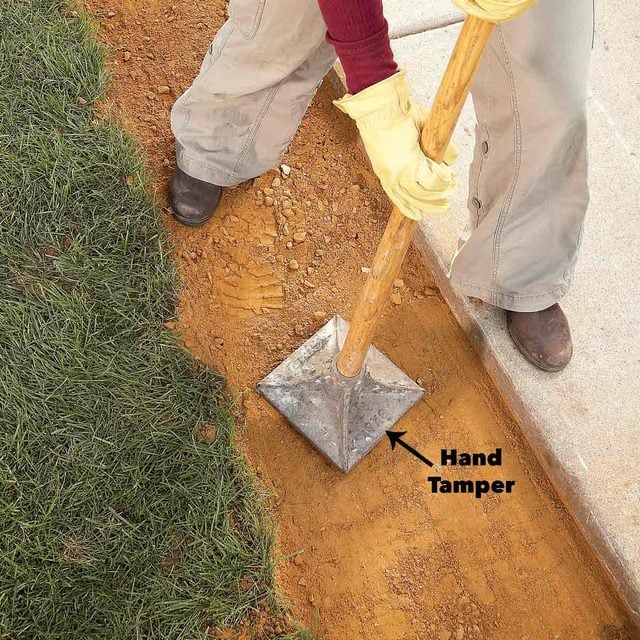
Pound the gravel with a hand tamper until it feels solid. The level will drop as the gravel settles, but that’s OK because you’ll add sand later to make up for it. Step 4
 Family Handyman
Next, spread a layer of sand a little deeper than 1 in. over the compacted base. If the sand is dry, dampen it with a mist from the garden hose. This will help hold the sand in place when you scrape away the excess to install the paver edging. Construct another screed and use it to level the sand. Figure the depth of the notch by subtracting 1/4 in. from the thickness of a brick. Set a paver on the screeded sand to test the depth. The paver should protrude about 1/4 to 1/2-in. above the surface of the sidewalk. You’ll make the pavers flush later by tamping them down into the sand bed. Step 5
 Family Handyman
Here’s how to install paver edging. Start by setting the bricks on the sand bed. Don’t worry if the tops aren’t even. You’ll tamp them down later to level them out and make them flush to the sidewalk. Since there’s a good chance you’ll have to cut the last brick to fit, start with a full brick in the most visible location and plan to finish in the least conspicuous spot. If your edging turns a right angle corner, start at the corner and work out. The photo above shows how to get started on how to install paver edging. Step 6
Project step-by-step ( Step 1
 Family Handyman
Two days before you start digging, call your local one-call number and ask to have the buried utility lines alongside your sidewalk located and marked. When you’re sure it’s safe to dig, start by removing a 14-in.-wide layer of grass along the sidewalk. If your grass is in good shape, slice it off carefully so you can use it to patch in along the new border. A sod cutter simplifies this job and leaves you with neat rolls of sod that are easy to reuse. If your grass isn’t worth saving, just dig it out and plan to buy a few rolls of sod instead. Next, dig a 14-in.-wide by 8-in.-deep trench along the sidewalk to accommodate the gravel, sand and pavers. The trench will provide space for the compacted fill along the walkway edging. The fill provides a stable base to keep the brick border from shifting. You’re going to have a lot of dirt to get rid of. Ask around the neighborhood to see if someone needs fill for a low spot, or consider building a raised bed garden or decorative earth berm. As a last resort, you can rent a 10-cu.-yd. trash bin. When you’re done digging, rake the bottom of the trench smooth and compact it with the hand tamper for driveway edging pavers. Step 2
 Family Handyman
Since the purpose of the gravel fill is to provide a stable base, it’s important to compact it well. Start by spreading a 3-in.-deep layer of gravel in the trench. Pound every square inch with the hand tamper until it’s tightly packed. Then add another 3 in. of fill and drag a screed across the top to create a surface that’s parallel to the top of the sidewalk. Level the gravel about 3-1/2 in. below the top of the sidewalk to allow room for the bricks and about an inch of sand. Construct a screed by screwing a 14-in.-wide scrap of plywood to a 32-in. length of 2×4. The plywood should extend below the 2×4 the thickness of the paver brick plus 3/4 in.
BEST paver edge?! #hardscape #pavers
0