Country Living editors select each product featured. If you buy from a link, we may earn a commission. Why Trust Us?
Whether youre designing a new garden or want to boost your existing gardens aesthetic, incorporating edging is a way to highlight the garden area and add more personality. Creating borders or garden edging establishes a defined space and gives your garden a more complete look. Use edging to make the space stand out or to create a garden bed for your pollinator garden, spring bulbs, fall-blooming flowers, winter blooms, and vegetable garden. With so many things to consider when planning or planting a garden, such as sunlight, USDA hardiness zones and choosing native plants, its easy for edging to be overlooked.
Edging helps define a space, enhances the aesthetic, and can reduce soil erosion and water runoff. Plus, creating borders in the landscape makes it easier to keep areas organized and prevent some plants from spreading and encroaching to other spaces by creating a natural or physical barrier. Installing edging can protect your plants, such as perennials and annuals by making a distinction from where one area ends and another begins. This helps avoid plants being clipped by garden tools or trimmed by lawnmowers when its time for yard maintenance.
There is an array of edging materials to choose from, including metal, plastic, terracotta, wood, and plants or shrubs. Choosing the type of edging is easier once you know your preferred garden style. For example, if you like the look of cottage gardens youll likely want a natural border so opt to use mixed plantings, shrubs, wood or stone as edging while a metal variety may be preferred for low-maintenance gardens. Before you jump in, understand that each type of edging has different costs, and requires a different skill set, tools, and amount of time to install. Some edging is more straightforward than others so plan accordingly and allow sufficient days or weeks to ensure successful completion.
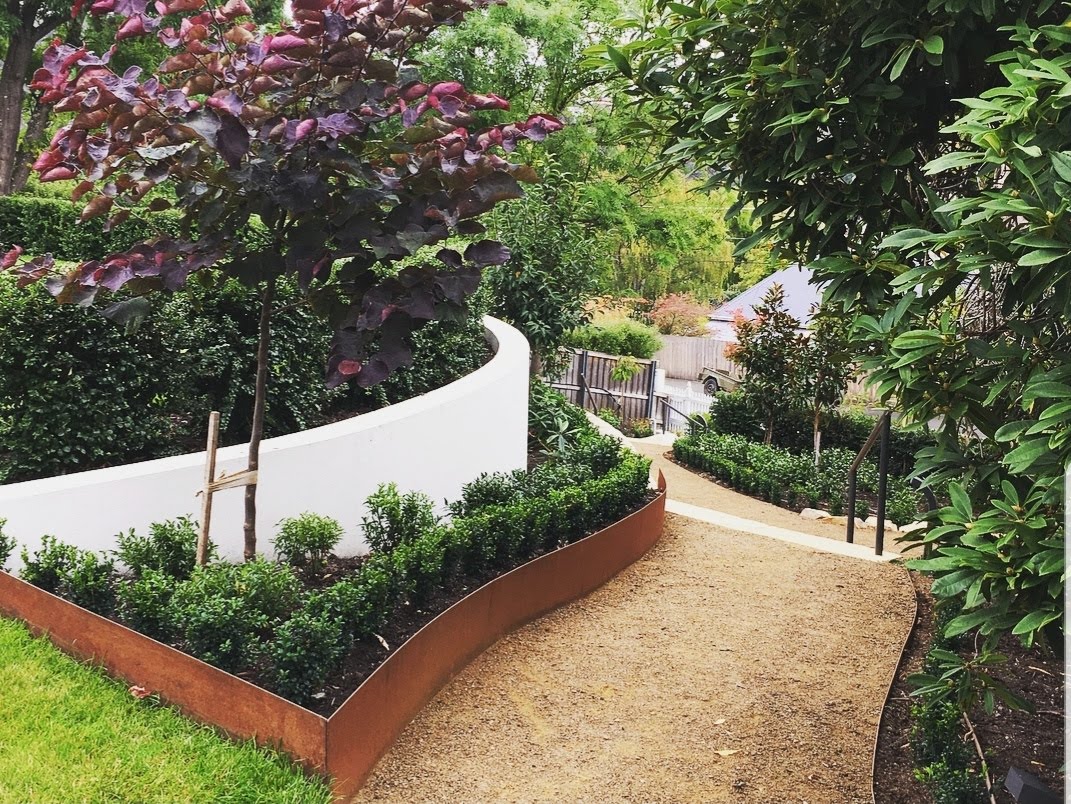
Installing a short concrete wall edge can provide a stylish yet classic look. This garden edging idea will require professionals for the installation rather than a weekend DIY project. This type of edging is best for those wanting a more permanent landscape design.Read More: 20 Fast-Growing Shrubs for Backyard Privacy
Raised garden beds have become increasingly popular for growing flowers, herbs, and vegetables. The contained design makes gardening accessible for all, while elevating plants to reduce bending. Edging is an important design element that completes raised beds, both functionally and aesthetically. This guide will examine the benefits of using edging, provide an overview of material options, and share creative ideas to inspire you in choosing edging for your unique raised bed garden.
Why Add Edging to Raised Beds?
Installing some form of border around raised garden beds provides several key advantages:
-
Contains soil and mulch – Edging keeps garden materials neatly within the bed perimeter and prevents erosion This is especially helpful on sloped sites
-
Finishes bed edges – The clean, defined edge lends a polished “finished” look. Edging transforms an informal pile of soil into an intentional garden feature.
-
Protects plants – Beds raised up above ground level are safer for plants with edging that buffers from foot traffic and lawn mowers.
-
Simplifies maintenance – Edging reduces the need to trim grass and weeds between beds. It provides a straight edge to guide the hose when watering.
-
Adds decoration – From simple to ornate, edging introduces color, texture, and creativity. It enhances overall garden design.
In short, edging takes raised garden beds from good to great with both form and function!
Popular Material Options for Raised Bed Edges
There are numerous edging solutions suitable for raised beds, each with their own pros, cons, and installation considerations:
-
Landscape Timbers – These wooden beams slot neatly together. Very rugged and natural looking. Requires periodic sealing.
-
Plastic Lumber – Affordable, easy to install. Withstands weather but can appear flimsy. Various colors.
-
Steel – Very durable aluminium and steel versions. Can have industrial vibe. Avoid sharp top edge.
-
Stone – Provides timeless, natural style. Needs good base for stability. Granite and fieldstone are common choices.
-
Brick – Classic modular option. Install tightly without gaps. Concrete brick lasts longer than clay.
-
Bamboo – Versatile green material adds a breezy, informal feel. Hardier varieties recommended.
-
Recycled plastic – Quick to install, reusable eco-friendly versions available. Less sturdy than permanent edging.
-
Concrete – Shapes include curves and angled corners. Allows smooth height transitions.
Consider longevity, appearance, installation difficulty, and budget when weighing the options for your unique space and style.
Key Considerations for Choosing Edging
Assess the following variables to select optimal edging for your raised beds:
-
Durability – How long will it last before needing replacement?
-
Height – Size appropriately for soil level. A few inches above soil line is ideal.
-
Appearance – Match edging style to your garden’s overall look and feel.
-
Lawn mower access – Will edging interfere with mowing? Protective trim might be required.
-
Install method – Choose edging you can easily DIY or will need professional help.
-
Maintenance – Some materials need periodic sealing, sanding, or repainting.
-
Budget – Weigh cost of materials plus labor if hiring installation.
-
Plant protection – Avoid thin, sharp edges. Opt for soft, rounded styles.
Carefully considering these factors will lead you to the perfect edging choices for your unique space.
Creative Edging Ideas to Inspire Your Design
Beyond the basic border, some creative edging possibilities can add flair:
-
Accent the corners with pavers, rocks, or metal flowers for a decorative touch.
-
Alternate wood plank sections painted in contrasting colors for bold definition.
-
Mimic a parterre garden with dense brick or stone dividing grid lines.
-
Use materials asymmetrically – steel in front, stone on sides.
-
Outline beds with different heights, textures, or leave intermittent gaps.
-
Train vines along wire or trellised edging for softening.
-
Illuminate edges with solar lights or uplights for drama.
Think about how edging choices can enhance views, create focal points, and highlight the best features of your garden.
Installation Tips for Edging Longevity
Proper installation ensures edging remains securely and neatly in place:
-
Dig trenches deep enough for materials to be stable, with several inches buried.
-
Build up a gravel base if needed, especially when using brick or stone.
-
Check edges frequently for level placement, adjusting as you build courses.
-
Secure pieces together tightly without gaps using provided connectors, stakes, or adhesive.
-
Use corner pieces rather than mitering for seamless angles.
-
Backfill soil over edging lip once in place. Pack firmly.
Taking time to correctly install edging leads to a polished look that will last for years to come.
Maintaining and Enhancing Edging Over Time
With regular care, edging can remain looking fresh and new:
-
Reseal wood edging annually to avoid rotting and extend life.
-
Pull weeds regularly to limit root damage, especially between pavers.
-
Refill soil erosion and fix tilting pieces for stability.
-
Reshape plastic edging with heat gun if warping occurs.
-
Replace cracked mortar between brick or stones promptly.
-
Touch up paint colors on wood or metal edging when needed.
Enhancing plain edging over time also boosts garden design:
-
Add decorative stones, sea glass, marbles or sculptures along top edge.
-
Accent the corners with colorful annuals spilling over.
-
Attach trellises to wood planks for climbing vines.
-
Alternate paver materials – flagstone, brick, concrete – for texture.
-
Incorporate driftwood, branches, or rustic antiques along edges.
With the right maintenance and creative embellishments, edging for raised beds can improve over time rather than deteriorate.
Key Takeaways
Edging is an essential design element that lends raised garden beds a polished, professional look while neatly containing soil, mulch and plant materials. Assess factors like cost, appearance, and installation method when selecting from the diverse edging options for your unique space. Taking steps to properly install and care for edging will keep your raised beds looking their best for many years of gardening enjoyment.
Grass and Shrub Edging
Create a living border with your grasses and flowering bushes for a lively edge. Play with leaf and grass blade hues for beauty year-round and mix and match bloom times for a more colorful display.Read More: 25 Best Flowering Shrubs to Make Your Landscape SingAdvertisement – Continue Reading Below
Building a brick wall for edging adds height and depth to the space and keeps your plants contained. Figure out how tall you want the brick wall and how long to determine how many bricks youll need.Read More: Dress Up Your Outdoor Spaces with These Container Garden Ideas
Scalloped terra-cotta edging is ideal for creating a pathway, or defining a flowerbed or garden bed. This option is straightforward to install–just make sure to measure how much you need before purchasing.Read More: 30 Best Perennial Plants for Year After Year of BeautyAdvertisement – Continue Reading Below
If you want a more natural look, grow your favorite plants and bushes as a mixed planting border. Experiment with height and style and different-colored leaves for vibrant and lively edging.Read More: Got a Shady Spot? Fill It with One of These Shade-Loving Plants

Plastic isn’t glamorous, but it is inexpensive and lasts for many years. It comes in long rolls and requires you to dig a trench in which to sink the edge. ( .)
The rolls can be unwieldy to handle, so enlist a helper for easier installation.
Read More: How to Grow and Care for Your Polka Dot PlantAdvertisement – Continue Reading Below

If you want to keep your project costs lean, try using gravel to create edging in your garden.
Settle on the area you want to install edging. Next, dig a trench thats at least four inches deep. Line the trench with a weed prevention barrier; fixing it in place with peg. Fill the trench with gravel and then rake to evenly distribute. Read More: 20 Best Flowering Shrubs for Every Garden

This eco-friendly garden edging idea is a great option for recycling glass bottles.
Simply create the border by inserting bottles upside down in the soil. Keep it simple or play with designs in the soil to create a unique pattern to suit your personal tastes.
Read More: 11 Ways to Use Wine Bottles In Your GardenAdvertisement – Continue Reading Below

If you have a pretty tree in the yard that needs pop of color, consider adding a raised-garden bed. Installing a garden bed with an array of colorful flowers and edging around the tree will give the area an instant upgrade!
This involves a lot of work so you may want to contact a landscaper to help plan and execute this project. Read More: 13 Best Privacy Trees for Your Backyard

A few companies now make recycled rubber edging, such as this .
Its secured with pegs you simply tap into place. It’s nearly indestructible and is designed so that mowers can get right up to it, eliminating the need for the dreaded trimmer. Read More: Our Favorite Lawn MowersAdvertisement – Continue Reading Below

This method of garden edging can be labor intensive to install. For a successful installation each section of will need to be straight so site prep is very important.
If you want a more curved edge, youll need to source individual pillars, and it will take even longer to install. Use a mallet to secure each pillar or section in place.
Read More: 11 Types of Dogwood Trees and Shrubs for Any Yard
Stone and Gravel Edging

Stone and gravel edging is a clever combination of natural materials and can be created with or without a roll of plastic edging. Much like installing gravel edging, this method requires digging a trench (about four inches deep) around the desired area. You can opt to insert plastic edging cut to the length of the space. Next, fill the trench with gravel and spread by hand or with a rake to evenly distribute the mixture. Complete the project by adding large stones across the gravel. Read More: 25 Full-Sun Perennials for Your GardenAdvertisement – Continue Reading Below
Lumber Dealers Don’t Want You To Know About This SECRET WOOD For RAISED BED GARDENING
FAQ
What is the cheapest way to edge a garden bed?
Plastic or rubber edging materials are the cheapest ways to edge your garden.
What should I line the sides of my raised garden bed with?
“You can line your raised bed to make it more durable and to prevent toxics from leaching into the soil. For lining, use landscape fabric found at gardensupply stores or cloth fabric from clothing. Avoid non-porous plastic, as it can retain too much water and discourage beneficial insects and worms.”
What do professional landscapers use for edging?
Concrete Edging – Concrete is a terrific choice when it comes to landscape edging as it offers unmatched durability and versatility.Mar 23, 2023
Are raised beds better than edging?
Edging is a lower-cost solution to containing your garden beds than raised beds. Repurposing and upcycling are usually my first choice for most projects around the yard for multiple reasons. This make-do-with-what-we-have (or can find) approach avoids buying new, which both conserves resources and saves money.
Why do I need edging in my garden?
To save on space. Because without containing the garden soil, especially with thick layers of organic materials, the beds tend to sprawl and taper down to the garden path. To raise the bed for easier weeding and harvesting. Edging is a happy medium between no edging and a fully raised bed.
What is garden bed edging?
Garden bed edging is the process of creating a distinct boundary between your lawn and garden areas using the earth itself or other materials. Proper edging prevents grass and weeds from invading your garden and keeps healthy mulch and soil inside the bed. This type of landscaping also keeps your yard neater by making a clear mow line.
What are the best garden edging ideas?
From traditional materials like brick and stone to more modern options like metal and plastic, in this guide, we take you through garden edging ideas that will enhance the overall look of your garden. The edging roll is one of the easiest ways to add edging to your garden.
How do you edging a garden bed?
Horizontal Log Garden Bed Edging One of the easiest ways to create a separation between a ground level bed and a path, patio or other garden zone is simply to lay natural logs horizontally around the edges of the site. Of course, you could also stack horizontal logs to create raised bed edging to a suitable height.
Do you need to edge a garden bed?
However, it may require more maintenance over time to prevent rot or insect damage. To edge your garden bed, you’ll need the following: If your garden bed has existing edging, such as plastic, pull it out of your garden bed and dispose of it properly. You can also reuse your edging if it is still in good condition.