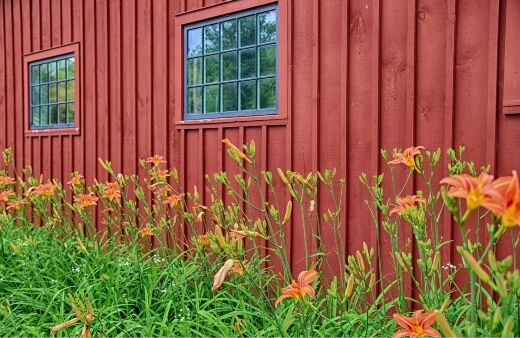
Daylilies are one of the most popular garden perennials. Their easy care and beautiful flowers make them useful in most gardens. Thousands of varieties are available and new varieties are released every year. The scientific name for daylily is Hemerocallis, which means “beautiful for a day” in Greek. The name accurately describes the one-day bloom period of individual flowers. Learn more about growing daylilies in your garden from questions answered by horticulturalists with Iowa State University Extension and Outreach.
Daylilies are one of the most beloved flowers for gardens, known for their rainbow of colors and ability to thrive with minimal care. Their cheery blooms and grassy foliage brighten up any sunny spot. An added bonus is that they are very easy to propagate so you can make more plants for free!
Why propagate daylilies?
There are several great reasons to propagate your own daylily plants
-
Get more plants for free – Buying lots of new daylily plants can get expensive, but propagating lets you increase your number of plants without spending money.
-
Make duplicates of your favorites – Found a variety you love? Propagating ensures you can make more just like it.
-
Control spreading – Some types spread aggressively. Propagating clumps helps keep them contained.
-
Share with friends – Daylilies make great gifts for fellow gardeners!
How daylilies grow
Understanding how daylilies grow helps inform how to propagate them. Here are some key points:
-
Daylilies are perennials that form dense clumps of grassy leaves
-
They bloom on tall stalks called scapes that each bear multiple flowers that last one day.
-
Large tuberous roots store food and water underground.
-
Mature clumps bloom less without division, so dividing every 3-4 years is needed.
Propagation methods for daylilies
There are three main ways to propagate daylilies:
1. Division
Dividing established clumps is the most common and reliable method.
-
Dig up entire clump and wash off soil to expose roots.
-
Gently pull apart into divisions with fans of leaves and plenty of roots.
-
Replant divisions right away spaced 2+ feet apart.
-
Dividing in early spring or late summer works well.
2. Seeds
Daylily seeds are an unpredictable but fun way to propagate.
-
Let spent blooms form seed pods, then collect seeds when pods crack open.
-
Store seeds in fridge 1 month to simulate winter chill.
-
Sow seeds in spring. Plants will grow but not match parent.
-
Wait 3+ years for seedlings to mature and flower.
3. Proliferations
Some daylilies produce tiny plantlets called proliferations on flower scapes that can be removed and replanted.
-
Allow proliferations to form leaves/roots while still attached.
-
Cut off both above and below proliferation and replant.
-
Dip in rooting hormone to encourage root growth.
How to divide daylily clumps
Dividing mature daylily clumps is the most reliable way to get new plants identical to the original. Follow these steps:
-
Dig up entire clump using a spade, keeping roots intact if possible.
-
Wash or brush soil off roots to expose them.
-
Gently shake clump and pull apart where it separates naturally.
-
Further divide pieces by sliding forks back-to-back into clump and gently prying apart.
-
Aim for divisions with 2-3 fans of leaves and plenty of thick roots.
-
Cut foliage down to 6 inches tall to reduce transplant stress.
-
Replant divisions right away spaced 2+ feet apart.
-
Water well and add mulch to help establish.
-
Dividing in early spring or late summer works best.
-
Spring divisions may not bloom much first year but recover well.
-
Fall divisions often bloom nicely the following season.
Growing daylily divisions
Caring properly for newly divided daylilies helps them recover and thrive:
-
Space plants 2+ feet apart to allow for future growth.
-
Plant crown 1 inch below soil surface.
-
Water deeply after planting and keep soil moist until established.
-
Add compost or fertilizer to planting holes to encourage root growth.
-
Use mulch to moderate soil moisture and temperature.
-
Remove faded flowers and water/fertilize established plants as needed.
Tips for success propagating daylilies
Follow these tips to successfully propagate more daylilies for your garden:
-
Divide big, mature clumps into smaller pieces with plenty of roots to recover well.
-
Replant divisions promptly so roots don’t dry out.
-
Allow proliferations to form their own roots before removing from parent plant.
-
Stratify seeds in fridge before planting for best germination.
-
Be patient with seeds – they take several years to mature and flower.
-
Give new plants ideal growing conditions with sun, space, water, and fertilizer.
-
Propagate your favorites but avoid aggressive spreaders like orange ditch lily.
The joy of propagating daylilies
Dividing daylily clumps, planting seeds, and potting up proliferations are all easy, rewarding ways to make more of these colorful perennials. In no time you’ll have an abundance to enhance your garden or share with other gardeners. Propagating your own daylilies means you can landscape with more of these carefree, economical plants that provide stunning color.
What types of daylilies can be grown?
There are over 100,000 registered cultivars of daylily, showing significant diversity. Their flowers, borne above grass-like leaves, range from 2 inches to over 12 inches in diameter on stalks (called scapes) 15 to 60 inches tall. Flowers vary in shape from trumpet to star to triangular and come in every color except true white and blue. Some have attractive eyes and throats, often with fragrance.
 While individual flowers last only one day, each scape has many blooms, and each plant produces many scapes, allowing for a succession of blooms over three to four weeks. While most bloom early to mid-summer, some cultivars start blooming as early as late May, and others start later but stay in bloom until frost. Reblooming cultivars bloom for 10 weeks or more. Proper variety selection will allow flowering from spring until frost.
Daylilies usually have 22 chromosomes and are referred to as diploid. Tetraploid cultivars have double the number of chromosomes. In most cases, the chromosome number is important only for those interested in plant breeding. However, many tetraploid cultivars have flowers that are larger and more intensely colored than diploid cultivars. Most varieties with ruffled or frilled petals and bold colors are tetraploid.
How do I care for daylilies?
Daylilies are low-maintenance, thriving in full sun or partial shade. Pastel varieties should be placed in partial shade to prevent bloom fading. They tolerate a wide-range of soil conditions but prefer well-drained soil rich in organic matter. Avoid excessive fertilizer to prevent abundant foliage growth at the expense of flowering. Clean up dead foliage in late fall, and remove damaged or yellow foliage and spent blooms and scapes throughout the season.
HOW TO DIVIDE DAYLILIES | A quick how-to on how and when to divide daylilies
FAQ
Can you propagate daylilies from cuttings?
Seeds resulting from evergreen parents can be, directly sown or, handled and stored the same as described above for seeds from dormant parents (Benzinger, 1968; Munson, 1989). Dividing the daylily clumps by pulling or cutting apart is the most common form of daylily propagation.
How to get a start from a daylily?
In the home garden, the easiest way to expand your daylilies is to dig up the plant and divide the root system into smaller plants. To introduce more variety into your collection, you can save seeds at the end of the summer and plant them in spring, although some varieties may take many years to bloom.