I have a confession to make. As someone who has worked in the horticulture industry for over 20 years with flower bulbs specifically for 13 years, there are some plants I haven’t grown. Shocking. Right? You would think I would have had the opportunity to grow a whole botanical garden worth of plants. Nope, the reality is throughout these twenty years I haven’t always had a yard of my own, or the light conditions needed to grow all the things I want.
While I have grown my fair share of bulbs, perennials, and annuals. The confession is I have never grown anemone or ranunculus bulbs. This spring I am changing that and will be planting ranunculus corms and anemone corms for the first time. I invite you to follow along with the first steps of planting ranunculus and anemone, we can learn together!
Ranunculus, with their ruffled, rose-like blooms in vibrant colors, are one of the most delightful flowers to add to any garden. However, growing these beauties from corms requires patience, as it can take 2-4 weeks for ranunculus to sprout after planting.
In this complete guide we will explore the ranunculus sprouting process, ideal timeline, and tips for success.
Understanding Ranunculus Corms
Ranunculus grow from corms, which are enlarged underground stems that store food for the plant. When you receive ranunculus corms in the mail, they will look shriveled and dry – essentially dormant.
Corms need to be “woken up” from dormancy through a process called pre-sprouting before they can be planted. This involves soaking the corms in cool water for a few hours then storing them in a moist medium like damp peat moss for 1-2 weeks. Small roots will begin to emerge when the corms are ready to plant.
Pre-sprouting is crucial for proper ranunculus germination. Skipping this step can delay sprouting for weeks or prevent it altogether.
When to Expect Sprouting
Once pre-sprouted corms are planted in prepared garden soil or containers, expect sprouting to occur in 2-4 weeks. The exact timeline depends on several factors:
-
Soil temperature – Ranunculus prefer cool soil around 60°F. Warmer temperatures above 65°F can inhibit sprouting.
-
Moisture – Keep soil consistently moist but not soaked. Too much water causes rotting.
-
Soil quality – Well-draining, loamy soil is ideal. Amend heavy clay soils.
-
Corm health – Damaged, soft, or shriveled corms may not sprout well. Purchase plump, firm corms.
-
Planting depth – Plant corm claws downward, 1-2 inches deep. Improper depth affects sprouting.
-
Variety – Some ranunculus varieties naturally sprout quicker than others.
When sprouting occurs in cooler weather, expect to wait 3-4 weeks. Warmer spring temperatures can accelerate sprouting down to 2-3 weeks in some cases. Be patient and avoid digging up planted corms.
Tips for Faster, More Reliable Sprouting
Follow these tips to encourage quick, vigorous ranunculus sprouting:
-
Pre-sprout corms – This step is absolutely vital for proper germination. Soak and store corms until roots emerge.
-
Choose plump, healthy corms – Select firm, undamaged corms without mold or rot.
-
Plant in nutrient-rich, well-draining soil – Heavy clay soils should be amended with compost or other organic matter.
-
Maintain even moisture – Water regularly to keep soil consistently moist, but not saturated.
-
Provide cool temperatures – Ideal sprouting temperature is 50-65°F. Avoid excessively warm soil.
-
Protect from pests – Slugs and snails can damage newly planted corms. Use deterrents if needed.
-
Be patient – Sprouting takes 2-4 weeks. Avoid digging up planted corms to check progress.
Troubleshooting Germination Issues
Sometimes ranunculus fail to sprout as expected. Common causes include:
-
Rotting – Excessive moisture leads to decay. Allow soil to partially dry between waterings.
-
Failed dormancy break – Corms may be too dry or weren’t pre-sprouted properly. Ensure corms are hydrated before planting.
-
Pest damage – Slugs, snails, and insects can eat new growth. Use baits or barriers if pests are an issue.
-
Incorrect planting depth – Corm depth should be 1-2 inches with claws facing down. Improper planting inhibits sprouting.
-
Poor drainage – Compacted or heavy clay soil prevents root growth. Amend soil to improve drainage before planting.
If sprouting still fails after 2-3 weeks beyond the expected timeline, the corms may be damaged or diseased. Consider purchasing fresh, healthy corms to start over.
Enjoying the Journey from Corm to Bloom
Watching the first tender ranunculus shoots emerge from the soil is an eagerly anticipated moment for gardeners. With proper care, those sprouts will unfurl into famously lush, ruffled blooms within 6-8 weeks after sprouting occurs. The sprouting stage is just the beginning of enjoying these exceptional beauties.
While the waiting period from corm to sprout can test one’s patience, the reward of vibrant ranunculus flowers is well worth it. Arm yourself with knowledge of their ideal growing conditions, follow reliable planting techniques, and you’ll be thrilled when the first sprouts appear.

How to Plant Ranunculus Bulbs in Spring
Ranunculus bulbs can be planted in the ground, but also grow well in containers. I have decided to plant the ranunculus in containers. Planting in containers allows more control of the environment which is important for these bulbs. If the goal is to have the ranunculus growing directly in the garden it is still advisable to start them in pots and transplant them into the garden.
For ranunculus bulbs to grow they have a specific temperature range they need to grow. In order for these bulbs to sprout they need to be planted when the daytime temperatures are in the 50s and 60s. The nighttime temperatures should be in the 40’s and 50s’.
Spring in Wisconsin and other cold to moderate climates is the best time to plant ranunculus bulbs. While there may be some days a bit warmer than 60 or a bit cooler than 40 at night, the average temperatures for the next 4-8 weeks meet the requirements. By planting the ranunculus in pots if the temperatures dip below freezing I will be able to protect the bulbs by moving the pots to a temporary warmer location.
The first step is to soak the ranunculus bulbs in room temperature water for 2-3 hours. However, I will admit we have an unintentional experiment that is about to occur.
The first two containers of ranunculus I planted a couple of days ago I did not pre-soak prior to planting. Therefore, some of the bulbs were soaked to help plump them up and add moisture, and others were dry when planted. I forgot that soaking ranunculus before planting was suggested. When I looked into planting instructions more I learned the importance of soaking the bulbs.
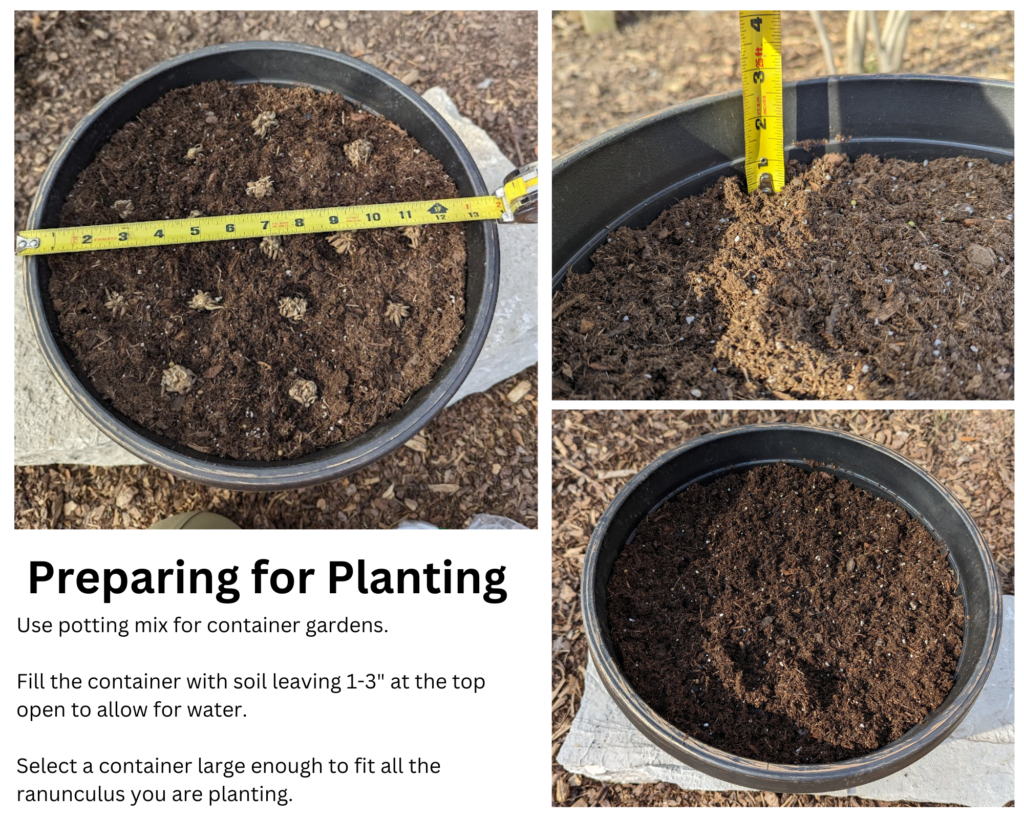
While the ranunculus are soaking get your containers ready. I used potting soil that was labeled for container gardens, as this soil tends to be light and fluffy with good drainage.
 The most important step to planting ranunculus is to have your dog inspect the bulbs for quality prior to planting! Just kidding he’s just a little nosy sometimes:)
Once the bulbs have soaked for 2-3 hours and your containers are ready, it’s time to plant. Plant ranunculus bulbs 1-2″ deep. The suggested spacing is 4-6″, however, I like my containers to be full therefore some bulbs were planted a bit closer.
I arranged the bulbs in a circular pattern prior to planting. Once they were set where I wanted them I gently pushed them into the soil so they were just below the surface. Then I added 1″ of additional potting soil over the bulbs.
Lightly water the bulbs after the initial planting so the soil is slightly damp. Until sprouts are visible adding additional water isn’t necessary and could lead to rotting. However, if rain does occur the soil and bulbs can get wet with no concern of complications. If a rainy pattern emerged monitor the pots to ensure the soil is not overly saturated. Move the pots to a place they won’t get rained on if a rainy pattern emerges and the soil begins to look overly saturated.
Now, it’s time to wait. Ranunculus will sprout in 4-6 weeks as long as the temperatures are in the range they need. The best thing to do during this time is to check the soil and the bulbs every couple of days. I already noticed some squirrels were digging in the pots, and therefore, I will need to protect the bulbs from critters.
Planting Ranunculus for the First Time
I was motivated to plant ranunculus this spring for a couple of reasons. The first is that Holland Bulb Farms has increased the variety and color choices offered. In addition to more color choices of ranunculus, they are offering the patented and world-famous Tecolote Ranunculus. If you aren’t familiar with Tecolote Ranunculus these types originate from growers in the Carlsbad fields in California. Tecolote Ranunculus produce large double flowers with sturdy stems. They are popular for cut flower arrangements and bouquets.
The second reason is that when it comes to gardening I enjoy a challenge. Most flower bulbs are very easy to grow. Some even prefer when you forget about them, especially in their dormant state. I am not saying ranunculus are difficult to grow. However, they do have more requirements for success than most bulbs. I wanted to experience for myself if they are tricky, or more likely just have a few more rules to follow for success.
How I Grow Ranunculus (+ Schedule of Planting Dates)! // Garden Answer
FAQ
Why are my ranunculus bulbs not sprouting?
If you do not see sprouting within 15 days, check the corm- if it feels too dry, re soak and start the process over.
How long until ranunculus bulbs sprout?
Ranunculus will sprout in 4-6 weeks as long as the temperatures are in the range they need. The best thing to do during this time is to check the soil and the bulbs every couple of days.
Why is it so hard to grow ranunculus?
Perhaps the most confusing part of growing ranunculus and anemones is knowing when to start them. Both ranunculus and anemones thrive under cool conditions. That’s why it’s best to grow these flowers during the earliest parts of spring when temperatures are still cool.
How long does it take for bulbs to sprout after planting?