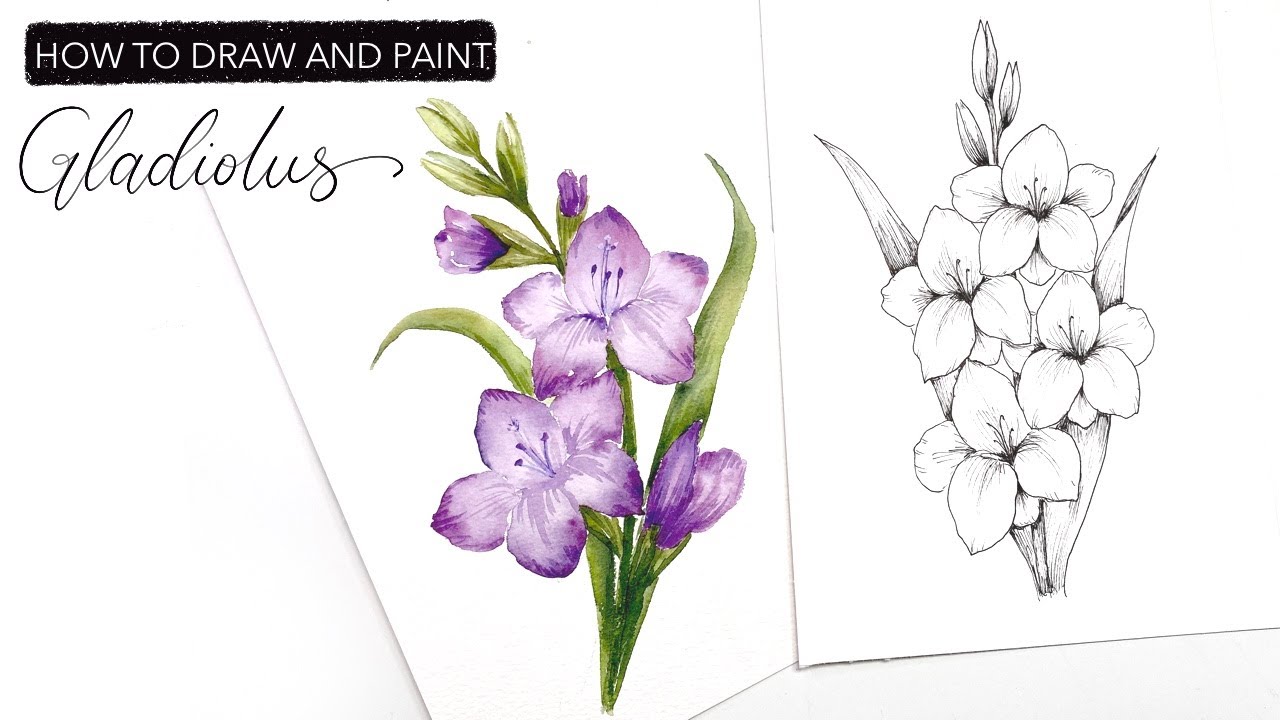
Welcome to this detailed tutorial on how to draw a gladiolus! As one of nature’s most elegant flowers, the gladiolus—often called sword lilies—boasts striking blooms that can elevate any artwork. Known for their tall spikes adorned with colorful petals, these flowers symbolize strength and moral integrity, making them beautiful and meaningful subjects for your sketches.
In this step-by-step guide, we will meticulously explore the process of creating a realistic depiction of a gladiolus, from its basic shapes to the intricate details that make it come alive on paper. No matter your skill level, whether you are just starting out or have some experience under your belt, our structured approach will help you refine your drawing skills and achieve stunning results.
So, gather your drawing supplies, find a comfortable spot, and let your creativity flow as we embark on this artistic journey together. Are you ready? Let’s dive into the world of gladiolus drawing!
Before we dive into the steps, let’s gather the materials you’ll need to complete this drawing:
How to Draw a Gladiolus Flower: A Step-by-Step Guide for Beginners
The gladiolus, with its dramatic spikes and vibrant blooms, makes a stunning subject for drawing. Though it may seem daunting to capture the complexity of this flower, having the right approach and techniques can make the process of drawing a gladiolus easy and enjoyable. In this comprehensive guide, we’ll walk through the steps to draw a gladiolus flower from start to finish.
Gather Your Drawing SuppliesBefore beginning your gladiolus drawing assemble the necessary art supplies
-
Drawing paper – Use quality paper with a smooth texture, such as Bristol board or mixed media paper This will allow for easier blending and shading.
-
Pencils – Have a range of pencils on hand, including 2H, HB, and 4B. The lighter pencils are good for initial sketching while the darker ones are ideal for shading and details.
-
Eraser – A kneaded or plastic eraser will allow you to erase mistakes and soften edges.
-
Blending stump – This tool helps smoothly blend pencil strokes for shadows and gradients.
-
Sharpener – Keep pencils sharp for crisp, precise lines.
-
Reference image – Have a photo of a gladiolus on hand to refer to. Studying the angles, shapes and details will make your drawing more accurate.
Sketch the Basic Shapes
To start, lightly sketch some basic shapes in pencil to lay down the foundation of the drawing:
-
Draw a slightly curved vertical line for the main stem. This line will serve as the anchor for the rest of the shapes.
-
Add oval and tube-like shapes fanning out from the stem to form the spikes. Consider the angles and direction of each one.
-
Draw a series of overlapping ovals within each spike to represent the individual florets. Stagger them to convey depth.
At this stage, the shapes should be simple and sparse. Don’t worry about detail yet. Focus on capturing the overall direction and proportions.
Refine the Flower Shapes
With the basic framework down, start refining the shapes to better resemble the parts of the gladiolus:
-
Shape the stem into a more natural cylindrical form using curved lines. Add a tapered tip at the bottom.
-
Adjust the spike shapes to have more irregular, organic edges versus geometric ovals.
-
Define the oval florets into more distinctive petal shapes. Consider the subtle indentations and asymmetry of real petals.
-
Use smooth, curved lines to transition between the shapes, erasing harsh corners or edges. The outlines should feel natural.
The goal here is to evolve the skeletal foundation into a more accurate representation of the flower while still keeping it simple. Details come later.
Start Adding Detail
Now we can begin transforming the simple gladiolus outline into a more realistic, detailed drawing:
-
On the stem, use short diagonal lines and cross-hatching to convey texture and form. Make it appear cylindrical.
-
Within each floret, add some linear details for the stamen and other interior parts. Keep these lines minimal for a soft effect.
-
Use subtle value changes to create the illusion of depth and roundness in the petals and leaves. Gradually build up tones moving from light to dark.
-
Pay attention to the edges of the petals, softening and lightening them to make the flower appear more three-dimensional.
-
Consider faint veins, speckles or other small elements that add realism and visual interest. Don’t overdo it.
Work slowly and deliberately when adding details. Step back occasionally to evaluate the overall effect.
Incorporate Leaves and Stems
To complete the drawing, integrate some realistic leaves into the composition:
-
Sketch long, slender leaves emerging from the base of the main stem. Capture their graceful, downward curving shape.
-
Use diagonal strokes and stippling to illustrate veining and texture on the leaves. Subtlety is key.
-
Shade the leaves to match the values of the flower, creating cohesion. Deeper tones at the edges make them stand out.
-
Draw more stems branching off the main one for a natural look. Vary the thickness and angles.
-
Add small leaves sprouting from the new stems, staggering placement and size. This creates balance.
The leaves help anchor the gladiolus and allow you to demonstrate your shading technique further. Take your time with this step.
Finish and Assess Your Drawing
With the main elements in place, put on the finishing touches:
-
Soften outlines by gently blending with a stump or tissue. Faint, blurred edges enhance realism.
-
Lift out highlights on petals and leaves with a kneaded eraser to make them pop.
-
Intensify shadows for greater drama and contrast. Use heavier pressure with your 4B pencil.
-
Eliminate any smudges or stray marks with a clean eraser. Finesse minor details that need refinement.
Now stand back from your drawing and evaluate it as objectively as possible. Make any final adjustments to create the composition, values and details you envisioned.
The Importance of Practice and Patience
Learning how to draw realistic flowers like the gladiolus takes time and practice. Have patience with yourself as you build skill through continuous drawing. Study botanical illustrations to understand techniques. With diligence, you’ll make steady progress toward rendering vibrant, lifelike gladiolus flowers.
Key Takeaways:
-
Use basic shapes to establish the initial framework. Build up detail gradually.
-
Pay close attention to the intricacies of the flower’s form and features. Strive for accuracy.
-
Work slowly and carefully when adding tone and texture. Subtlety is key.
-
The leaves and stems are integral parts. Don’t overlook them.
-
Evaluating your drawing objectively allows you to refine it further.
Drawing the elegant gladiolus combines science and art. Follow this comprehensive guide, hone your observation skills, and you’ll be able to capture the beauty of this flower in your artwork with confidence. Let your creativity bloom!
Step 3: Detail the Petals
Next, it’s time to add detail to the petals. Start by adding ridges to each petal. These ridges should follow the curve of the petal and give it a three-dimensional appearance. Continue adding these ridges to each petal, paying attention to the varying lengths and shapes.
Step 1: Sketch the Basic Shape
Start by lightly sketching the basic shape of the gladiolus. Begin with a straight vertical line for the stem and then draw a slightly curved line for the lower part of the flower’s central spike. Add a slightly curved line at the top for the tip of the spike. Don’t worry about perfection at this stage; we will refine the shape later.
Draw Gladiolus Like a Pro! STUNNING Gladiolus Flower Step-by-Step Drawing Techniques!
FAQ
What does gladiolus symbolize?

Gladiolus flowers generally symbolize strength of character, faithfulness, and remembrance. They also represent infatuation and are associated with gladiators, thus embodying courage and honor.
How long do gladiolus take to bloom from bulbs?
Gladiolus typically bloom 70-100 days after planting the bulbs (corms). This timeframe can vary slightly depending on the specific variety and growing conditions, according to bulb retailers.
What do gladiolus flowers look like?
Pale-yellow to golden-orange flowers (up to 12 cm diameter, Oct-Dec) are followed by seed capsules (5 x 2 cm) containing many brown, flattened, 3-sided to disc-like seeds. Are there any similar species? Many Gladiolus and related species are similar, and there are four other exotic Iris species that appear in the wild.
How to draw a Gladiolus flower?
With a few simple steps, you can easily draw a realistic gladiolus flower. To start drawing the gladiolus flower, you will need a pencil, a piece of paper, and eraser. Start by lightly sketching the flower’s basic shape. Draw a large oval for the center of the flower and then draw the petals around it, making sure to overlap the edges.
How do you color a Gladiolus?
Choose a color palette that brings out the characteristic shades in a gladiolus and gives it depth. You can use colored pencils, markers, or watercolors. Gladiolus petals are usually two contrasting colors, one dominant, and the other more muted. Shade the flower randomly, making sure to keep some of the petals dark and some light.