Learn how to draw a great looking Venus Flytrap with easy drawing instructions and video tutorial.
By following the simple steps, you too can easily draw a perfect Venus Flytrap. [mbr_is_for tags=CUSTOMER – EDG Member – Active]
The Venus Flytrap is one of the coolest and most unique plants in the world. This carnivorous plant actually moves to trap insects in its jaw-like leaves! While Flytraps may look intimidating, they are very easy to draw with just a bit of practice. In this simple, step-by-step drawing tutorial, I’ll show you exactly how to sketch a great looking Venus Flytrap plant.
Supplies You’ll Need
Before we begin the drawing lesson you’ll need to gather a few basic supplies
- Paper – Any type of paper will do. Plain white printer paper works great.
- Pencil – The standard #2 pencil is perfect. Bring a sharpener too!
- Eraser – An eraser is handy for tidying up little mistakes.
- Coloring supplies (optional) – You can color your Flytrap with crayons, colored pencils, markers etc. This step is optional though.
That’s it – we’re ready to start drawing!
Step 1: Draw the Flower Pot
We’ll begin by drawing a simple pot or vase for the Flytrap to sit in. Drawing the pot first gives us a foundation to build upon.
To draw the pot:
- Draw a narrow horizontal oval shape near the bottom of the page.
- Add a curved line above and below the oval. These will be the top and bottom of the pot.
- Connect the ends of the curved lines with two short vertical lines.
- Extend two straight lines from the bottom of the pot down to form the base.
- Finish the base with one more curved line at the bottom connecting the two verticals.
Step 2: Draw the Plant’s Stem
Now we can start on the actual plant. First is the stem:
- Draw two curved lines extending upward from the pot’s opening. Have the lines meet at a point to finish the stem shape.
Be sure to erase any overlapping lines
Step 3: Draw the Mouth/Trap
The iconic part of the Venus Flytrap is its jaw-like trap. Let’s tackle that next:
- Draw a sideways heart shape at the end of the stem. This will become the “mouth” of the plant.
- Add a curved line across each side of the heart shape. Have the lines meet at a point in the middle.
- Connect the points with a gentle curved line down the center. This is the “hinge” of the mouth.
Step 4: Add the Teeth
No carnivorous plant is complete without teeth inside its trap! Here’s how to add teeth to your Flytrap drawing:
- Draw 4-5 pairs of curved lines extending from the edges of the sideways heart shape.
- Have each set of lines meet at a sharp point – these will be the teeth.
- Fill the remaining lobe of the trap with another 4-5 sets of sharp teeth.
Step 5: Draw the Leaves
Let’s surround our hungry Flytrap with some nice big leaves:
- At the base of the plant, draw pairs of curved lines that meet at points. Add leaves in different sizes and shapes.
- Draw leaves extending off the plant’s stem using the same technique.
- For a drooping effect, add a curved triangle shape at the end of some leaves.
Don’t forget to include the central leaf veins too!
Step 6: Add a Bug for the Trap (Optional)
As a final detail, you can draw a hapless bug about to become lunch for your Venus Flytrap! Here are some tips:
- Draw an oval for the body and partial ovals for the head, eyes and wings.
- Add curved lines to detail the wings and legs.
- Position the bug near the mouth, seemingly about to fly right in!
- Inside the mouth, draw a spiral shape to show the trap slamming shut.
Feel free to get creative and design your own bug. Just make sure it ends up as plant food!
Step 7: Color Your Venus Flytrap (Optional)
Once your drawing is complete, go ahead and add color if desired. Here are some coloring suggestions:
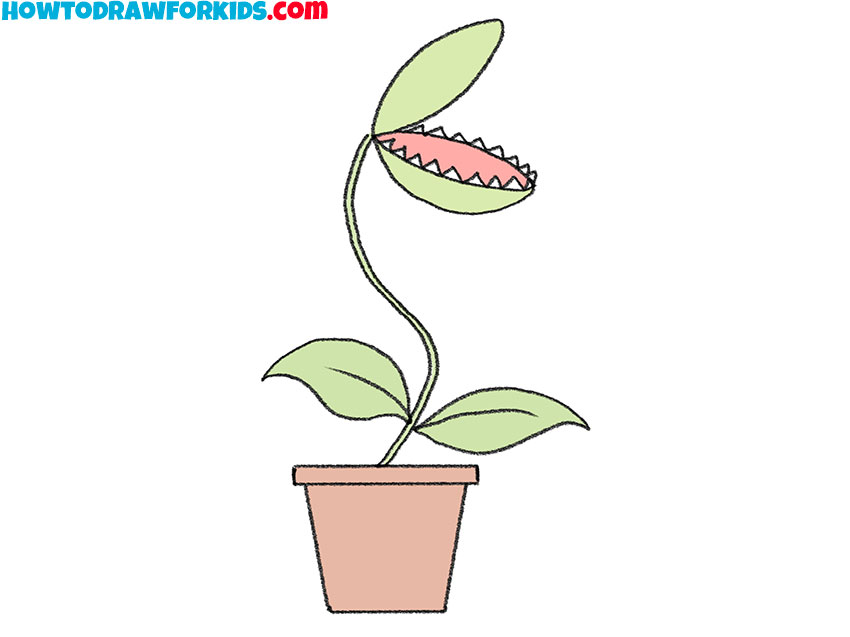
- The plant itself is usually bright green. Use lighter greens for highlights.
- The inside of the trap/mouth can be red or pink. This helps lure in insects!
- The pot can be tan, brown, rust or any earthy tone.
- For the bug, use any colors – bright yellows, oranges and blues look fun.
Get creative with patterns, shading and textures too. The coloring step brings your Venus Flytrap to life!
And that’s it – you have successfully drawn a carnivorous Venus Flytrap plant! Follow the simple steps in this guide and you’ll be able to create your own Flytraps. Add as many details and creative touches as you’d like.
Tips for Drawing Amazing Venus Flytraps
Here are a few quick tips to take your Flytrap drawings to the next level:
- Practice the basic shapes first – ovals, triangles, curves etc.
- Use smooth, consistent lines. Avoid sketchy shaky lines.
- Look at photo references of actual Flytraps for inspiration.
- Play with perspective – draw giant monster Flytraps in the foreground!
- Tell a story with your scene. Add a habitat and other plants/critters.
Drawing should be fun and relaxing. Don’t worry about making perfect art – just enjoy the creative process. With a bit of practice, you’ll be amazed at the awesome Venus Flytraps you can create.
Good luck and happy drawing! Let your imagination run wild.
Add More Details to Your Venus Flytrap Picture – Step 8

8. Draw a flying insect about to become this plants next meal. Draw an oval for the eye, and partial oval shapes for the remaining eye and the head. Then, extend curved lines and double them back upon themselves to outline the wings. Enclose another partial oval to form the body, with short curved lines indicating the legs.
Unlock AD FREE and PRINTABLE drawing and coloring tutorials
- 1,900+ drawing & coloring PDFs
- 50+ ebooks
- Ad-free website

3. Erase overlapping lines from the stem. Use curved lines to draw a sideways heart shape. This is the mouth or trap of the plant. The trap isnt actually a flower, but two hinged lobes located at the end of each leaf.

4. Draw a curved line across each lobe of the plant, meeting at a gentle point near the point of the heart. Then, draw a curved line between the lobes. This is called the midrib or hinge. [mbr_is_for tags=CUSTOMER – EDG Member – Active] [ELSE_is_for] [/mbr_is_for]

5. Draw pairs of curved lines extending from the edge of the lobe. Allow the lines to meet at points, forming narrow triangular shapes. These are the plants “teeth.”

6. Draw pairs of curved lines that meet at points along the edge of the remaining lobe.

7. Draw the plants leaves. Extend pairs of curved lines from the base of the plant and from its stem. Allow each pair to meet at a point, outlining the leaf. Draw a curved line down its center to indicate the central leaf vein. Give some of the leaves a drooping appearance by drawing a curved triangle at the tip, and extend the vein.
EASY How to Draw VENUS FLYTRAP
FAQ
What happens if you feed a Venus flytrap a dead fly?
Dead insects are okay. As long as it’s not growing weird things like mold. It should be smaller than 3 quarters of your plant’s trap, or if it goes in, the trap may die, but if the plant is healthy, it won’t affect the rest of the plant.
How to properly plant a Venus flytrap?
Mature Venus Flytraps prefer a deeper pot of 4-6” (10-15cm) because of their long root(s). It does best when the soil is evenly moist, but not soaking wet. It can tolerate very wet, even submerged conditions, for weeks at a time. Let the soil become drier; yet remain somewhat moist, during winter dormancy.
How do you draw a Venus flytrap plant?
Many Venus flytrap plants have between 4-7 traps emerging from a central rosette. Start by drawing the pot or soil at the base, then sketch circles or ovals for each trap. Connect the traps together into one plant with slightly curved or zig-zagging lines. At this stage, focus on capturing the overall formation rather than details.
How do you add detail to a Venus flytrap?
To add detail to the Venus Flytrap’s traps, follow these steps: Start by sketching the basic shape of the traps, ensuring they are in proportion to each other and the rest of the plant. For Step 2: Adding Detail to the Venus Flytrap’s Traps, use short, curved lines to add the teeth along the edges of each trap.
How do you capture a Venus flytrap?
The underside of the plant and the soil at the base should be shaded darker as well. A key part of capturing a Venus flytrap is rendering the interior of the open traps accurately. Inside each open leaf is a reddish coloration near the “hinge” and small sensitive trigger hairs. Sketch these details lightly inside the open traps.
How do you grow a Venus flytrap?
Venus flytrap thrives in poor, acidic soil that stays damp but still has good drainage. Avoid using regular potting soil, some of which may have added fertilizers. A blend of one-third perlite (or sand) and two-thirds sphagnum peat moss provides the best drainage and moisture retention. Keep the soil constantly moist. How to plant a Venus flytrap?
How do you add texture and veins to a Venus flytrap?
When adding texture and veins to the Venus Flytrap, follow these steps: Start by lightly sketching the texture lines on the inner surface of each trap using a sharp pencil. To create a realistic look, vary the thickness and spacing of the texture lines. Pay attention to the natural patterns found on real Venus Flytraps.
How do you paint a Venus Fly Trap?
Cross-hatching: Cross-hatching is a technique of drawing intersecting lines to create shading or texture. It’s a great way to add detail to the Venus Fly Trap’s leaves and spikes. Highlighting: Use a white colored pencil or eraser to add highlights to the Venus Fly Trap. This will create the illusion of shiny, reflective surfaces.