It’s true, the skin color is tempting, though deceptive, because skin color often turns the color of maturity 4+ weeks before maturity is reached— though honeynut, with her built-in ripeness indicator below, is a fabulous exception! She is finally ripe once all the green has turned a deep pumpkin-y caramel color.
Most winter squash skins turn the color of edible maturity well before they are ripe, though honeynut is a marvelous exception, only fully ripe when all green streaks have disappeared.
Honeynut squash is a delicious winter squash valued for its sweet nutty flavor and petite single-serving size. With proper harvesting and post-harvest handling, these squash can be enjoyed for months after the growing season ends. This guide will walk you through identifying ripeness, harvesting techniques, curing, and storage methods to get the most out of your homegrown honeynut squash crop.
Knowing When Honeynut Squash is Ripe for Harvesting
Timing is critical when harvesting winter squash. Pick too early and the squash won’t be fully sweet, nutty, or flavorful. Pick too late and you risk the squash rotting on the vine. So how do you know when honeynut squash are at their peak for harvesting? Here are the telltale signs of ripeness to look for:
Stem Condition
Keep an eye on the squash stem where it attaches to the fruit. The squash will be ready for harvest when the stem appears dry and papery A bright green, flexible stem means the squash needs more time on the vine to fully mature
Rind Color
Check the color of the squash rind. Honeynut skin changes from green to tan or orange when ripe. Rinds still showing green patches need more time to finish maturing. The skin should look uniformly tan/orange when squash is ready for picking.
Days to Maturity
Days to maturity can give you a target timeframe for when to start checking squash for ripeness cues. Honeynut squash typically reach maturity around 100-110 days after flowering begins. Mark your calendar and monitor based on estimated days to maturity.
Once stems are dry, skins deep orange, and maturity targets are reached, your honeynut squash are ready for harvest.
Harvesting Techniques for Honeynut Squash
When signs point to ripe squash, use these tips for safe, effective harvesting:
Use Sharp Bypass Pruners
Cut squash from vines using sharp, clean bypass pruning shears or scissors. This gives a clean break versus tearing. Never twist or pull squash off vines.
Leave Stem Intact
Leave a 1-2 inch stem portion attached when harvesting squash. The stem protects from bacteria and fungi entering through the cut vine site.
Handle Gently
Be gentle when handling freshly picked squash to avoid bruises, scrapes and punctures. Any damage can lead to decay, shortening storage time.
Harvest in Dry Weather
Avoid harvesting just after heavy rains or when vines are very wet; damp conditions encourage disease spread.
Follow these simple guidelines – use sharp pruners, retain stems, handle gently, harvest when dry – and you’ll gather unblemished squash ready for curing and storage.
Curing Honeynut Squash After Harvesting
Curing is vital for honeynut squash to develop their signature sweet, nutty flavor and maximize storage life. Here are tips for post-harvest curing:
Cure in a Warm, Dry Area
Cure freshly harvested honeynut squash in a warm (75-85°F), dry spot out of direct sunlight. The warmth helps harden off the skins while dryness prevents rot.
Cure for 1-2 Weeks
Leave harvested squash to cure for 1-2 weeks. The longer cure time results in better flavor and storability. Check periodically and remove any squash showing signs of decay.
Allow Good Air Circulation
During curing, do not pile up squash. This traps moisture and encourages rot. Spread out squash in a single layer with space between each fruit to promote air flow.
Periodically Turn Squash
Gently turn squash every 3-4 days as they cure. This allows all sides to cure evenly. Watch for soft spots or damage when handling cured squash.
Follow these curing guidelines and your honeynut squash will transform into sweet, nutty squash perfect for enjoying all winter long.
Storing Cured Honeynut Squash
After curing, honeynut squash can be stored for use well into winter. Here are storage tips:
-
Store cured squash somewhere cool (50-60°F) and dark with low humidity. A basement or refrigerator works well.
-
Inspect stored squash every 2-3 weeks. Remove any with wrinkling, mold or soft spots developing.
-
Allow space between squash when storing. Do not stack or pile squash together.
-
Avoid storing near ethylene-producing fruits like apples that can prematurely ripen squash.
-
Try layering squash in straw or newspaper to cushion and insulate, extending shelf life.
Follow proper harvesting, curing and storage methods and your honeynut squash will deliver heaps of sweet flavor all winter, ready for soups, baked dishes, desserts and more. With the right care, you can enjoy garden-fresh honeynut flavor for months post-harvest!
Frequently Asked Questions About Honeynut Squash Harvest & Storage
How long does honeynut squash last after harvesting?
With proper curing and favorable storage conditions, honeynut squash typically last 2-6 months in storage depending on size. Larger fruit may last up to 6 months; smaller squash 2-3 months.
Can you harvest honeynut squash early?
It’s best to leave honeynut squash on vines until fully mature. Early harvested squash will be lower in sugars, less flavorful, and won’t store nearly as well as ripe squash. Patience leads to the best results.
What are signs honeynut squash are ready to harvest?
The best indicators of ripeness for honeynut squash are:
- Dry, shriveled stem
- Deep orange rind with no green patches
- Reaching estimated days to maturity (100-110 days)
Is curing required for stored honeynut squash?
Yes, curing is vital for honeynut squash to reach full sweet flavor and gain longest storage life. Curing helps dry and harden the rind, sealing in flavor. Squash not cured won’t store nearly as long.
What causes rot in stored honeynut squash?
Rot in stored honeynut squash is caused by rind damage or overly damp conditions. Prevent rot by never storing damaged squash, maintaining ideal storage conditions, and proper curing to fortify rind defenses against decay organisms.
Enjoy Sweet, Nutty Honeynut Squash All Winter
With the right harvest timing, diligent curing, and favorable storage conditions, you can enjoy homegrown honeynut squash for months after summer ends. Follow the tips above for identifying ripeness, careful harvesting, thorough curing, and proper storage and you’ll be rewarded with nutritious, sweet honeynut flavor throughout winter. A little patience and care allows you to enjoy garden-fresh flavor in every season!

When to Harvest Winter Squash
Winter squash require ~60 days from pollinated flower to ripe, mature fruit, so here in Zone 5, waiting til mid-September is just a safe bet at the earliest.
We wait as long as possible before frost because, even with powdery mildew often drenching the plants (as below), if there is any green in the leaves & stems that means sugars are being photosynthesized & sent into each fruit.
(Briefly, the best way to prevent powdery mildew is to sow seeds naturally resistant to it, like Cornell’s Bush Delicata, Honeynut and Gouda (a delectable refinement of Long Island Cheese pumpkin!), all the gifts of Cornell’s public plant breeders.)
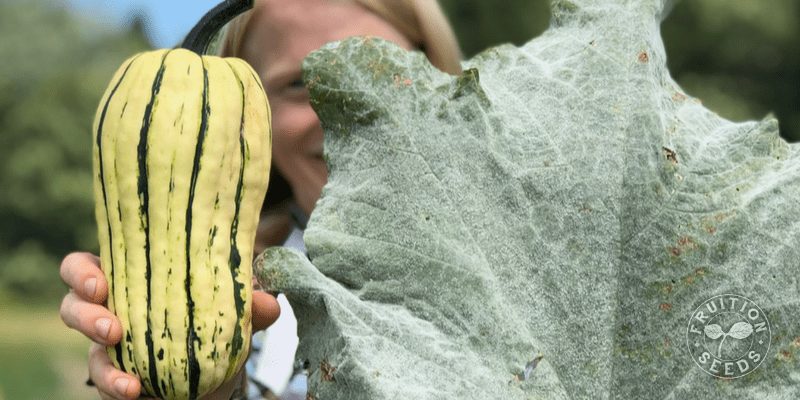
If there is any green in the leaves, even if they’re covered in powdery mildew, keep the fruit on the vine: incredibly, they’ll continue to ripen, deepening in flavor & in storage capacity.
Once your plants are quite thoroughly dead and/or it’s about to frost, we harvest each fruit by snipping each stem 1″ from the fruit, handling them carefully, as if they were marvelously large easter eggs, which I suppose they are!
Harvest all winter squash with snips rather than pulling them from the vine, leaving 1″ of the stem & handling them as delicate eggs. This is Brulee, by the way!
If you’re not able to harvest them before frost, throw old sheets or floating row cover over your fruit to prevent frost from forming on their skin. Frost damages winter squash skin, preventing it from curing which prevents it from storing. Frosted squash is still delicious, just be sure to enjoy it as soon as possible, ideally within one month of frost, with plenty of garlic (if you’re anything like us!). This is true if the stem happens to snap off your fruit or if the skin is punctured even a little, as well.