Topiary balls are a charming way to add greenery and style to your home or garden These sculpted spheres made of boxwood, juniper, ivy or other plants can be an elegant decoration indoors or out While you can purchase ready-made topiary balls, making your own allows you to customize sizes and shapes. With a bit of creativity and effort, you can craft beautiful topiaries to showcase.
What Are Topiary Balls?
Topiary refers to the pruning and training of plants into decorative shapes like animals, geometric forms, spirals and balls. Topiary balls are one of the simplest and most popular topiary forms. These rounded shrubs make stunning accents in home gardens and interior spaces. The most common plants used for topiary balls are boxwood, yaupon holly and English ivy, which respond well to frequent trimming. But many shrubs and vines can be coaxed into ball shapes with proper care.
Benefits of Topiary Balls
There are many reasons to try making your own topiary spheres
- Add greenery and living sculpture to your decor
- Make focal points in your garden or interior rooms
- Express your creativity through shaping plants
- Customize sizes to fit your space
- Less expensive than buying ready-made topiaries
- Change up looks by altering plant types
- Fun DIY project for all skill levels
Whether you want topiaries to flank your front door or desire a living centerpiece for your dining table, crafting ball shapes out of plants allows you to create your perfect decor.
How to Make a Topiary Ball
While shaping live plants into topiary balls takes time and effort, the basic process is straightforward. Follow these steps to make your own sculpted sphere:
Choose a Plant
Select a shrub or vine that responds well to frequent trimming and shaping. Boxwood, holly, ivy and juniper are common choices. Make sure you pick a healthy plant that is well-rooted. For outdoor topiaries, choose a type suitable for your climate.
Prepare the Root Ball
If using a nursery plant, check that the roots are well established in the potting mix. You may need to repot it into a larger container so the roots have room to grow as you shape the plant. Make sure there is a drainage hole in the bottom of the pot.
Place a Frame
To guide the growth into a rounded shape, place a wire frame over the plant. You can use chicken wire formed into a ball shape or purchase a pre-made topiary frame. The frame should fit snugly on top of the shrub.
Train the Foliage
Use sharp pruning shears to begin clipping foliage so it fills out the frame. Try to distribute branches evenly for the fullest shape. Prune just above leaf nodes to encourage bushy new growth. Remove any inward-facing branches.
Maintain Trimming
Check your topiary weekly and trim back any errant growth extending beyond the general rounded shape. Focus on keeping the overall form even as it grows to fill the frame. Be careful not to overprune and stress the plant.
Remove the Frame
Once the shrub has filled out to create a cohesive ball shape, carefully remove the frame. Continue trimming frequently to maintain the round silhouette. Be patient – it can take a couple years for a topiary to fully achieve the desired form.
Alternative Ways to Make Topiary Balls
If training live plants seems daunting, there are shortcuts for crafting faux topiary balls:
-
Use preserved boxwood or other greenery: Preserved and dried plants retain their shape when wired into ball forms. This is an easy instant topiary option.
-
Try foam forms: Styrofoam spheres covered in moss or clipped greenery can mimic the look of shrub topiaries.
-
Create wire forms: Bend chicken wire or grapevine into a ball shape then insert fresh greens or flowers into the frame.
-
Buy boxwood balls: Craft stores sell ready-made spheres of fake boxwood leaves that can be used as-is or embellished.
While these ideas don’t involve sculpting live plants, they offer ways to make sphere-shaped topiaries with less work. The results look surprisingly realistic and make unique decor accents.
Design Inspiration for Topiary Balls
Once you’ve shaped your greenery into sphere forms, there are infinite ways to put them on display:
Outdoor Topiary Ideas
- Flank entryways or line garden paths
- Use different sizes together in clusters
- Nestle in flower beds and borders
- Place in patio planters or on outdoor shelves
- Use as focal points in garden rooms
Indoor Topiary Ideas
- Center on dining tables or coffee tables
- Sit on bookshelves, mantels or cabinets
- Tuck into floor plant stands or wall sconces
- Use in entryways or hallways
- Flank a bathroom mirror or sit on vanities
- Top a bar cart or kitchen island
Let your creativity run wild when brainstorming how to show off your topiary balls indoors or out. They make great standalone statement pieces but also combine beautifully with flowers, garlands, candles and other decor.
Caring for Your Topiary Balls
To keep your sculpted spheres looking their best for years to come, provide proper care and maintenance:
- Water thoroughly – don’t let plant dry out
- Fertilize regularly in spring and summer
- Prune frequently to maintain shape
- Protect from harsh weather conditions
- Dust or wash leaves to clean when needed
- Repot rootbound plants into larger containers
Well-cared for outdoor topiaries can last for decades. Indoor faux topiaries may need replacing every few years as foliage fades. But giving your sculpted plants the right care will keep them flourishing.
Unleash Your Creativity with Topiary Balls
What better way to brighten your living space than with spheres of lush greenery? Crafting topiary balls is deeply satisfying and they add so much charm to gardens and rooms. With simple materials and pruning effort, you can create elegant living sculptures expressing your unique style. Get creative with shapes, sizes, plants and display locations. Add a touch of natural beauty to your decor with these delightful topiary projects.

How do you make a topiary shape? What are the simple topiary shapes?
There are unlimited options of decorative shapes for topiaries. This can be achieved with chicken wire, a wire frame, or styrofoam to make the desired shape. Then, boxwood sprays or other pieces of greenery are inserted. The best option for a perfect ball is to use styrofoam balls as they come in a variety of sizes. You can use a tomato cage if you want a cone shape. The best option for a spiral is actually a pool noodle. Put a coat hanger through the middle of the pool noodle and just bend the wire form into a spiral topiary
Using a coat hanger is an option for more complex shapes but for simple shapes, go with premade options. After you determine the size of the topiary, you can begin to make your topiary forms in a variety of sizes. The coat hanger will be the main frame of the wire topiary and use the chicken wire to make a wire topiary in whatever ornamental shape you desire. Use wire cutters to cut the chicken wire and floral wire to fasten the loose ends.
Step 8: Cutting Holes in the Faux Greenery Balls to Make a DIY Topiary Tree
Take your boxwood balls and cut some of the plastic net-like interior, just enough so the balls can fit tightly over the top of the sticks.
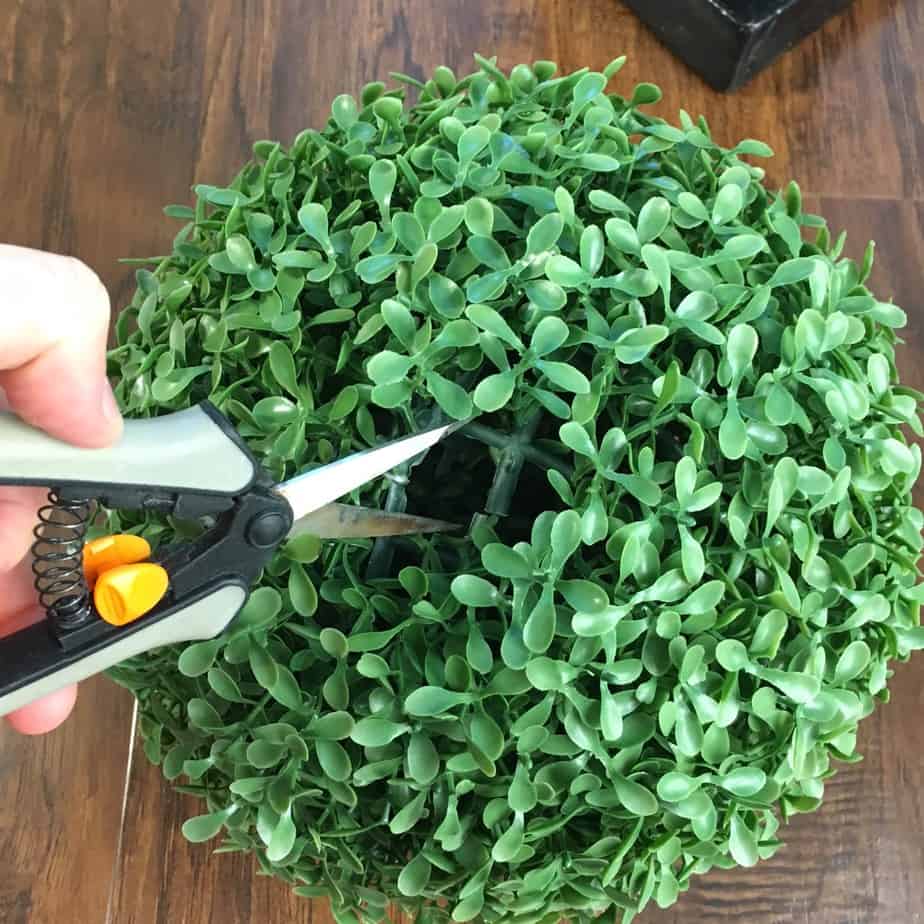
One of my topiary balls was sliding down the stick a little bit too much, so I wired some of that interior netting to the sticks. (You’ll find most of these faux boxwood balls are hollow with an interior plastic netting that all the leaves attach to.)
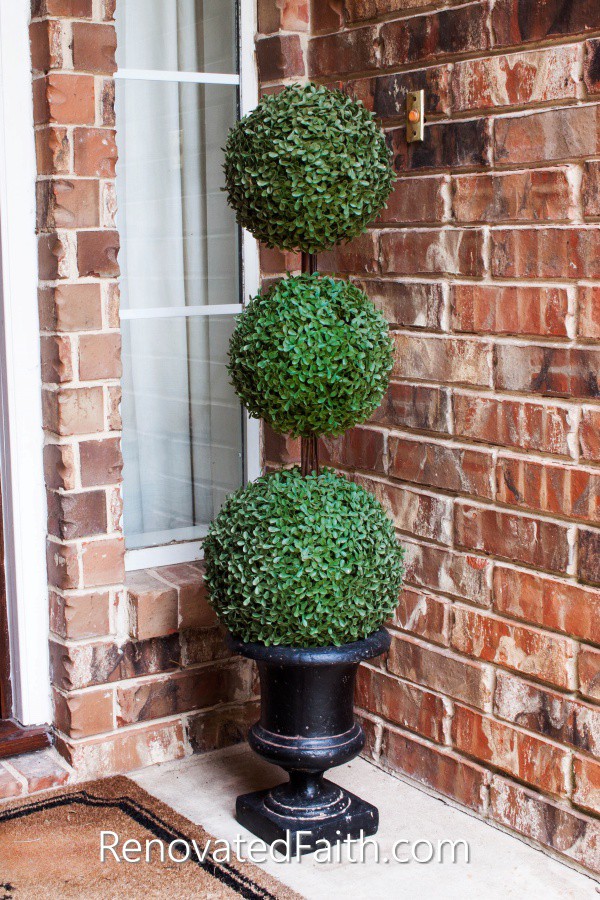
Push down the entire ball onto the wood piece. Once you have all the faux greenery balls on the topiary, you are done!
Now that you are done, I’d love to see how it turned out! ❤️ Post your DIY topiary tree pic here!
![]()


Topiary Ball | DIY | Interior Design | Terri Cumming
FAQ
What is the best plant for topiary balls?
Spruce, juniper, hemlock, servi; rosemary, laurel, boxwood and some ivy varieties are suitable for Topiary.
How to keep topiary balls from falling over?
To ensure stability with larger, top-heavy topiary plants such as standards and spirals that are liable to fall over, plant your topiary in a good-sized, heavy pot such as one made of wood or terracotta. If using a lightweight pot add a couple of bricks to the base before planting.
How to make a topiary step by step?
- Start by placing a tarpaulin around the plant. This helps to make a speedy job of clearing up the clippings.
- Place a frame in your chosen shape over the plant. …
- Make small, neat cuts in line with the frame.
- Stand back frequently to survey your handiwork.