Staghorn ferns are stunning epiphytic plants with dramatic antler-shaped fronds. They make eye-catching additions to indoor décor when grown in hanging planters or mounted on boards. However like all houseplants staghorn ferns need periodic repotting to refresh the potting mix and give their roots more room.
Repotting a staghorn fern properly is crucial for its health and continued growth. Follow this complete step-by-step guide to learn when and how to safely transplant your staghorn fern into a fresh container.
When is it Time to Repot a Staghorn Fern?
Staghorn ferns prefer to be slightly rootbound, so you only need to repot them every 2-3 years. Watch for these signs that it’s time to move your fern to a larger pot:
- Roots are visible above the soil line
- Fronds seem crowded or are spilling over the pot rim
- The plant is top-heavy or the pot feels lightweight when lifted
- Growth has slowed down noticeably
Aim to repot staghorn ferns in early spring, before the most active growth period. This gives the roots time to establish themselves in the new container. Avoid repotting during dormancy or when new fronds are emerging.
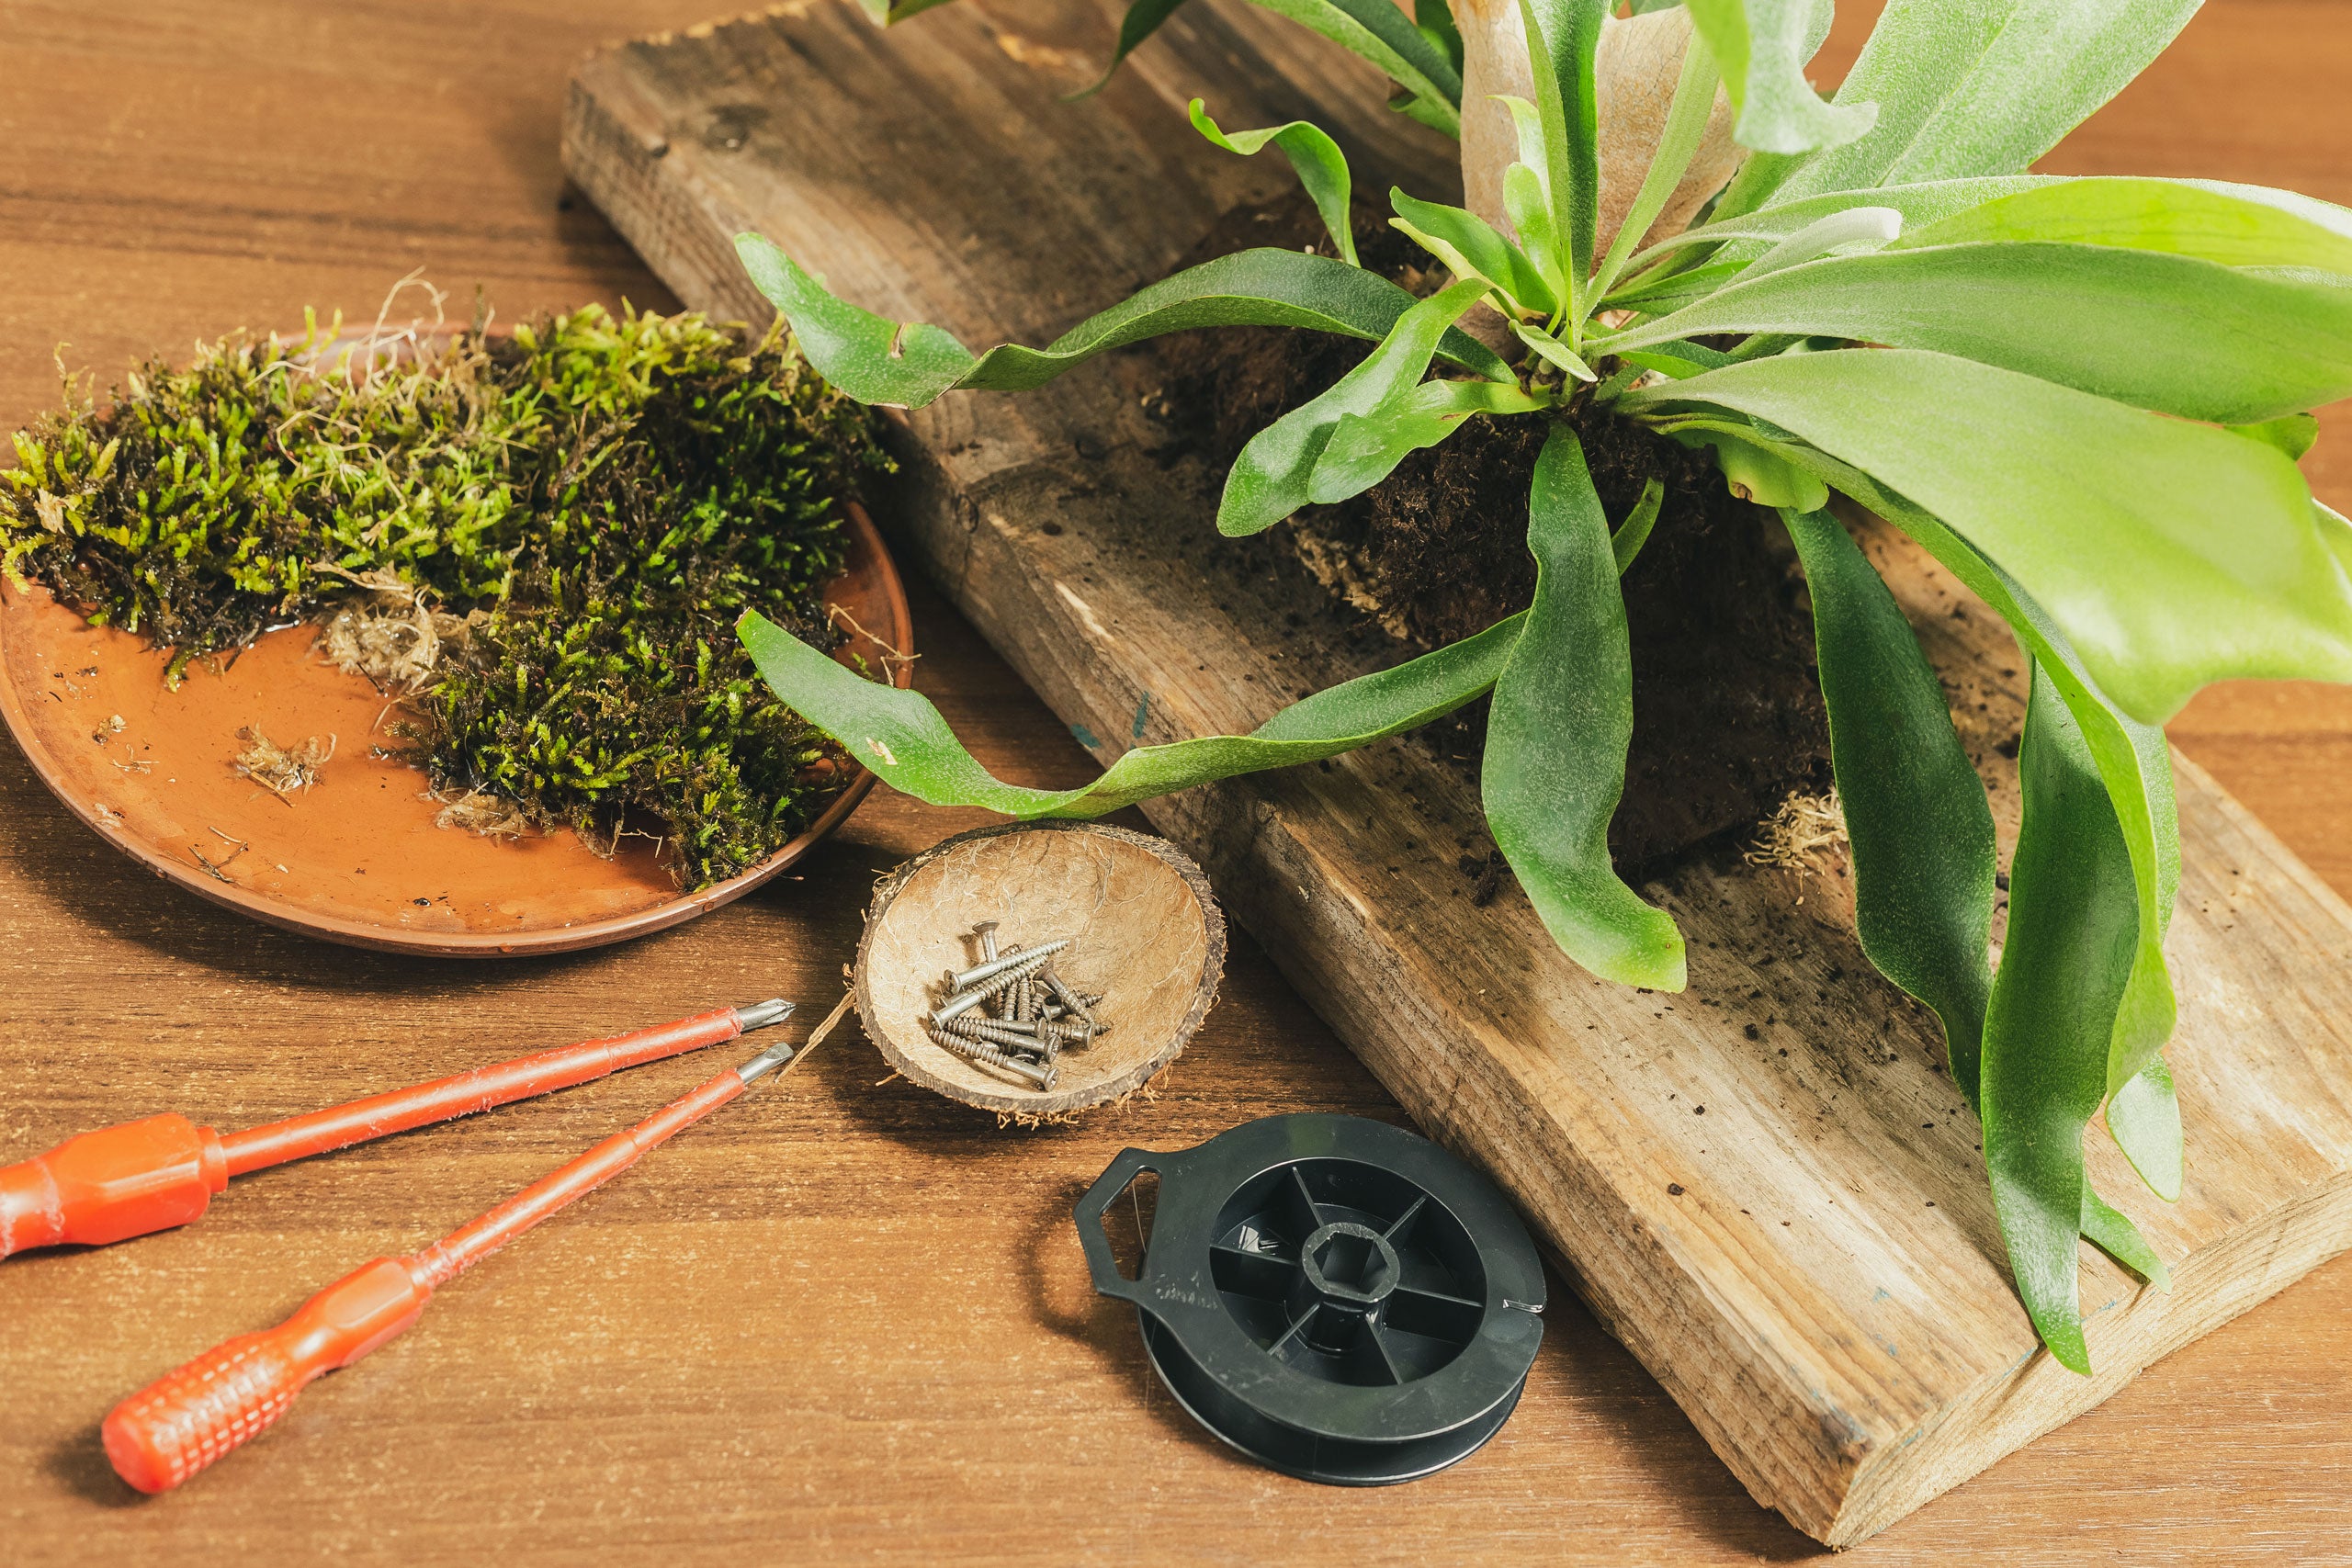
Supplies You’ll Need
Before starting the repotting process gather these supplies
- New hanging basket or pot at least 2 inches wider than the current container
- Potting mix formulated for epiphytes – bark, moss, perlite, etc.
- Sphagnum moss
- Clean, sharp pruning shears or knife
- Clear plastic bags or sheeting
- Twist ties or string
Avoid regular dense potting soil, as it will compress roots. An airy, porous potting mix is required.
Step-by-Step Repotting Instructions
Follow these steps closely to safely transplant your staghorn fern into a larger container:
- Fill the new pot or basket about 1/3 full with moistened potting mix. Lightly pack it down.
- Carefully remove the staghorn fern from its old container. You may need to gently loosen stuck roots by massaging the sides.
- Shake or brush off any old potting mix clinging to the roots. Trim off any dead roots with pruners.
- Place the staghorn fern into the prepared new container. Spread and arrange the roots over the potting mix.
- Add more fresh potting medium around the roots to stabilize the plant. Leave the rhizome and fronds fully exposed.
- Pack the mix gently but firmly around the roots. The plant should feel snug but not crammed.
- Water thoroughly until it drains freely from the bottom drainage holes. Let excess water drain away.
- Cover the entire plant with a plastic bag to increase humidity. Secure it with a twist tie or string.
- Provide bright, indirect light while the fern adjusts to its new pot. Remove the bag after a week.
- Resume normal care, watering often enough to keep the potting mix lightly moist.
With the proper repotting method and aftercare, your staghorn fern will quickly recover from transplant stress. Be sure to meet its light, humidity, water, and airflow needs in the new container.
Choosing the Right Pot or Basket
Staghorn ferns thrive in open, airy containers that mimic their natural epiphytic environment. Here are some suitable options:
-
Hanging baskets: Allow excellent air circulation and provide a way to display the cascading fronds. Line wire types with sphagnum moss.
-
Orchid pots: Slotted sides promote airflow to the roots inside. Opt for wider over taller pots.
-
Mounted plaques: Attach ferns to wood or cork sheets. Keep roots moist by watering more frequently.
-
Bamboo poles: Insert into soil or mount vertically. Let fronds spill down the sides.
Aim for a container 2-4 inches wider than the previous one. Ensure it has drainage holes to prevent soggy roots.
After Repotting Care Tips
To help your staghorn fern recover quickly after repotting, follow these important care tips:
-
Keep it out of direct sun, which can scorch the tender fronds. Offer bright, filtered light.
-
Mist the fronds daily or place on a pebble tray to boost humidity.
-
Water more frequently, allowing the potting mix to dry out just slightly between waterings.
-
Watch for transplant shock symptoms like browning tips or yellowing leaves.
-
Apply a balanced orchid fertilizer monthly at half strength.
-
Consider removing a few oldest fronds to reduce transpiration water loss.
With proper growing conditions after repotting, your staghorn fern will soon resume vigorous growth!
Common Repotting Mistakes to Avoid
Avoid these common mistakes that can hinder recovery after transplanting staghorn ferns:
- Using regular dense potting soil instead of an epiphyte-specific mix
- Repotting during dormancy or active frond growth periods
- Failing to trim away dead roots or loosen bound rootballs
- Burying the rhizome/crown or exposing roots above the potting mix
- Overly packing the potting medium or leaving it too loose
- Watering too infrequently while new roots establish
- Moving the plant to direct sun before it adjusts to the new pot
Signs of a Healthy Repotted Fern
Within a few weeks after repotting into an appropriate container and potting mix, you should notice these signs of a happy, healthy staghorn fern:
- New frond growth emerging from the center
- Fronds standing upright and firm
- Leaves are dark green without browning
- Roots visibly growing over the pot sides and bottom
- Plant feels securely anchored in the pot
- Mix is lightly moist but not soggy
Repotting rootbound staghorn ferns every 2-3 years is vital for their health. Follow this complete guide for optimal timing, potting mixes, container choices, step-by-step repotting method, and proper aftercare. Avoid common mistakes and your staghorn fern will quickly re-establish itself and resume vigorous growth!
Staghorn Fern Care Guide
The Staghorn Fern (Platycerium spp) is a fern non-flowering perennial with two types of leaves; heart-shaped and antler-shaped leaves. With origins from tropical Australia and New Guinea forests, they thrive in warm environments with high humidity. Studies show that the plant prefers growing in shades with filtered, indirect light. An advantage of the Staghorn fern is that it can be grown as an outdoor plant or an indoor plant.
Staghorn ferns are epiphytes, meaning they grow on other plants, but they are not parasitic. They grow in forests where it rains frequently, but since their roots are exposed, they only get moist, and the rest of water drains. This implies their water requirements are strict – they should be kept moist but never overwatered. The rule of thumb suggests they should be watered once or twice a week.
Naturally, Staghorn Ferns grow in tree canopies where they receive filtered bright light. This presupposes an east exposure will give your plant enough light. However, it is advisable to keep the plant ten inches away from searing windows to protect it from scorching. For continued growth during winter, move the plant to brighter spots. Staghorn ferns are not cold hardy; they thrive in warmer environments of temperature ranging between 60°F-80°F.
The forest environment is always very humid; in contrast, the household environment is barely moist. The sterile leaves of Staghorn ferns absorb moisture from the air; hence dry air will deprive the plant supply of water. Besides, dry air promotes loosing of water through transpiration. It is upon the enthusiasts of the plant to devise strategies to raise the humidity to 70-80 percent. The easiest approach to improve humidity is misting the sterile leaves. Alternatively, you can use electric humidifiers or a tray of water and pebbles under the pot.
The soil medium should allow free drainage of water. For Staghorn ferns mounted on wood, sphagnum moss is the best growing medium. For plants growing in pots, never use a standard pot mix. Applying a mixture of orchid bark and cactus soil will work best. Fertilizer is an essential part of a Staghorn fern’s care. In the natural habitat, Staghorn ferns collect vital nutrients from decomposed leaves. Staghorn ferns growing indoors or in the garden should be supplied with dilute liquid feed with a ration of 1:1. The frequency can be adjusted to once a month.
Just like many other indoor plants, the Staghorn fern requires cleaning to extract dust particles. Cleaning can be done using a soft, damp cloth. Alternatively, a feathery instrument can be used for dusting. This plant does not require pruning. Some people remove brown lower fronds for mistaking them for dead leaves. These sterile leaves perform a vital function of absorbing water and nutrients as well as shielding the root ball. When they expire, they can be removed by simply pulling them off; when obsolete they attach to the plant loosely.
The easiest method of propagating a Staghorn fern is pulling offshoots from the plant. Mature Staghorn ferns produce offshoots with independent root systems that can be plugged off the parent plant. If you try to remove a sucker and it does not come out quickly, it is an indication it is too soon to separate it from its parent – give it more time to grow. Offshoots should be mounted or planted immediately to minimize chances of dying. This method of propagation is beneficial for thinning the parent plant.
Staghorn Ferns thrive when crowded. Growers should have nothing to worry about unless the pot is almost bursting. Repotting should be done during spring, and probably once in three years. Repot to a container that is about 2 inches in diameter wider. Fill the pot with the relevant soil mixtures as described in the soil and fertilizer section, remove the plant from its original pot, and plant it in the new pot. Cover the roots with soil but make sure the stem and leaves are exposed. Soak the potting mix and allow water to drain.
Though rarely, staghorn fern can be infected with scale. This can be fixed by removing them by hand or a cotton swab. Underwatering the plant will cause it to wilt – just increase water. Insufficient sunlight is indicated by browning or yellowing of leaves; this can be reversed by moving the plant to a spot with bright light. The plant can also be infected with spider mites – they can be removed by applying oil insecticides. The Staghorn Fern is non-poisonous, thus suitable for rooms with pets and children.
How to repot a staghorn fern in an orchid basket
FAQ
What is the best soil for staghorn fern?
A staghorn fern grows best in warm, very humid conditions, bright, indirect, or dappled sunlight, in a base of organic soil, and it prefers temperatures …Aug 7, 2024
What is the best way to repot a staghorn fern?
You can use up to one-third regular potting mix, but never use garden soil. Remove the staghorn carefully from its container and move it to the new container as you gently spread the roots. Finish filling the pot with potting mix, so the roots are completely covered but the stem and fronds are exposed.
What kind of pots do staghorn ferns like?
Wire or mesh baskets are well-suited for growing staghorn ferns, but you actually can grow one in a standard pot. Fill the pot with a loose, well-drained potting mixture: preferably something like shredded pine bark, sphagnum moss, or similar. Be sure to repot when the plant gets crowded.
When to replant a staghorn fern?
Staghorn ferns should be repotted as soon as they are too big for the current plant container. This happens about every 3 to 5 years. In order not to damage the roots, they should be carefully detached from the piece of wood or plant container. In any case, only repot in spring.
Can a staghorn fern outgrow a pot?
Once you have worked out how to repot a staghorn fern, you can allow your potted beauty to really stretch its roots out. You probably won’t have to repot it too often, but if you notice it outgrowing its pot or looking a little squashed, then that’s your cue. Staghorns, like all plants, can outgrow their pots.
Can you repot a staghorn fern?
Yes, when repotting a staghorn fern, it is important to allow the soil to dry out completely before watering it again. This will prevent the plant from becoming waterlogged and ensure that it receives the proper amount of moisture. Another mistake people make when repotting staghorn ferns is not providing enough light.
How do you grow a staghorn fern?
When it comes to potting media, Ridley’s Staghorn Fern prefers a mixture of orchid bark, sphagnum moss, and perlite. This combination provides adequate drainage and aeration to the plant’s roots. You can also mount your fern on a board or piece of wood and use sphagnum moss to hold it in place.