October is a good month to think about caring for your orchids as many orchids have finished flowering and are about to go into their major growth period.
Cymbidiums are the most popular orchids. Theyre the ones with the tall flower spikes and bulbous swellings at the base of the long strappy leaves. This is the best time of year to tidy them up and get them ready for the new growing season.
Start by taking a good look at the orchid to see if the clump is crowded enough to need dividing. Sometimes this decision is easy: the bulbous bases are so crowded together that theyre almost bursting out of the pot. Or there are a lot of dead bulbs in the pot. With either of these situations, its worth re-potting. But dont rush into it – a plant can stay in the same pot for a number of years. And remember, after orchids have been divided it can take two or three years for them to reach flowering stage again.
Cymbidium orchids also known as boat orchids are treasured for their graceful sprays of delicate blooms that can last for months. To keep your cymbidium orchid thriving and flowering year after year, periodic repotting is essential. This complete guide will walk you through when and how to repot your cymbidium orchid successfully.
When Should You Repot a Cymbidium Orchid?
The optimal time to repot a cymbidium orchid is in the spring, right after it finishes flowering Repotting at this time allows the plant time to recover before the next flowering cycle begins in the fall Late spring, around May, is ideal. Some growers prefer repotting in early fall instead. Avoid repotting during very hot or very cold weather, as temperature extremes put additional stress on the plant.
Plan on repotting mature cymbidium orchids every 2-3 years. Younger plants may need more frequent repotting, even annually, as their root systems expand rapidly in the first few years. Repotting too frequently risks shocking the plant, so only repot if truly necessary.
Supplies Needed for Repotting Cymbidiums
Before starting the repotting process. gather the necessary supplies
- Sharp, sterile pruning shears or knife
- An appropriate sized orchid pot or container
- Fresh specialized orchid potting mix
- Clean pots and labels
Be sure to scrub pots and sterilize tools with diluted bleach to prevent disease transmission between plants.
Step-by-Step Repotting Process
Follow these steps to successfully repot your cymbidium orchid:
1. Remove the Plant from the Pot
Start by removing the cymbidium orchid from its current pot. Gently loosen the roots from the edges using your fingers. For root-bound plants, you may need to cut or break the pot to remove the orchid.
Use your fingers to gently remove as much of the old potting media as possible. Removing all the old mix allows inspection of the root system.
2. Assess and Trim the Roots
Examine the cymbidium’s root system. Healthy roots are plump and white. Trim away any dead, brown, mushy roots with sterile shears to prevent rot from spreading.
Also remove any old backbulbs that are shriveled or lack leaves. Backbulbs can harbor disease.
3. Divide Overgrown Plants
If the cymbidium orchid has outgrown its pot, you will need to divide it into smaller sections. Divisions should have 3-5 pseudobulbs each.
Use a sterile knife to slice between bulb growths. Dividing cymbidiums may induce a rest period, delaying flowering temporarily.
4. Select an Appropriate Orchid Pot
Choose a pot that allows for 2 years of growth. Cymbidiums prefer being slightly root-bound but need adequate room for new bulb growth.
Pots must have drainage holes to prevent soggy mix that can rot roots. Slotted orchid pots provide maximum aeration.
Use orchid pots or plastic pots. Avoid metal or glazed ceramic pots that retain moisture.
5. Add New Potting Mix
Place a layer of fresh orchid potting mix in the bottom of the pot. Position the cymbidium so the newest pseudobulbs sit just below the pot’s rim.
Add more potting mix around the roots, pressing gently to fill air pockets. Leave at least 1/2 inch from the mix surface to the pot rim.
Top-dress with a slow-release orchid fertilizer to provide nutrients.
6. Water and Establish the Repotted Plant
Water the repotted cymbidium orchid well to settle the media. Allow it to dry slightly between waterings while roots re-establish over 2-3 weeks.
Keep the plant shaded during recovery. Once regrown, gradually acclimate it to higher light levels.
Delay fertilizing with high nitrogen fertilizers for 2 months after repotting. Then resume regular fertilizing schedules.
Tips for Repotting Cymbidium Orchids
Follow these tips for successful cymbidium orchid repotting:
- Repot just before new root growth emerges to reduce stress.
- Keep the plant shaded and humidity high while it re-establishes.
- Smaller divisions may not flower the first year after dividing.
- Larger divisions flower more quickly than very small ones.
- Add medium orchid bark and sphagnum moss to boost moisture retention.
- Use a pot that provides a snug root run, cymbidiums grow best when root-bound.
- Avoid fertilizing for 2 months after dividing to prevent fertilizer burn.
What Potting Mix Should You Use?
Cymbidium orchids require a very well-draining potting medium made up of coarse materials. Common potting mixes include:
- Coconut coir, bark, perlite, and charcoal
- Orchid bark and sphagnum moss
- Coarse perlite and fir bark pieces
Avoid using regular potting soil or dense mixes that retain moisture. Be sure any potting mix components have been sterilized first.
How Often Should You Repot Cymbidiums?
Most cymbidium orchids should be repotted every 2-3 years. Young plants may need annual repotting as their roots rapidly expand.
Signs it’s time to repot include:
- Plant is popping out of its pot
- Mix no longer drains well
- Leaves or blooms are declining
- Mix is breaking down into a fine texture
As long as 2-3 new pseudobulbs can fit in the pot, repotting likely isn’t urgent yet. But don’t wait longer than 3 years between repotting.
Common Problems When Repotting Cymbidiums
Avoid these common mistakes when repotting cymbidium orchids:
- Repotting too often – Only repot when truly necessary.
- Burying aerial roots – Leave exposed roots above the potting mix.
- Dividing into sections that are too small – Use 3-5 bulbs per division.
- Using a dense, moisture-retentive potting mix.
- Fertilizing too soon after repotting causing burn.
- Exposing freshly repotted plants to temperature extremes or direct sun.
With the proper timing, technique, sterilization, and aftercare, repotted cymbidium orchids should reward you with vigorous growth and abundant cascading blooms for years to come. Repotting cymbidiums takes some effort but is essential to maintain their health and flowering. Follow this guide for step-by-step best practices when it’s time to refresh your cymbidium’s roots.
Caring For Other Orchids
Moth orchids (Phalaenopsis spp) are becoming increasingly popular. These can be kept indoors permanently in a well lit position but will, once its reliably warm, appreciate a spell outdoors in a lightly shaded spot. These plants really appreciate humidity, so keep them well watered in hot weather and mist over the leaves regularly. Moth orchids can produce new shoots and buds from the stem that flowered last year, so only trim dead sections from flowering shoots.
Moth orchids can be re-potted into fine orchid bark every three years or so. Feed during the warmer months with Yates Orchid Liquid Plant Food every two weeks or Yates Thrive Flower & Fruit Liquid Plant Food.
Watch for mealy bugs – Yates Natures Way Citrus & Ornamental Spray will take care of most of the common pests, including mealy bug.
Slipper orchids, so-named because their flowers resemble a dainty piece of ladys footwear, will appreciate similar care. A break outdoors can be good for these plants, too, but, because theyre naturally understorey dwellers, they can tolerate more shade.
How to re-pot your Cymbidium Orchid:
- Remove the plant from the pot. Sometimes its even necessary to break the pot in order to free the orchid.
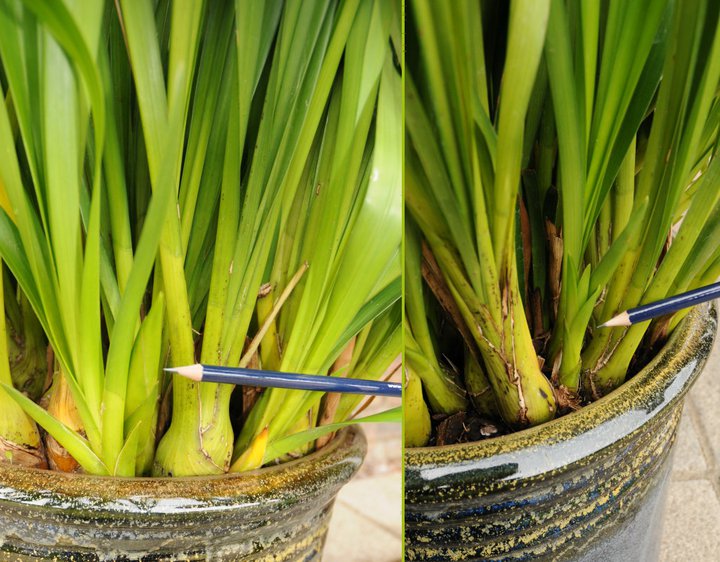
- Take a knife or another strong tool and use it to lever between the bulbs (pictured). Separate the clump into at least two sections.
- Remove most of the leafless, dead-looking or squashy bulbs. You can leave a single row of these back bulbs next to the leafy shoots.
- Check the roots for damaged, rotted or tangled sections. Remove these.
- Choose new pots. Yates Tuscan pots are ideal because they have plenty of drainage holes. Good drainage is critically important for orchids.
- Pack some orchid potting mix into the base of the pot.
- Sit the orchid in the pot and fill around it with the mix. Make sure that each bulb is sitting above the mix.
- Water well and sprinkle some pellets of Yates Dynamic Lifter Soil Improver & Plant Fertiliser on top of the pot.
- Begin feeding with Yates Orchid Liquid Plant Food every two weeks.
- After Christmas, to encourage flowering, use Yates Thrive Flower & Fruit Liquid Plant Food fortnightly.
Complete Cymbidium Orchid Repotting. step by step guide
FAQ
What month do you repot cymbidium orchids?
The best time to repot cymbidiums is in spring, just after flowering but before new growth starts. Choose a container that has enough room for two years’ growth (about 10cm/4in wider than the previous one). Avoid using a much larger pot (overpotting), as the compost will stay wet for longer, which can cause root rot.
What is the best potting mix for cymbidium orchids?
The word to remember about proper soil is “loose.” A combination of fir bark, perlite, peat moss and other loose organic material will ensure good drainage.Aug 5, 2023
How do you divide and repot cymbidium orchids?
- Remove plant from pot.
- Shake and pull out old potting material.
- Loosen roots and trim back. …
- Grasp and pull or cut apart groups of 3 or more bulbs.
- Pull or cut away dead back bulbs.
- Be careful to protect new growth bulbs.
Do you cover all roots when repotting orchids?
When you repot it, use a pair of clean scissors to snip off any obviously dead and brown roots, but otherwise leave it alone. Just hold it in place at the approximate height you want it, and fill in around it with bark or moss.
How do you repot a Cymbidium orchid?
You can repot in a specialist cymbidium orchid mix or make your own try a 50 % pine bark and 50 % coir peat mix. The potting mix that is best will depend on your climate and watering regime. Use a pot that will provide a restricted root run, cymbidiums grow better with a confined root system. Do not fertilise for about 2 months after dividing.
How often should you repot a Cymbidium orchid?
Repot your cymbidium orchid every two or three years. Orchids prefer a crowded pot, so you do not need to transplant an orchid just because it has expanded to fit its pot. However, if the orchid is sending shoots dangling over the edge of the pot, it may be time to repot.
How do you repot a Cymbidium plant?
Most healthy cymbidiums can handle losing about a third of their roots during repotting without a problem. Separate the pseudobulbs into natural clumps. Look for natural groupings of at least 3 to 4 pseudobulbs on your plant. On some plants, the natural line of division will be obvious.