Mid to late spring in the vegetable garden is one of the most exciting times! The day we’ve all been waiting for finally arrives – we dig out our gardening tools and sink our hands into the soil. Ahhhh!
Although spring is a wonderfully fun time, it’s also a very busy time for gardeners. We have a lot of tasks on our to-do lists and everything feels like it needs to be done right now.
At the top of that list is prepping spring garden beds for planting. Spring is when the majority of planting happens in our vegetable gardens and our garden soil needs to be ready for the many seeds and plants waiting to be tucked into the garden.
In my experience, most gardeners think prepping spring garden beds for planting requires many hours of time-consuming and often physically exhausting labor.
In this post I’ll show you how to set up your garden for easy spring garden prep so when the sunny and warm weather arrives, you’ll be able to walk out to your garden and start planting your seeds and plants, no backbreaking work required.
Tilling a raised garden bed helps create ideal growing conditions for vegetables, flowers, and other plants. By turning and breaking up the soil, you allow air to permeate, blend in fertilizers and compost, and eliminate weeds and pests. Learning the proper techniques for tilling raised beds will give your plants the healthiest start while avoiding common mistakes.
When to Till Raised Beds
Tilling raised beds is usually done in early spring before planting any seeds or transplants The timing depends on your climate and what you intend to grow Here are some guidelines for when to till raised garden beds
-
Early spring before planting warm weather crops. This gives soil time to settle before planting.
-
After clearing spent plants in fall and before planting any cool weather or winter crops
-
After harvesting root vegetables or heavy feeders that leave soil compacted.
-
If the soil becomes overly hardened during summer heat and drought.
-
When adding significant amounts of new soil, compost fertilizer, or other amendments.
Avoid tilling soil when it is excessively wet. Wet soil forms clumps instead of breaking up. Test soil moisture by squeezing it in your hand. If it compacts into a hard ball, it is too wet. Allow it to dry out before tilling.
Tilling Tools for Raised Beds
While spading beds by hand is possible, using the right tools makes tilling faster and easier. Some tilling tools well-suited for raised beds include:
-
Garden fork – A sturdy, short-handled fork efficiently breaks up soil clumps. The tines help mix in amendments. Good for small to medium beds.
-
Hoe – Use a long-handled hoe in a chopping motion to till the top few inches of soil in raised beds. Blends amendments into top layers.
-
Electric tiller – Rotating tines powered by an electric motor offer an easy tilling solution for small to medium raised beds. Provides thorough mixing.
-
Gas tiller – Quickly till soil in larger raised beds. Tines chop and turn soil and can till along edges. Requires fuel and maintenance.
-
Broadfork – Lifts and turns soil instead of chopping it. Preserves soil structure. A manual option well-suited for smaller beds.
How to Thoroughly Till Raised Beds
Follow these steps for a raised bed with freshly tilled, high-quality soil:
-
Clear any existing plants, roots, or weeds from the raised bed. Discard diseased plant residue.
-
Use a garden fork to loosen the top 2-3 inches of packed soil to prepare for tilling. Break up large clumps.
-
Spread any fertilizer, compost, aged manure, peat moss, or soil amendments evenly over the raised bed.
-
Select your tilling tool(s). Use a garden fork or hoe for small beds. For larger areas, till systematically in rows with a power tiller.
-
Make several passes through the bed, turning and tilling soil to a depth of 8-12 inches. Thoroughly mix amendments into soil.
-
Use a rake to break up any remaining large clumps and remove rocks or debris unearthed during tilling. Smooth soil surface.
-
Lightly rake a 1-2 inch layer of compost over the tilled soil to boost fertility, structure, and nutrition.
-
Water thoroughly after tilling to moisten soil to a depth of 6 inches before planting. Let soil dry out slightly before seeding or transplanting.
Tilling Tips for Raised Beds
Follow these tips for properly tilled raised garden beds:
-
Till raised beds when the soil is moist but not sopping wet. Tilling mud will compact soil.
-
For new beds, remove grass sod first rather than tilling directly into grass. Remaining grass roots will regrow.
-
Only till as deep as plant roots grow. Don’t compact lower subsoil layers. 8-12 inches is sufficient for most vegetables and flowers.
-
Several weeks before tilling, mix in bulk organic amendments like compost and manure to give them time to stabilize.
-
Blend amendments throughout the bed, not just where seeds or transplants will be planted.
-
Work raised beds in rows, not walking directly on newly tilled soil, to avoid re-compacting it.
-
Add nitrogen fertilizers if amending soil with high-carbon materials like sawdust or dry leaves which can rob nitrogen during decomposition.
-
Loosen soil around transplants regularly to improve downward root growth into the tilth.
Power Tiller Tips
Gas or electric powered tillers allow quick tilling of larger raised beds. Follow these tips when using a power tiller:
-
Review safety procedures in the owner’s manual before operating the tiller.
-
Wear protective footwear in case you accidentally step on the spinning tines.
-
Set the tiller to a shallow depth of no more than 6-8 inches for raised beds. Don’t dig too deep.
-
Make systematic, overlapping passes across the length and width of the bed for even tilling throughout.
-
Use short, repeated up and down motions rather than forcing the tiller forward to avoid compacting soil.
-
If the tine blades bog down, lift them out of the soil briefly to clear any obstructions before re-engaging.
-
Keep tiller tines away from latticework, support posts, or obstacles they could catch on.
Avoiding Common Tilling Mistakes
Some common mistakes to avoid when tilling raised beds include:
-
Tilling wet, muddy soil that can become compressed instead of loosened.
-
Turning over excessive subsoil from deeper layers, bringing weed seeds and poor soil to the surface.
-
Allowing soil amendments like compost and fertilizer to touch plant roots, stems, or leaves which can burn plants.
-
Leaving large clods, soil clumps, or debris that can interfere with seeding, transplants, and root growth.
-
Over-tilling soil multiple times unnecessarily, damaging soil structure.
-
Walking on freshly tilled raised beds, re-compacting the loose soil.
Proper tilling promotes soil health while giving plants the optimally loose, fertile, and well-drained soil they need in a raised bed environment. Follow these tips to get your raised garden beds ready for a productive growing season.
Steps for Prepping Spring Garden Beds
Before we get into exactly how to prepare your soil and expertly plant seeds and plants, let’s talk about how to set your garden up for easy spring prep. There are a few main things you can do to ensure you’re garden is ready to go in spring.
#1: Set up a permanent garden design
When you have a garden that gets tilled every year it means you’re starting from scratch each season. Instead, I recommend you install a no-till garden.
I don’t recommend tilling because it can create more weeds by bringing seeds to the surface. The soil structure in your garden is also a complex web of bacteria and fungi that serves your plants better if it stays intact. And, wrestling with a tiller can be a lot of work.
I’m all for simple and easy in my garden. That’s why I always install permanent beds and paths in my gardens.
You don’t need to dig, flip, till or do any heavy soil lifting. I definitely don’t! In fact, many people are shocked when they find out that I’ve never tilled my garden in the 21 years I’ve been a gardener.
You can read more about tilling and why I’m against it in this article: Stop Tilling Your Vegetable Garden!
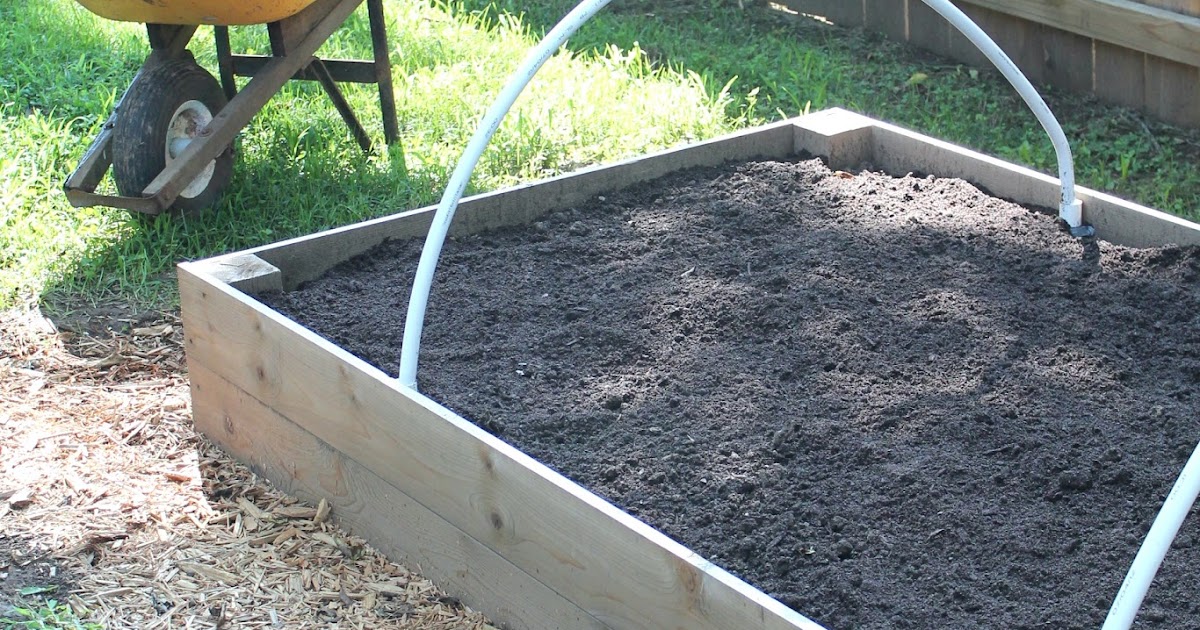
Establishing permanent beds often means building wooden raised beds, but there are plenty of other options. What matters most is that you’re garden beds and paths are staying in the same place for many years in a row so you’re not changing the layout over and over every season.
The benefits of permanent garden beds and paths are:
Less work in spring. With an established garden bed there’s not much prep you need to do to start planting in spring. If you cleared out and mulched your garden in fall, all you have to do is wait for the soil to warm up, and then walk out and start planting. (You’ll see how I put this into practice in the video below.)
There’s no wrestling with machinery, digging or flipping over the soil, or really any backbreaking work at all!
Better for your soil health. Having a permanent garden design means it’s very clear where your beds and paths are located. That encourages you to stay on the paths when walking and working, and you’ll be less likely to step into the garden beds.
Walking and stepping on the soil you’re growing food in will compact it over the long term. Keeping yourself in permanent aisles will help maintain loose soil within the garden beds, which will make it easier to plant seeds and plants, remove weeds, and provide space and air for your plants’ roots to grow.
Less maintenance over the long term. One of the great things about having permanent beds and paths is you can easily keep them mulched all year round, which will go a long way towards reducing the number of weeds that grow.
And that means many fewer hours you need to spend weeding in your garden.
Creates a more attractive garden. Permanent raised garden beds create organization and structure in your garden. These are not bad things to have in a vegetable garden because they lend to the overall attractiveness of your garden.
I like to think of the raised garden beds as the canvas. Once they’re constructed, you can take that blank canvas and use the vegetable plants and flowers to “paint” on it to create beautiful and interesting combinations of colors, textures, and heights.
Check out this blog post where I share three different options for creating easy raised garden beds, discuss the pros and cons of each style, and share the supplies you’ll need: How to Make Easy Raised Garden Beds for Your Vegetables.
#2: Keep your garden mulched
Bare soil in the garden = weeds. There’s no way around it. Nature doesn’t like when soil is exposed so she sends in the weeds as the first line of defense. Their job is to quickly grow and hold the soil in place so it doesn’t blow away in strong winds, wash away in a heavy rainstorm, or get compacted by the elements.
One of the best ways to cut down on the time it takes to prepare your spring garden for planting is to keep it weed-free. And the best way to keep those weeds at bay to make sure your garden beds and paths are mulched all year round.
This post explores the benefits of mulch, explains what mulches to use and what to stay away from, and show how I use it in my garden: Why Mulch is the Ultimate Garden Tool.
These first two steps are long term actions you can start implementing in your garden this season to set yourself up for a much easier time in spring when it’s time to start prepping spring garden beds for planting.
Once you have a permanent garden design established and you’re cutting down on the weeds you’ll have to deal with in spring by keeping your garden mulched, most of the work to actually plant is super quick and simple.
How to Plant Spring Seedlings & Seeds
If you have some experience gardening then you know that some vegetables are best planted as plants (or seedlings) and some grow better when they’re sown as seeds.
If you’re not sure whether you need a seed or a plant for the vegetables you’re growing, this article breaks it all down for you: How to Know When to Sow a Seed or Plant in Your Garden.
How I prep a garden bed depends on what I’m planting in it and what the weather has been in my garden. Let’s start with how to plant a seedling, otherwise known as a baby plant.
How to Plant a Seedling in Your Garden
I have two ways for you to learn how to plant a seedling:
You can read this article which takes you through the eight steps I use for planting every time: 8 Steps to Expertly Planting a Seedling.
Or watch the accompanying video that I filmed in my garden demonstrating planting a seedling in real-time. The video talks a bit more about how I don’t dig or flip any of my soil before planting. I simply pull the mulch aside and plant. So easy!
How to Sow Seeds in Your Garden
In the article I wrote about above regarding planting seedlings, I show how I usually leave the mulch in place when I’m planting a seedling instead of taking it off the garden bed.
When you’re planting seeds you’ll want to approach it a little differently by removing the mulch that’s covering the garden bed before you get started planting.
This is a case where it’s okay to have some bare soil in your garden for a short period of time while you’re waiting for seeds to germinate.
I think the best way to learn how to plant seeds is to watch me actually do it in my garden in the accompanying video. I explain how to prep the soil, figure out the spacing, and more.
Watering Newly Planted Seeds & Plants
Once you have your baby plants and seeds tucked into your garden don’t ignore them! When they’re young they can be vulnerable, so you’ll want to offer them some extra loving care, especially with watering.
Newly planted seedlings don’t have an established root structure yet, so it’s going to be more difficult for them to forage for water in the garden soil.
You should be paying attention to the weather after planting seedlings. If you’re getting regular spring rains like my garden does Wisconsin, you might not have to water much.
But, if it’s unseasonably hot after you plant them, or there’s an extremely windy day, go out and give them some extra water while they’re working hard to settle into your garden.
Newly planted seeds need even more attention than seedlings. In order for them to germinate, you must keep them evenly moist for anywhere between 5-21 days depending on the vegetable you planted. Some seeds germinate much more quickly than others.
I suggest watering newly planted seeds every 1-2 days depending on the weather. On a day where your garden receives rain, you won’t have to water. If it’s hot and sunny water you should water more frequently.
Because seeds are so small you only need to keep the top few inches of soil moist for them to germinate.
Once they’re established, most vegetable plants only need about 1 inch of water per week, but this definitely depends on what kind of soil you have and where you live. Read more: Secrets to Watering Your Vegetable Garden the Right Way.
When I used to have a plot in a community garden, every spring I noticed my fellow gardeners spending lots of unnecessary time prepping their spring garden beds for planting.
This does not have to be your gardening reality!
If you create a garden with permanent beds and paths and keep it weeded and mulched throughout the year, you’ll be able to waltz into your garden in spring and just start planting. No hours of weeding, bed layout or soil prep needed.
Tilling The Raised Garden Beds
FAQ
Do raised garden beds need to be tilled?
No tilling involved. The other reason raised beds require less maintenance is largely because they can be set up to keep out both weeds and pests.
Can you use a tiller in a raised garden bed?
I highly recommend using a broadfork for this size bed. Tilling with a motorized tiller injects excess air into the soil which hinders the growth of beneficial bacteria. A broadfork will allow you to break up the soil without pulverizing its structure.
What do you mix with soil when tilling?
Tilling is also a perfect way to mix in organic material such as compost or to add other amendments that improve the texture and quality of the soil.
Should I till my raised garden bed?
Introduction – B. Drawbacks of tilling raised garden beds When considering whether to till your raised garden bed, it’s essential to weigh the potential drawbacks associated with this common gardening practice. While tilling can help to break up compacted soil and incorporate organic matter, it is important to be aware of the tradeoffs involved.
Can garden soil fill a raised bed?
Garden soil may seem an obvious choice for filling raised beds, but garden soil usually doesn’t work well. Soil from your garden can be dense, and it becomes even more compact in a raised bed. Over time, this dense soil can impair water flow and stunt root growth.
What are the disadvantages of tilling raised garden beds?
Soil Structure Disruption: One of the main drawbacks of tilling raised garden beds is the disruption of soil structure. Tilling can destroy the natural soil layers and beneficial organisms, leading to a loss of soil fertility over time. According to Gardening Know How, continuous tilling can result in degraded soil health.
How much soil do you need for a raised bed?
You want enough soil to provide a good root system. If the raised bed is taller than 2 feet (60 cm), you can fill the extra space with other material, as long as you end up with 2 feet of soil. There are many options for this layer. Some are soil based and some are completely soilless.
Should you till your garden bed?
However, excessive tilling can disrupt the soil structure, leading to erosion and loss of beneficial organisms. It is essential to assess the existing condition of your garden bed before deciding whether or not to till, taking into account factors such as soil composition, drainage, and plant health.
Can you add Gravel to a raised bed?
Rocks or gravel are sometimes added to raised beds to boost drainage, but this practice can create a false water table and impair water flow. Better options are to grade the soil around the raised bed away from your garden and ensure it has good drainage. Treated lumber is not a good option for filling garden beds.