In this tutorial, Im going to show you how to draw a simple cherry blossom tree.
Ive broken the drawing up into detailed and easy-to-follow steps so you can make your very own cherry blossom tree drawing!
Disclaimer: In the name of full transparency, please be aware that this blog post contains affiliate links and any purchases made through such links will result in a small commission for me (at no extra cost for you).
Hey there! I’m super excited to share my favorite spring DIY project with you today. As someone who’s been crafting for years, I can tell you that making your own cherry blossom tree is easier than you might think. Let’s create some springtime magic together!
What You’ll Need
Basic Materials:
- White tissue paper
- Pink acrylic paint
- Brown and cream acrylic paint
- Natural branches
- Small beads
- Masking tape
- Floral tape (brown or green)
- Hot glue gun
- Craft glue
- Tall vase (around 14 inches)
Optional Materials:
- Artificial cherry blossom stems
- Green yarn
- Styrofoam cube
- Decorative moss
- Wire cutters
- Pruning shears
Step-by-Step Guide
1. Gathering and Preparing Branches
- Take advantage of windy days to collect fallen branches
- Choose branches with interesting shapes and natural curves
- Clean branches if necessary
- Cut branches to about 1.5x the height of your vase
- Pro tip: Do a trial arrangement before making final cuts!
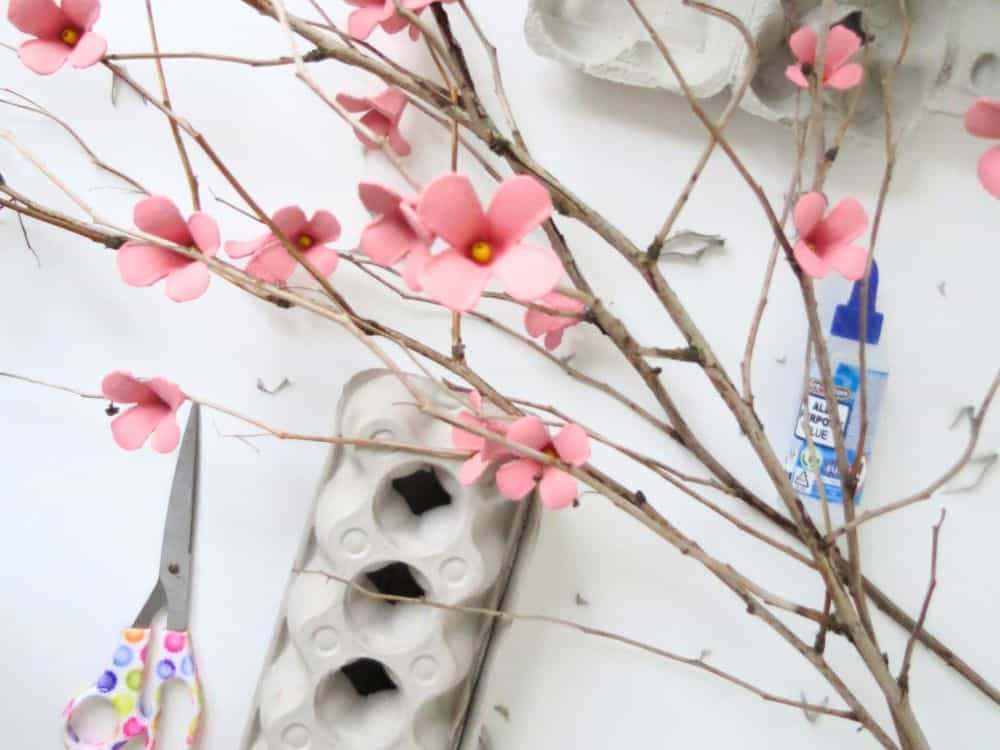
2. Creating the Blossoms
You can choose between two methods:
Method A: Tissue Paper Flowers
- Cut flower shapes from white tissue paper
- Paint lightly with pink acrylic paint
- Let center remain white
- Allow paint to dry (it’ll naturally curl the petals!)
- Add beads to centers with craft glue
Method B: Artificial Stems
- Purchase faux cherry blossom stems
- Cut stems into smaller sections
- Attach to branches using brown floral tape
- Distribute evenly for natural look
3. Assembling the Tree
-
Create the Base
- Bundle branches together with masking tape
- Position tallest branches in center
- Arrange shorter branches around edges
-
Add Detail to Trunk
- Paint masking tape brown
- Add cream-colored lines to mimic bark
- Let paint dry completely
-
Final Touches
- Secure branches in vase
- Add decorative moss around base
- Adjust flower placement for balanced look
Pro Tips from My Experience
- Don’t overcrowd the branches – real cherry blossoms have some spacing
- Mix different pink shades for more realistic look
- Use brown floral tape instead of green to better hide attachments
- Keep away from direct sunlight to prevent fading
- Dust regularly with a soft brush
Cost-Saving Ideas
- Wait for craft store sales to buy materials
- Use fallen branches after storms
- Split costs with crafting buddies
- Check dollar stores for basic supplies
- Reuse vases you already have
Display Ideas
Your gorgeous creation will look amazing in these spots:
- Entryway table
- Dining room centerpiece
- Living room corner
- Office desk
- Bedroom dresser
Common Mistakes to Avoid
- Making flowers too uniform – nature isn’t perfect!
- Overcrowding branches with blossoms
- Using wrong vase size
- Skipping the trial arrangement step
- Rushing the assembly process
Maintenance Tips
- Store in cool, dry place when not in use
- Clean with gentle feather duster
- Refresh paint touches as needed
- Secure loose flowers promptly
- Keep away from curious pets
Why Make Your Own?
I love making my own cherry blossom tree because:
- It lasts way longer than real blossoms
- Costs less than store-bought versions
- Gives me creative control
- Makes a unique conversation piece
- Perfect for any season
Final Thoughts
Making your own cherry blossom tree is such a rewarding project! It might take a couple hours, but the result is totally worth it. I’ve made several over the years, and each one turns out unique and beautiful in its own way.
Remember, there’s no “perfect” way to make your tree – let your creativity flow and have fun with it! If you’re like me, you’ll probably end up making more than one once you see how gorgeous they look in your home.
Got questions about making your own cherry blossom tree? Drop them in the comments below – I’d love to help! And don’t forget to share pics of your creation when you’re done. Happy crafting!
Step 2: Color The Cherry Blossoms Pink
Next, I added tons of dots by using the brush nib of my RV130 Queen Pink marker. These dots represent the cherry blossoms.
I first added a few to see if the shape looked all right.
And when I thought it looked good, I added a ton more dots.
I made the dots denser at the parts closer to the branches and where branches overlap. And I made it less dense further away from the branches or where there is only a tiny branch.
I barely colored any cherry blossoms close to the tree trunk, just a few.
Step 5: Add Texture To The Tree Trunk & The Branches
After that, I used a white colored pencil to add a bit of texture and highlights to the tree trunk and some parts of the branches.
On the trunk, I tried to follow the shape and flow of the branches a bit and on the branches, I highlighted the top edge.
I also used a black pencil to add some shadows on the tree trunk. I added these shadows to the right and the bottom of the white highlighted textures.
I Made My Own Cherry Blossom Tree From Scratch [DIY] | MATOKA
FAQ
How to make a cherry blossom tree?
Glue strands of yarn to the Styrofoam base to make grass. Glue more flowers on the tree and add artificial spring flower branches if desired to give it a fuller look. Now you know how to make a cherry blossom tree, you can always enjoy this beautiful spring decor even when they are not in bloom.
How do I choose a cherry blossom tree?
Choose the type of cherry blossom tree you want. There are actually a variety of different cherry blossom trees available, each with different features. The Yoshino cherry tree grows quickly and has wide-spreading branches, while the Okame cherry tree has a rounded appearance and is a bit smaller.
How do I plant a cherry blossom tree?
Nurseries sell cherry blossom tree planting stock as young trees, rather than seeds. Choose a tree in the type you have selected that is one- to two-years-old and that has been grown in an environment similar to the one you plan to transfer the tree too (i.e. sun exposure, soil type). Plant your cherry blossom tree after the last frost.
Are cherry blossom trees hard to grow?
Cherry blossom trees are beautiful and vibrant, but they’re also finicky and hard to grow. The cherry blossom tree’s name comes from the soft and pretty blossoms they produce, and range in color from hot pink to creamy white. If you’d like to grow your own cherry blossom tree, choose a consult a nursery or landscaper before beginning.
How do you display a homemade cherry tree?
Find a perfect spot to showcase your homemade cherry tree! Ideal places include entryways, living rooms, bedrooms, or even your garden. Turn on fairy lights at night for extra magic. Refresh the blossoms once they accumulate dust. Now you can enjoy this beautiful sight of spring any time.
How do you grow a cherry tree?
Select a space with deep, fertile soil. The soil beneath your cherry tree should be rich and deep. It’s important that the soil is moist, but well-draining. Cherry trees can adapt to several soil types, but do better in acidic than alkaline environments. Procure a one- to two-year-old tree.