Installing an efficient irrigation system is one of the best ways to ensure your raised garden beds thrive. With the right watering setup, your plants will grow stronger, produce higher yields, and be healthier overall.
In this complete guide, we’ll cover everything you need to know about planning, choosing, installing, and maintaining raised bed irrigation
Why Raised Beds Need Irrigation
Raised beds provide many benefits for gardeners. The contained soil warms faster in spring, drains better, and gives you more control over the growing environment. But raised beds also tend to dry out quicker than in-ground beds. Their drainage can be a double-edged sword, whisking away both excess water and the moisture plants need.
That’s why irrigation is so important for raised beds. It replaces water lost through drainage and evaporation. Irrigation also:
- Encourages deep root growth
- Lowers disease by reducing water on leaves
- Saves water compared to sprinklers
- Reduces time spent hand watering
With a proper watering system, your raised beds will thrive even in hot, dry conditions.
Irrigation Options for Raised Beds
Several types of irrigation work well for raised garden beds
Drip Irrigation
Drip irrigation uses a network of tubes or tapes with small holes that deliver water directly to plants’ root zones. Drip irrigation is efficient, customizable, and easy to install. Kits are available or you can buy components separately.
Pros:
- Conserves water
- Customizable layout
- Simple to install and repair
Cons:
- Can clog over time
- Rodents may chew holes
Soaker Hoses
Soaker hoses are porous hoses that leak water across their entire length. Lay them in beds and they’ll water plants along the row.
Pros:
- Inexpensive
- Simple to install
Cons:
- Prone to clogging
- Water delivery can diminish over time
Olla Irrigation
Ollas are unglazed terra cotta pots with a wide base, narrow neck, and a lid. Bury them in beds and fill through the neck. Water seeps out, irrigating nearby soil.
Pros:
- Simple, passive system
- Less evaporation loss
Cons:
- Labor intensive for multiple beds
- Hard to gauge water usage
Micro-spray Jets
Mini spray heads attach to tubing and water beds from above. They’re like mini sprinklers.
Pros:
- Familiar sprinkler-type system
- Flexible positioning
Cons:
- Less efficient than drip irrigation
- Can encourage leaf fungal diseases
Overhead Sprinklers
Traditional above-ground sprinklers that spray over the entire garden bed.
Pros:
- Familiar system
- Can mount on risers or tripods
Cons:
- Not efficient; waters pathways
- Encourages diseases on leaves
Manual Watering
Watering raised beds by hand with a hose or watering can.
Pros:
- Simple
- Inexpensive
- Full control over watering
Cons:
- Time consuming
- Inconsistent coverage
Choosing the Best System
Consider these factors when selecting an irrigation method:
- Water efficiency – Drip irrigation ranks highest. Ollas and soaker hoses conserve more than overhead watering.
- Water pressure – Overhead and micro-sprayers need more pressure than drip. Most drip systems operate from 10-45 psi.
- Bed quantity and layout – Drip offers the most flexibility for any configuration. Ollas work better for fewer beds.
- Plant types – Drip excels for gardens with different water needs. Overhead suits uniform needs.
- Trip hazards – Raised beds limit above-ground options. In-bed systems like drip are safest.
- ** rodent issues** – Buried drip lines are vulnerable to chewing. Above-ground systems are better if rodents are a problem.
- Convenience – Drip irrigation and micro-sprays can be automated. Ollas require frequent filling.
- Budget – Drip irrigation offers the best value long-term but requires a larger upfront investment.
Consider your unique situation and raised bed setup to select the right system. Often a combination approach works best.
Designing Your System
Once you’ve decided on an irrigation method, it’s time to design your system.
Sketch Your Beds
Draw a rough outline of your raised beds and pathways. This will help you visualize the layout and positions for irrigation components.
Determine Water Source
Where will your main water supply come from? Options include:
- Hose bib or spigot
- Exterior water outlet
- Rain barrel gravity flow
- Water timer attached to a hose bib
- Well or pump system
Consider flow rate, pressure, and location.
Mark Component Positions
Based on your water source location, sketch where tubing, emitters, ollas, or sprinkler risers will go. Think about flow rates and pressure differences. Generally, beds farther from the source need slightly bigger supply tubing.
Select System Components
Choose your specific tubing, emitters, ollas, fittings, and other parts. Consider width for main supply lines. Drip emitters come in different flow rates measured in gallons per hour.
Automate (Optional)
Adding an automatic timer to your system frees you from watering tasks. Just be sure to check beds occasionally for issues.
Installing Your Raised Bed Irrigation
Follow manufacturer instructions for installing components. Here are some general tips:
Main Supply Line
- Run from water source to garden along a fence, down a pathway, or buried.
- Use wider diameter tubing (often 5/8″ to 1″) for main lines.
- Secure with tubing hold downs or staples, but avoid sharp bends.
Drip Emitter Tubing
- Use 1/4″ or 1/2″ tubing with emitters inside beds.
- Lay along rows or snake throughout beds.
- Stake emitter tubing in place with hold downs.
- Flush lines and check emitter flow rates after installing.
Ollas
- Bury ollas to shoulder level 6-12 inches from plants.
- Fill ollas by hand or use a narrow sub-irrigation line.
- Group plants with similar water needs around each olla.
Micro-Sprays and Sprinklers
- Position above beds on risers or tripods for even coverage.
- Angle spray to avoid watering paths.
- Use misters, micro-sprays, or rotary nozzles for lower flow.
Timers and Valves
- Install a timer on the main water supply line.
- Add valves to turn sections on and off automatically.
- Set timer and valves to match your plants’ water needs.
Backflow Preventers and Filters
- Install a backflow preventer if using municipal water.
- Add a filter after the shut-off valve to prevent emitter clogs.
Caring for Your Raised Bed Irrigation System
Regular maintenance keeps your system working efficiently.
- Inspect for leaks, clogs, and damaged tubing. Flush drip lines regularly.
- Make sure emitters are producing the expected flow rates. Clean or replace clogged emitters.
- Check timers and valves early in the season. Replace batteries in timers.
- Drain and blow out above-ground pipes before winter if you live where it freezes.
- Rodent-proof system components and bury lines if nuisance chewing is an issue.
- Adjust watering schedules throughout the season to match weather and plant needs.
Troubleshooting Common Raised Bed Irrigation Problems
If your system isn’t performing properly, try these troubleshooting tips:
Clogged emitters or tubing – Flush with clean water. Use filtered water and emitter cleaning brushes.
Uneven watering – Check flow rates of individual emitters. Clean or replace underperforming emitters.
Leaks – Inspect fittings, connectors, and tubing for cracks. Replace damaged components.
Timer issues – Replace timer batteries. Check timer display and settings. Override to test.
Pressure problems – Measure pressure. Install a pressure regulator if pressure is too high. Check for blockages if too low.
Rodent damage – Replace chewed tubing. Use solid tubing or covers. Bury lines deeper. Redirect water source if necessary.
Poor plant growth – Verify water is reaching bed centers and bottoms. Increase frequency or duration if water is not sufficient.
Wilting plants – Check system is delivering expected flow. Rule out other issues like disease or poor
How to Install a Drip Irrigation System for Raised Garden Beds | Step-by-Step DIY Guide
FAQ
What type of irrigation is best for raised beds?
Not only is drip irrigation more efficient for you, it’s also more efficient with water than other methods because it delivers H2O right to the roots of your plants, losing very little to evaporation.
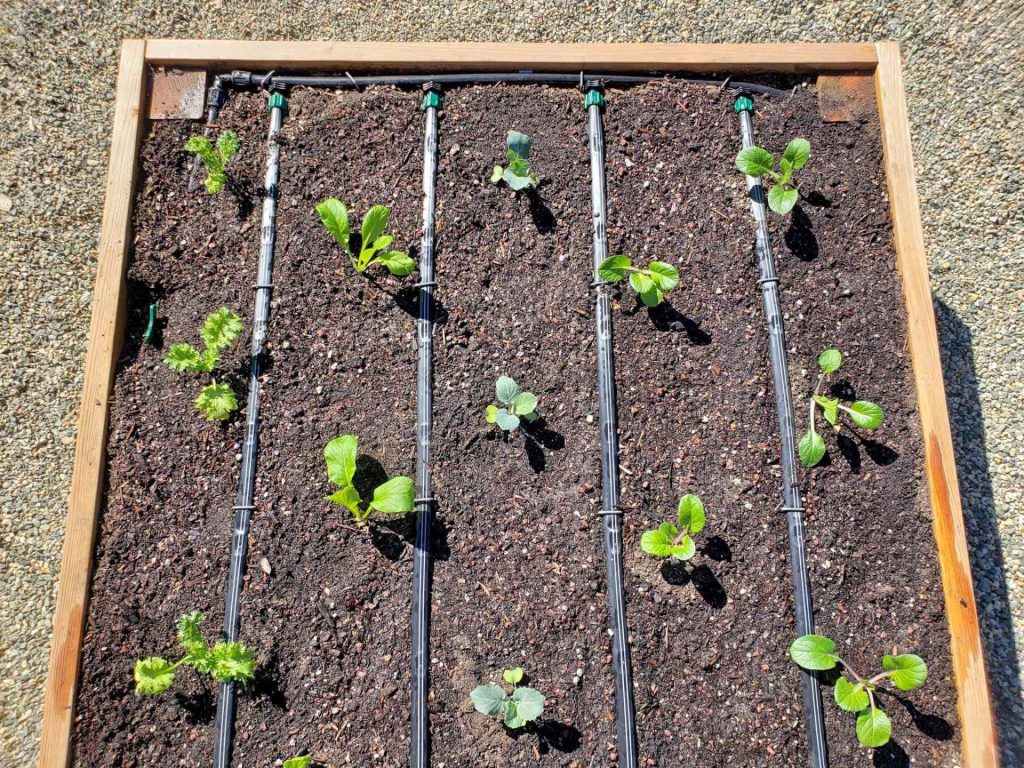
How many drip lines for 4×8 raised bed?
We recommend spacing drip lines about 12” apart, so in each 4’x8′ bed you’ll need 4 lines.Feb 22, 2020
How often should you water a vegetable garden in a raised bed?
Apply water 2 to 3 times a week, up to once every other day, depending on the temperature.Nov 20, 2024
Which is better, drip irrigation or soaker hose?
Drip systems are designed for years of use, whereas soaker hoses often require frequent replacements. This durability reduces waste and means a smaller environmental footprint, as it minimizes the need for repeated manufacturing and disposal compared to soaker hoses.