Hello, green-thumbed pals! I recently stumbled upon a gem of an event at our local shopping centre – a free terrarium-making workshop. Trust me when I say this: it’s like making a garden in a jar, and it’s unbelievably cute and low-maintenance. I have wanted to try this craft for ages, and was thrilled to have a chance to do it! So, in this post, I’ll give you the lowdown on what gardens in jars are, and a step-by-step tutorial on how to make your very own. Let’s get our hands dirty!
Hey there, fellow nature lovers and DIY junkies! Ever thought about bringin’ a slice of the outdoors inside, but like, in the cutest, teeniest way possible? Well, I’m stoked to spill the beans on creatin’ a small garden in a glass container—a lil’ piece of magic that fits right on your desk or shelf. These mini terrariums (yeah, that’s the fancy word) are like pocket-sized jungles, and trust me, they’re easier to whip up than you think. I’ve been messin’ around with these for a while now, and I’m here to walk ya through the whole shebang—why they’re awesome, how to make ‘em, and all the fiddly-diddly details to keep ‘em thrivin’.
So, grab a cuppa somethin’ warm, and let’s dive into this green adventure together!
What’s a Small Garden in a Glass Container, Anyway?
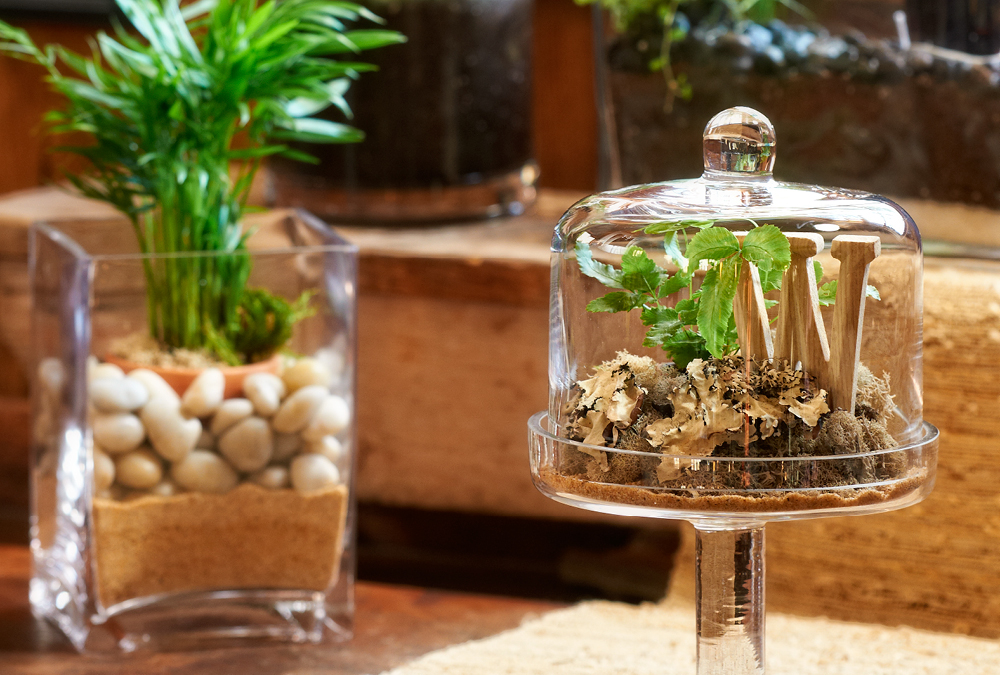
If you’re scratchin’ your head wonderin’ what I’m yammerin’ about, picture this: a tiny ecosystem, all snug inside a glass jar or bottle, with moss, rocks, maybe a couple of itty-bitty plants, lookin’ like a fairy’s backyard. That’s a small garden in a glass container—a self-contained world where nature does its thing with barely any nudge from you. Some folks call ‘em mini terrariums, and they can be closed with a lid to keep the moisture in or left open for a breezier vibe.
Why do I dig these so much? They’re like a low-key way to garden without needin’ a big yard or tons of time. Plus, they look darn cute sittin’ on a windowsill or as a centerpiece. It’s like havin’ a pet plant that don’t bark or need walkies. You can make ‘em as simple or as fancy-pants as you want, dependin’ on your vibe.
Why Bother Makin’ One? The Perks of Tiny Glass Gardens
Alright, before we get our hands dirty, let’s chat about why you’d wanna make a small garden in a glass container in the first place. I mean, ain’t got no time for pointless crafts, right? Here’s why these lil’ guys are worth your while:
- Super Easy Maintenance: Unlike my sad, overwatered houseplants (RIP, fern), these need just a sprinkle of water now and then. A closed one can basically take care of itself with the moisture recyclin’ inside.
- Brings the Calm: There’s somethin’ real zen about gazin’ at a tiny green world. It’s like a stress-buster you can stare at when life gets cray-cray.
- Decor Goals: They jazz up any space—think bookshelf, kitchen counter, or even your bathroom if you’re feelin’ wild. It’s a convo starter for sure.
- Nature Fix Without the Mess: No yard? No prob. You get that earthy connection without trackin’ mud everywhere.
- Kid-Friendly Fun: If you’ve got little humans runnin’ around, this is a sweet project to do together. They’ll love buildin’ their own mini jungle.
I’ve got a couple of these scattered around my place, and every time I peek at ‘em, it’s like a lil’ reminder to chill out. Plus, they make awesome gifts—way more personal than a gift card, ya know?
How to Make Your Own Small Garden in a Glass Container
Now, let’s get to the good stuff—rollin’ up our sleeves and makin’ one of these bad boys. I’ve tried a bunch of ways to do this, and I’m gonna break it down super simple so even if you’ve got two left thumbs, you can pull it off. Here’s what you’ll need and how to do it
Stuff You’ll Need
First, gather up your gear. Most of this you might already have lyin’ around, or you can snag it cheap from a dollar store or craft spot. Here’s the lineup:
- Glass Container: Grab a small glass jar, bottle, or vial with a lid if you want it closed, or without if you’re goin’ open-style. I’ve used everything from old jam jars to tiny medicine bottles I found in a junk drawer. Taller or wider ones work best for fiddlin’ around inside.
- Moss: This is the star of the show! Use live moss with a bit of dirt still on it for a real, breathin’ terrarium. I’ve nabbed mine from shady spots in the neighborhood (more on that later), but you can buy it at garden shops too. If you don’t wanna deal with livin’ stuff, dried moss works for looks but won’t grow.
- Small Rocks or Pebbles: These go at the bottom for drainage so your moss don’t rot. Just a handful of lil’ stones will do.
- Mini Plants (Optional): If you wanna level up, toss in tiny plants like succulents. I’ve used bits of succulents that grow slow and don’t need much water—perfect for tight spaces. You don’t even need roots; just a cuttin’ will do.
- Natural Bits: Think small twigs, seed pods, or grapevine scraps for extra texture. I’ve added lil’ resin figurines too, as long as they’re waterproof.
- Tools for the Job: Long tweezers to place stuff inside without makin’ a mess, a paintbrush to clean the glass or push dirt down, and some cotton swabs for wipin’ smudges off the inside.
Got all that? Cool, let’s build this thing
Step-by-Step Guide to Buildin’ Your Mini Garden
Followin’ these steps you’ll have a small garden in a glass container in no time. I’ve messed up plenty so I’m includin’ tips to save ya from my dumb mistakes.
- Lay Down the Rocks: Start by droppin’ a layer of small pebbles into the bottom of your glass jar. This keeps water from poolin’ and turnin’ your garden into a swamp. About half an inch deep is plenty for tiny containers.
- Add the Moss Layer: Next, plop in your moss. If it’s got dirt on the roots, that’s perfect—don’t shake it all off. Use the handle of your paintbrush or tweezers to press it down gently so it’s snug over the rocks. Don’t pack it too tight; let it breathe a bit.
- Pop in Plants or Decor: If you’re usin’ mini plants, nestle ‘em into the moss now with your tweezers. I’ve stuck in tiny succulent cuttings that just sit pretty on top. Add any twigs, lil’ rocks, or funky natural bits for flair. Get creative—make it look like a teeny forest or fairy hideout.
- Sprinkle Some Water: Last, add just a few drops of water to get things moist. Not a flood, mind you—just enough to dampen the moss. If it’s a closed container, this moisture will cycle around and keep things happy. Open ones might need a spritz every week or so.
- Seal or Leave Open: Decide if you’re cappin’ it with a lid for a closed system or leavin’ it open for easier access. I usually keep mine closed to trap the humidity, but I pop the top off every few days to let it air out and wipe down any fog on the glass.
And bam! You’ve got yourself a small garden in a glass container. First time I made one, I was legit gigglin’ at how cute it turned out. Takes maybe 20 minutes tops, and the cost? Barely nothin’ if you’re scavengin’ supplies like me.
Gettin’ Creative: Ideas for Your Tiny Glass Garden
Now that you’ve got the basics down, let’s brainstorm some ways to make your small garden in a glass container stand out. I’ve gone down some rabbit holes tryin’ different vibes, and here’s what’s worked for me:
- Fairy Tale Theme: Add tiny figurines like fairies or gnomes (waterproof ones!) and make it look like a magical lil’ spot. Use lots of moss for that enchanted forest feel.
- Desert Vibes: Skip the lid and go heavy on succulents with some sand or extra pebbles. It’s like a mini Sahara in a jar—super low maintenance too.
- Beach Escape: Layer some light-colored pebbles and toss in a shell or two with moss as “seaweed.” I made one like this and swear it reminds me of the ocean every time I glance at it.
- Holiday Twist: Around Christmas, I stuck a tiny pine sprig in one and added a red bead as a “berry.” Boom, instant festive decor!
You can also play with container shapes—wide jars for more landscape, tall bottles for a stacked look. I’ve even used old light bulbs (carefully hollowed out) for a quirky edge. What’s your style? Go wild with it!
Tips to Keep Your Mini Garden Thriving
Alright, you’ve built your small garden in a glass container, but how do ya keep it from turnin’ into a moldy mess? I’ve learned the hard way, so lemme share some pointers:
- Don’t Overwater: Seriously, a few drops is all it needs. Too much, and you’ll get rot or funky smells. If it looks soggy, open the lid for a day to dry it out a smidge.
- Watch for Mold: Yeah, mold happens—it’s natural in a damp spot like this. I open mine up every week or so to air ‘em out and wipe the inside with a damp cotton swab to keep things clear for viewin’.
- Light, But Not Too Much: Put it somewhere with indirect sunlight. Too much sun cooks the moss, too little and it won’t thrive. My kitchen window (not direct sun) is perfect.
- Check on Your Babies: Peek at it every few days. If the moss looks dry in an open container, give it a tiny spritz. Closed ones usually handle themselves fine.
- Clean the Glass: Foggy glass is normal in closed jars, but it hides your pretty garden. Pop the lid, wipe with a swab, and seal it back up.
I’ve had some of mine goin’ strong for over a month now, and they’re still lookin’ fresh. A well-balanced closed one can legit last forever if you treat it right.
My Own Mini Garden Mishaps and Wins
Lemme tell ya a quick story or two about my journey with these small gardens in glass containers. First time I tried, I got way too excited and dumped in too much water—ended up with a slimy mess that smelled like old socks. Had to scrap it and start over, but lesson learned! Now I’m real stingy with the H2O.
On the flip side, one of my proudest lil’ creations was a tall bottle I turned into a mini jungle with moss I found on a walk. I’d been strollin’ around my neighborhood, pokin’ into shady corners for patches of green stuff, and scored some fluffy moss that looked straight outta a fairy tale. Added a twig that looked like a tree trunk, and I swear it’s my fave piece of decor now. Every time I walk by it on my desk, I grin like a goof.
Where to Find Materials (Without Breakin’ the Bank)
Speakin’ of findin’ stuff, you don’t gotta spend a fortune on this hobby. Here’s how I source my bits and bobs:
- Glass Containers: Check your kitchen for old jars—jam, pickles, whatever. I’ve hit up dollar stores for cheapo bottles too. Even thrift shops got weird lil’ vials sometimes.
- Moss and Naturals: Take a wander outside! Shady spots under trees or near sidewalks often got moss growin’. I’ve picked up twigs and pods on walks too. Just make sure it’s clean-ish before poppin’ it in your jar.
- Rocks and Plants: Got a gravel path nearby? Snag a few pebbles. For plants, I’ve snipped tiny cuttings from my own succulents or asked pals for a lil’ piece of theirs.
If you’re stuck on where to hunt for moss, try scopin’ out local parks or green spots. I’ve even used maps on my phone to find nearby nature-y areas with good shady patches. It’s like a treasure hunt, and it’s free!
Where to Show Off Your Glass Garden
Once your small garden in a glass container is ready, you’ll wanna display it somewhere it gets noticed. Here’s where mine live around my pad:
- Desk or Workspace: Keeps me grounded when I’m sloggin’ through emails. It’s like a lil’ green buddy cheerin’ me on.
- Bookshelf: Tucked between novels, it adds a pop of life to boring old paperbacks.
- Kitchen Counter: Near the sink, it’s a nice touch of green while I’m washin’ dishes or sippin’ coffee.
- Bathroom Shelf: Sounds odd, but the humidity in there keeps the moss happy, and it looks super chic.
Play around with spots in your home. Group a few together for a bigger impact, or let one stand solo as a statement piece. I’ve got a cluster of three on my coffee table right now, and folks always ask about ‘em when they come over.
Wrappin’ It Up: Get Your Green On!
So, there ya have it—everything you need to know about craftin’ a small garden in a glass container. It’s a fun, cheap, and downright adorable way to bring a bit of nature into your life, no matter how small your space is. I’ve loved sharin’ my tips and flops with ya, and I’m hopin’ you’re feelin’ inspired to give it a whirl.
Start simple—grab a jar, some rocks, and a bit of moss, and see where your creativity takes ya. Messed up? No biggie; just try again. I’d love to hear how yours turns out, so drop a comment or tag me if you share pics online. Let’s keep this tiny green party goin’!
Keep growin’, keep glowin’, and let’s make the world a lil’ greener, one glass garden at a time.
Creating Your Terrific Terrarium: Step-by-Step
- A clear glass jar or container with a lid (Mason jars work a treat)
- Small pebbles or gravel
- Activated charcoal (available at garden centres)
- Potting soil suitable for terrariums
- A fittonia plant (also known as the nerve plant)
- A bit of moss
- Decorative pebbles or stones
- A spray bottle with water
Step 6: Shower Your Garden (with Water)
Use a spray bottle to moisten the soil. You don’t want to drown your plants, just give them a nice, gentle shower. This mimics a self-sustaining cycle inside your terrarium.
Create a MINI Terrarium in a Small Jar with EASY Steps
0