Snow peas are heavy croppers that are easy to grow in home veggie beds or potted gardens. Snow peas flat pods can be eaten pod and all, and they are delicious raw or cooked and because they are sweet and crunchy they are a kids favourite!
Snow peas are best grown in the cooler months of the year, so any season except summer – as long periods of temperatures higher than 25°C will reduce their flowering and cropping.
Snow peas seeds are large, making them easy to handle and great for kids to sow and grow in the garden or pots. Snow peas are best grown up a simple support or trellis as the plants can reach up to 1.5 to 2.0 metres tall.
Snow peas are a delicious addition to stir fries, salads, and more Their sweet, crisp texture makes them a favorite ingredient. However, timing is everything when it comes to getting a good harvest of snow peas. This guide will walk through when and how to plant snow peas for optimal results
What are Snow Peas?
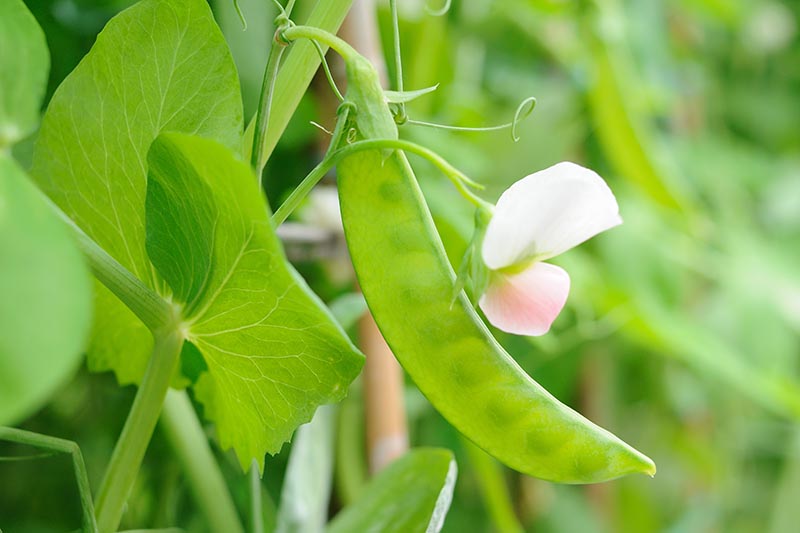
Snow peas, also known as sugar peas or Chinese pea pods, are a variety of pea with edible pods and seeds. The pods are flat and harvested before the peas develop, which gives them their signature crunchy texture. Both the pods and peas can be eaten raw or cooked.
Some key differences between snow peas and other peas:
-
Snow peas have smaller peas inside the pod compared to snap peas.
-
Snow pea pods are flat while English pea pods are more rounded.
-
Snow pea pods are eaten whole while English pea pods are discarded.
Snow Pea Growing Conditions
Snow peas thrive in cool weather and require specific conditions to grow properly:
-
Sun: Full sun is ideal, but partial shade also works. At least 6 hours of direct sun per day.
-
Soil: Well-draining loamy soil with a slightly acidic pH between 6.0-6.5.
-
Temperature: Germinates at 45-70°F. Stops growing at temps above 85°F.
-
Water: Consistent moisture. At least 1 inch per week.
As long as temperatures remain cool, snow peas will continue to produce pods throughout the growing season. Hot weather will stunt their growth.
When to Plant Snow Peas
Snow peas are a cold weather crop best suited for spring and fall planting. Here are some guidelines for timing:
Spring Planting
Plant 2-4 weeks before the last expected frost date for your area. For most regions, this means planting in February or March.
The seeds need soil temperatures of at least 40°F to germinate, so planting too early when the ground is still frozen will prevent sprouting. However, planting later in spring risks hotter weather that will inhibit growth.
Aim for daytime temperatures averaging 60-75°F once the plants sprout. Light frosts won’t harm established plants.
Fall Planting
In areas with long, mild falls, snow peas can be planted again in late summer/early fall about 8-10 weeks before the first expected autumn frost.
This second harvest takes advantage of cooler temperatures before winter arrives. Choose disease-resistant varieties when planting in fall.
Winter Growing
Some snow pea varieties can grow through winter in zones 9-11. Time planting for mid-late fall after the summer heat has passed but before freezing weather sets in.
Tropical Climates
Snow peas require cooler conditions and won’t grow well in tropical climates with sustained hot, humid weather. They are better suited for temperate regions.
Dry Climates
Dry regions can grow snow peas but need to ensure consistent soil moisture through irrigation. Mulching also helps retain moisture.
How to Plant Snow Peas
Follow these steps for planting snow peas from seed:
-
Location: Choose a spot that gets full sun (at least 6 hours per day). Have trellising installed and ready to go.
-
Soil prep: Loosen soil and mix in compost or aged manure 2-3 weeks before planting if possible. This improves drainage.
-
Planting depth: Sow seeds 1 inch deep and 1.5-2 inches apart in rows spaced 6 inches apart.
-
Support: Snow peas require trellising or staking alongside the row they are planted in. Install this at planting time, before seedlings emerge.
-
Irrigation: Ensure consistent moisture, especially when plants are young and becoming established. About 1 inch of water per week.
-
Maintenance: Apply mulch once seedlings are several inches tall to retain moisture and reduce weeds.
When to Harvest Snow Peas
-
Days to maturity: Expect around 60 days from planting to harvest depending on variety.
-
How to tell: Pods should still be completely flat with just a slight bulge from the peas inside when picked. Overripe pods will be lumpy.
-
Frequency: Check plants every 2-3 days for ready pods. Pick often to encourage more pod production.
-
Picking: Gently twist pods off the vine. Use scissors if needed. Handle carefully to avoid bruising.
-
Storage: Refrigerate harvested pods and use within 1-2 days for best quality. The sweetness fades quickly after picking.
-
Ongoing harvest: Pick frequently to maximize yields over 4-6 weeks. Flowering and pod production slows in hot weather.
With the right planting schedule for your climate and good care, it’s easy to enjoy handfuls of homegrown snow peas! Let this guide help you determine the best time to sow seeds.
Top 5 steps to growing snow peas
- Choose a full sun position and set up the support or trellis structure before planting. This will avoid disturbing your snow peas roots later on.
- Improve the soil before planting by adding compost or Scotts Osmocote Compost Premium Soil Improver and fork it through the top 20-30cm of the soil, breaking up any soil lumps as you go.
- Direct sow snow peas seeds into dampened, prepared soil. Sow seeds at the base of your support or trellis – allowing 7-15cm between each seed.
- Snow pea seeds will germinate in 7-10 days and will be ready to harvest 8-12 weeks from planting, depending on your climate and the variety you’ve chosen.
- Slugs and snails are a big problem for young snow pea seedlings. Sprinkle Defender Slug & Snail pellets around to keep your crops from attack.
Choose a full sun spot for your snow peas and set up a simple bamboo poll support structure or wire trellis for them to climb up as they grow.
Enrich the soil before planting snow peas with Scotts Osmocote Compost Premium Soil Improver, dug through the top 10-20cm of soil. Water the soil or potting mix before planting to make it damp, but not soggy.
Sow snow pea seeds directly into the prepared bed or pot you want them to grow in. Plant them at the base of your support structure, approximately 2-3cm deep and with 7-10cm between seeds. Cover the seeds with soil or potting mix and don’t water them again until they’ve germinated in 7-10 days.
Fertilise with a light sprinkle of Scotts Osmocote Plus Organics All Purpose (including Natives) Plant Food & Soil Improver once the snow peas seedlings are about 10-15cm tall. Mulch around your snow peas plants to suppress weeds and retain moisture.
Snow peas can be grown from seedlings – simply plant the seedlings 7-10cm apart into prepared soil or potting mix (if growing in a pot) at the base of a support structure.
Fertilise with a light sprinkle of Scotts Osmocote Plus Organics All Purpose (including Natives) Plant Food & Soil Improver once a few weeks after planting and mulch around your snow peas plants to suppress weeds and retain moisture.
Snow peas can easily be grown in medium pots at least 20-30cm deep by the same width or choose a narrow trough style planter that’s easy to position up against a trellis for the snow peas to climb up.
Fill the pot or planter with Scotts Osmocote Plus Organics Premium Potting Mix and water it to dampen the potting mix. Sow the seeds approximately 2-3cm deep and 7-10cm apart at the base of your support structure.
Position your pot in a full sun spot and don’t water it again until the seeds germinate in 7-10 days.
Fertilise with a light sprinkle of Scotts Performance Natural All Purpose Organic Based Fertiliser on the potting mix surface once the snow pea seedlings are 10-15cm tall.
Mulch around your snow pea plants to suppress weeds and retain moisture.
Depending on the variety of snow peas you’ve grown, you’ll be able to begin harvesting from around 6-10 weeks after planting. Snow peas are sweetest and most tender when their pods are smaller and the peas inside the pods are not overly swollen.
Harvest pods as you need them and eat them raw or cooked. Snow pea shoots, tendrils and flowers are also edible and can be added to salads for pretty pea flavoured garnish.
Slugs and Snails will cause significant damage to snow pea seedlings, particularly when they are very small. Protect your snow pea crop by setting beer traps (saucers filled with beer) or use Defender Slug & Snail pellets. When to Plant Jan Feb Mar Apr May Jun Jul Aug Sep Oct Nov Dec
Want to learn more? Discover tips and tricks for your favourite plants Choose a plant
5 Tips How to Grow a Ton of Snow Peas
FAQ
What is the best month to plant snow peas?
Peas are a spring crop that germinates best at about 70 degrees. Snow peas have a characteristic flat pod. This spring crop doesn’t like hot weather, and germinates best at about 70 degrees fahrenheit, so it’s perfect to plant around February.
What is the best month to plant peas?
“Peas can be planted in early November for an early June crop. They may not make it every winter. Green peas and edible pod peas (sugar peas) can be planted until mid-July. A moderate harvest can be expected in fall.”
Do snow peas like sun or shade?
Snow peas prefer a well limed, free draining soil and a sunny to part shade aspect.
How long does it take for snow peas to grow?
Harvesting Snow peas are ready to harvest relatively soon after planting–most varieties begin producing in about 60 days. You can pick them anytime after the peas start forming, when the pods are a couple of inches long. Don’t wait until the peas get too fat.