After moving to the farm we decided to design and build our dream garden, doing all of the labor ourselves. It has been an adventure, and we’re anxiously awaiting completion of the project and being able to put plants in the ground this spring.
My wife Sherry and I moved back to the family farm in late 2018 after spending 20+ years in Plano.
While we were in Plano we very much enjoyed gardening and the peace it brought. Planning of what to plant, prepping the soil and of course harvesting and eating the crops.
We had a typical sized lot in the suburbs, and over the years had played with different types of beds. Raised beds made of cinder blocks worked best for us. We had the house landscaped several years back, and it was expensive to put those beds in! There were three raised beds made of 16x8x8 cinder blocks stacked two high with water run to each bed.
Our goal with this garden is to grow enough produce to feed not only ourselves, but Sheron, Dan, David and his family as well. We also want to do a lot of canned goods, such as pickles, tomatoes, tomato sauce, peppers, and so on.
At first we were going to go with three square raised beds, and as we looked at the space we had available (a lot!) and the number of cinder blocks in a pallet (72) we decided to go with six raised beds, stacked three blocks high in a square formation. Four pallets of cinder blocks would provide exactly enough blocks to do 6 beds at roughly 6′ square.
We drew the plan out paper and it didn’t look like all that much work. Just six squares on paper. Ha!
Sherry had brilliant idea of adding a raised berm behind the beds for planting plants that would attract butterflies and bees, large bushy herbs and vine plants. No problem! How much soil would a little old raised berm take? (as it turns out it took 225 cubic feet of soil, more on that in another post)
Raised garden beds made from cinder blocks are a great way to grow vegetables and herbs. Cinder block raised beds have many advantages over traditional in-ground gardening. They allow you to control the soil quality, prevent pests, reduce weeds, and make gardening accessible for people with mobility challenges.
In this article we will walk through the full process of designing building, and planting cinder block raised beds for your vegetable garden.
Benefits of Cinder Block Raised Beds
There are several key reasons why cinder block raised beds are a smart choice
-
Control soil quality – With in-ground gardening, you have to work with whatever native soil exists in your yard Raised beds allow you to fill the frame with high-quality growing medium optimized for your plants.
-
Prevent pests – Raised beds can help block tunneling animals like gophers and moles from wreaking havoc on plant roots and tubers. The cinder block foundation provides a solid base.
-
Reduce weeds – Weeds are far less likely to take hold in loose, well-drained raised bed soil compared to compacted ground. It’s much easier to pull any weeds that do appear.
-
Accessibility – Raised beds elevate your plants so there is no need to bend down. This makes gardening possible for people with back problems or mobility limitations.
-
Improve drainage – Loose soil in a raised bed promotes good drainage and air circulation to plant roots.
-
Long-lasting materials – Cinder blocks are extremely durable. A properly constructed raised bed will last for many years.
Design Considerations
When planning your cinder block raised bed project, keep these tips in mind:
-
Size the beds so you can comfortably reach the center from either side. Most standard depth cinder blocks will allow for a 3 to 4 feet wide bed.
-
Leave 2-3 feet between beds to allow for walking and maintenance access.
-
Position the beds with the longest side facing south to maximize sun exposure.
-
For efficient watering, group plants with similar watering needs together in each bed.
-
Incorporate square or rectangular blocks to offset seams and increase stability.
Gather Materials
You will need:
- Cinder blocks
- Cinder block adhesive
- Crushed gravel
- Landscape fabric
- Garden soil
- Sand
Allow 1-2 blocks per linear foot as a general rule when estimating materials. It’s better to get a few extra.
Prepare the Site
Choose a level spot in full sun with good drainage. Remove any grass or weeds. Dig down at least 6 inches and fill with crushed gravel, then add a layer of landscape fabric. This will prevent weeds from below and provide drainage.
Level the site by raking smooth and compacting. Any dips at this stage will transfer to the finished raised beds.
Build Bottom Layer
Dry stack the first layer of blocks directly on the prepared gravel base. Use square blocks sporadically to break up the seams. Level each block front-to-back and side-to-side as you go with a mallet.
Stagger overlaps to increase stability. Check overall level frequently, and adjust low blocks with sand underneath. Leave small gaps between blocks for drainage.
Adhere Blocks
Once the first course is level, lift blocks and apply concrete adhesive to the edges that will contact neighboring blocks. This “glues” the blocks together to form one solid structure.
Reseat the blocks in position. Allow adhesive to dry fully before stacking second level.
Add Second Layer
For the second layer, place blocks perpendicular to the first layer to tie the courses together. Apply adhesive between layers. Square blocks can be used again to break up seams.
Repeat adhesive application. Allow to fully cure before filling bed with soil.
Fill Beds
The basic rule is to fill beds with rich soil up to 6 inches below the top of the blocks. This leaves space from settling while preventing soil from washing over the edges.
For raised beds, a high-quality potting mix amended with compost is recommended vs. garden soil which can compact over time. Fill beds in 4-6 inch layers, watering between each batch, until you reach desired height.
Plant and Enjoy
Your raised beds are now ready for planting! Follow best practices for spacing plants appropriately and providing support structures as needed.
Consider adding pathways between beds with wood chips, gravel or pavers for easy access. Maintain your raised bed soil health with yearly compost top-dressing. With proper care, your cinder block raised beds will provide many years of bountiful harvests!
What is the difference between a cinder block and a concrete block?
If you google “how to build a raised garden bed with concrete blocks”, you will see both options. (Also, cement blocks aren’t a thing. You’re looking at either concrete or cinder blocks.) If you’re wondering what the difference is , here’s the info.
- Made from cement and aggregate (true concrete)
- Stronger than cinder blocks
- Heavier than cinder blocks
- Longer-lasting
- Made from cement and cinders or ash for aggregate
- Less durable and more likely to break under pressure
- Lighter than concrete blocks
- Most importantly, they haven’t been made on a large production scale since the mid 20th century.
How to lay your cinder blocks for a raised garden bed
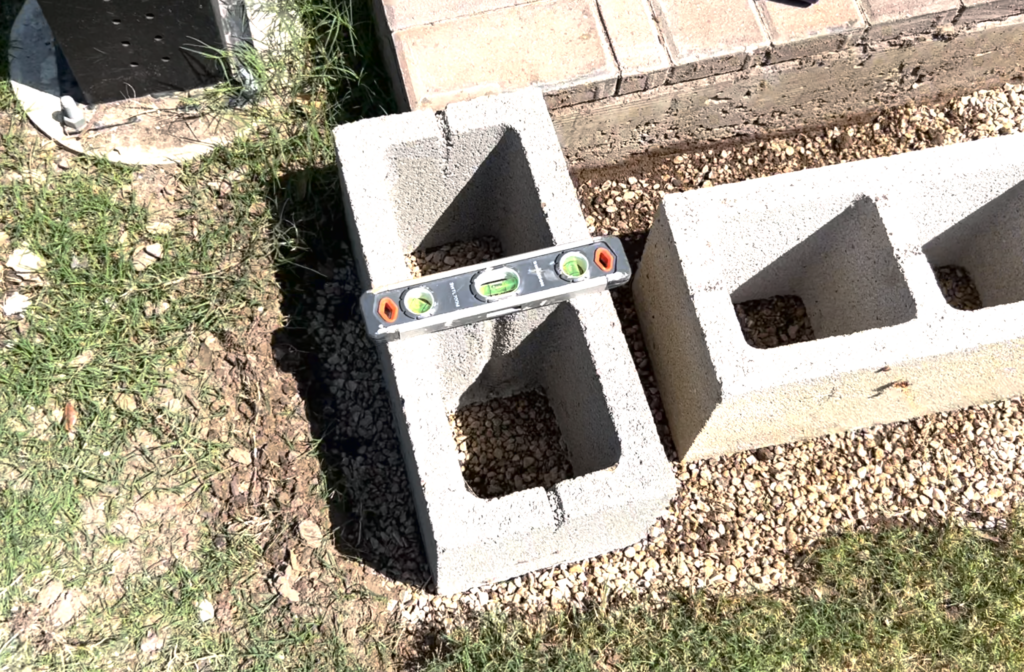
So, once you have put down your gravel and sand mixture, it’s time to lay the first block! This block MUST be level or your entire garden bed will be off, so take the time to get it right. Lay the block down where you want it to sit and put your level on top. The air bubble needs to be in the center of both the vertical and horizontal vials. Once it is level, place the next block down next to it. Ensure it is really close, as you don’t want any gaps between your blocks. As soon as I put that block down next to the first one I could see it was lower at the back corner. I didn’t even need a level to see that! So, I built up that corner by adding a bit more gravel under it and then trying again.
It was so close!
Just a little bit high. Before I took the block out again and started removing gravel, I hit it with my mallet first. That corner was now level but it was a bit high on the opposite corner now. So, I moved the block and took a bit of gravel out from where it was high. As you can see, leveling this first layer of blocks took some time. But block by block I was able to get every single one leveled out in a straight line. It is just a bit of a process.
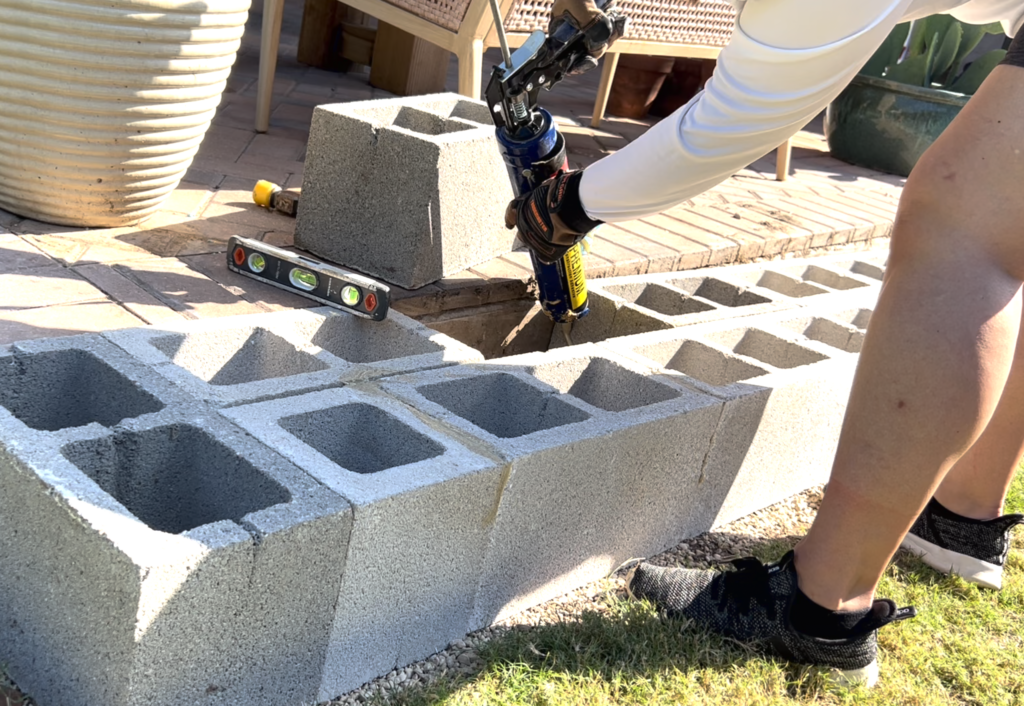
Do you remember that I purchased a single square block as well as the rectangular ones? You don’t want to line up the blocks perfectly with one another. This would have made a single line of weakness where the blocks all butted up against each other. Instead, I put a square block in the lineup in the second position so the ends were staggered. I also put the first block down in one direction and the rest that followed were the opposite direction.
These tricks are something easy you can do to increase the stability of your final structure.

Once the base layer of blocks was down and leveled out, I made it even stronger by adding Loctite construction adhesive. I simply removed the blocks one at a time from their set position, added the adhesive to the ends, and then put them back in place. And of course, after I put each block back in place I checked that it was level again, making little adjustments here and there with my trusty mallet. I highly recommend this step, as it will make your garden boxes into one solid piece and help prevent your blocks from settling separately over time.
RANKED: The BEST (and Worst) Raised Garden Materials
FAQ
Are cinder blocks good for raised garden beds?
Can you use concrete blocks for raised garden bed? So, can these blocks be used to create a raised garden space? Yes! Concrete blocks are perfect for a project like this.
How many cinder blocks do I need for a 4×8 raised bed?
20 blocks will give an interior bed area of 4′ x 8′.
What do you put on the bottom of a cinder block planter?
Fill the bottom of the planter box with gravel, rocks or old paver stones.
What are the cons of cinder block?
- Concrete masonry units are heavy to handle. …
- A CMU block wall often requires installing an air and moisture barrier, which adds another trade and more labor to the foundation project.
- Improperly reinforced CMU blocks produce weak foundations.
How to build a garden bed with cinder blocks?
Build the supports for your raised garden bed with the cinder blocks. Make sure to leave enough space between each wall for storage. Then, place wood planks or even a full box on top of the walls to finish the raised bed. If you don’t use a full wooden box, you can place individual cinder blocks on top for your plants.
Do cinder block raised beds need to be tilled?
Unlike traditional garden beds, cinder block raised beds do not require tilling or digging. Simply fill the bed with soil and compost, and you’re ready to start planting. This is also great if you live on hard soil conditions and want to grow more bountiful gardens.
What are cinder block raised beds?
One of the great things about cinder block raised beds is that they are very versatile. You can make them as small or as large as you want, and you can stack the blocks to create different heights. This makes them perfect for growing a variety of plants, from small herbs to large vegetables.
What can you plant in a cinder block raised garden bed?
The DIY raised garden bed is now ready for planting. We planted potatoes, carrots and onions in our beds. The finished concrete block raised bed will be 4’ x 8’ on the inside when completed. Maximize your garden space and gain control over the quality of your soil by building a cinder block raised garden bed.
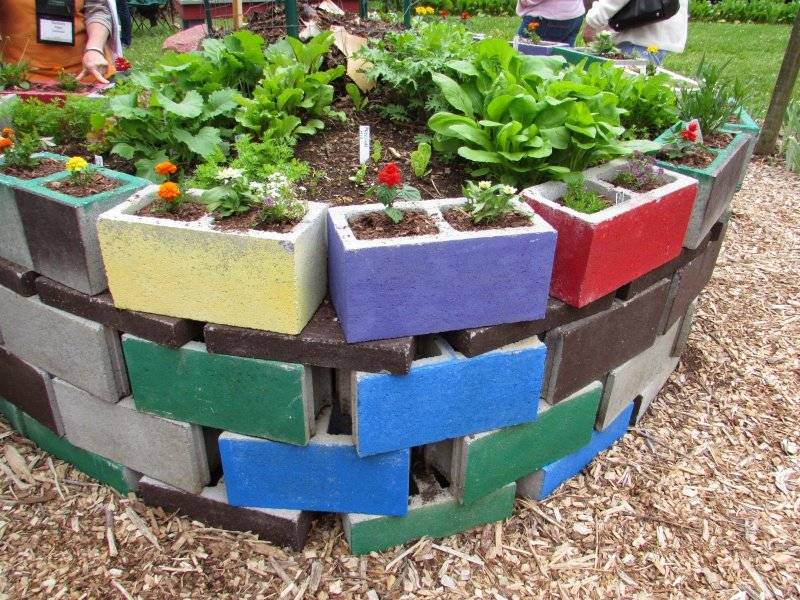
What is a cinderblock keyhole raised garden bed?
We love this cinderblock keyhole raised garden bed design, featured on Garden Gate Magazine, which uses cinder blocks to create a circular raised garden bed with a composting basket in the center. This design is not only functional, but it also looks great in any backyard.
Can a cinder block be used as a raised planter?
Use A Painted Cinder Block As A Single Raised Planter Cinder blocks don’t have to be used to build entire walls. Sometimes all you need is a small bed of soil to start growing. This method uses two cinder blocks, but only uses one as the raised bed itself. First, place one block on its side so that it’s wider than it is tall.