All-in-one mushroom grow bags provide a convenient, beginner-friendly way to grow gourmet mushrooms at home. These pre-inoculated blocks contain a pre-mixed, sterilized substrate along with mushroom spawn, eliminating much of the guesswork and hassle from mushroom cultivation. With simple maintenance, the mycelium will colonize the block and produce bountiful flushes of mushrooms.
In this comprehensive guide, we’ll walk through the entire process of using all-in-one grow bags, from preparing your workspace to harvesting your mushrooms Whether you’re a novice or a seasoned cultivator, follow these instructions to get your fungi growing and enjoy homegrown mushrooms with minimal effort
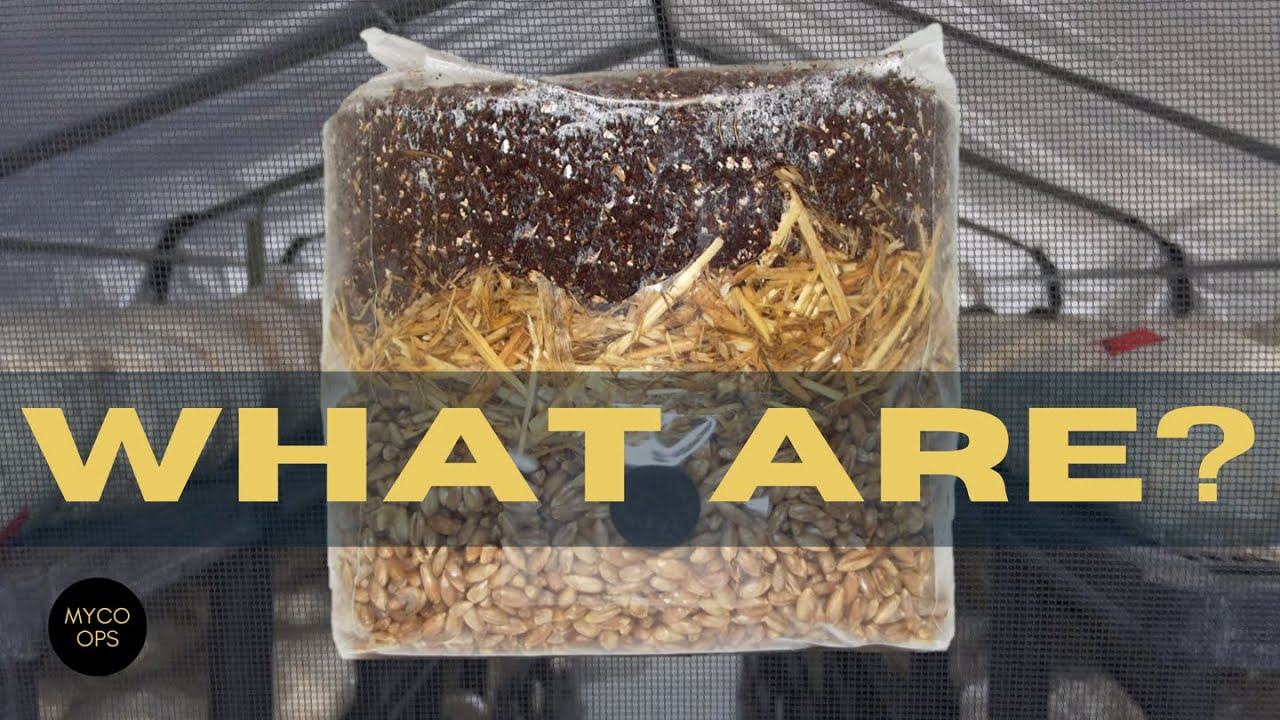
What Are All-In-One Grow Bags?
All-in-one grow bags integrate the substrate and spawn into one self-contained block. The bag contains pasteurized material like straw, manure, or sawdust along with live mycelium. This eliminates the steps of mixing, sterilizing, and spawning bulk substrates. The grower simply injects the pre-mixed block to initiate colonization.
These complete kits offer major advantages
- Simplicity – Skip complex preparation like bulk substrate sterilization.
- Convenience – The bag contains everything needed to grow mushrooms.
- Beginner-friendly – Great for first-time cultivators with limited experience.
- Self-contained – Reduce contamination risk with a controlled environment.
- Consistent results – Pre-mixed substrates guarantee quality mushrooms.
Reputable all-in-one bags use proven recipes formulated for optimal mushroom growth Options cater to different species with substrates tailored to their needs Grow everything from oyster mushrooms to lion’s mane using this simplified cultivation method,
Selecting an Ideal Growing Space
Choosing the proper growing area is key for your all-in-one bag. Find an indoor location protected from direct sunlight, drafts and extreme temperature swings. A basement, garage or insulated shed often work well.
The ideal temperature range is 65-75°F. Avoid areas exceeding 80°F or dropping below 55°F. Maintaining high humidity around 70-90% is also crucial. Increase ambient moisture with a humidifier if needed. Good air circulation is important but avoid direct, strong fans blowing on the bags.
Prepare your workspace by clearing clutter and wiping down surfaces with 70% isopropyl alcohol. Working in front of a still air box provides added contamination protection. Thoroughly wash hands and wear gloves when handling bags.
Inoculating the Grow Bag
With your cleaned workspace set up, you’re ready to inoculate the all-in-one bag. Begin by flame sterilizing the needle tip of your liquid culture syringe. Let it cool before injecting 2-5 mL of culture through the injection port. Distribute the inoculant evenly by gently massaging the bag after injecting.
If using a spore syringe, expect a 1-3 week delay before seeing growth. Store leftover inoculant properly refrigerated. Place the injected bag in your prepared growing area out of direct light. Ideal colonization temperatures are 70-75°F. Full colonization can take anywhere from 3 weeks to 3 months.
Mixing the Substrate for Even Colonization
Once nearly fully colonized, gently break apart any clumps and mix the substrate to disperse mycelium. This speeds colonization of uncolonized areas. After mixing, let the bag sit undisturbed 1-2 more weeks until dense, white mycelium permeates the entire substrate. Forcing early fruiting leads to poor results – patience pays off!
Initiating Fruiting Conditions and Pinning
The mycelium needs proper conditions to produce mushrooms. After full colonization, introduce light and fresh air to trigger pinning. 12 hours of daylight prompts primordia formation. Add gas exchange holes if lacking. Maintain high humidity and fan the bag daily.
Within a week, small white pins should emerge. Resist altering conditions while pins develop to avoid aborts. Once pins mature into small mushrooms, it’s time for the next steps.
Preparing the Grow Bag for Optimal Fruiting
To optimize yields, prep the grow bag when mushrooms reach 2-4 inches tall. First, make a horizontal slit below the substrate line to prevent side pins. Secure the area under the slit with a rubber band or tape.
Next, cut an X-shaped gap above the substrate level to expose the developing caps while leaving the back and bottom sealed. Mist the inside walls through the X-slits 1-2 times daily to maintain humidity. Some growers remove the top fully but this dries out the substrate faster. The X-cut method balances moisture and air exchange.
Determining the Best Time to Harvest
Unlike produce, mushrooms grow rapidly and decay quickly. Check your grow bag at least once daily, harvesting each mushroom as the cap edge starts curling under. Harvest before veils break or caps flatten.
Gently twist mushrooms to remove without damaging the block. Use a sharp knife to cut away leftover stems. Refrigerate promptly after harvesting for maximum freshness. Pick frequently for the highest yields possible.
Flushing the Grow Bag for Additional Harvests
Even after the first flush, your grow bag has potential. To rejuvenate it, first remove all stems. Then seal it up and soak the block in cool water 6-12 hours. Drain excess moisture and recover 5-7 days before repeating fruiting. With proper care between flushes, you can often harvest 3-4 times from each bag.
Avoiding Contamination During Fruiting
Bacterial blotch, mold and pathogens can quickly ruin grows. Isolate and dispose of any contaminated bags. Disinfect the area to prevent spreading issues. Limit risks by following sterile procedures, maintaining cleanliness, and allowing proper air flow. Act fast at the first signs of trouble.
Tips for Maximizing All-In-One Grow Bag Yields
Follow these best practices for the highest mushroom yields from your all-in-one grow bags:
- Maintain a stable, ideal temperature range
- Keep humidity between 80-95%
- Provide 12 hours of moderate daylight
- Fan and ventilate the bag daily
- Pick mushrooms as soon as they mature
- Avoid overhydrating or drying out the block
- Keep pests like fungus gnats away
- Sanitize tools and workspace frequently
- Act promptly if contamination appears
With this complete all-in-one grow bag guide, you’ll understand the entire process required to nourish abundant mushroom harvests at home. Just provide your bag with the ideal growing conditions, and enjoy the fruits of your fungal labor!
Watch All-in-one Grow Bag Instructions
Choose and clean your work area. If you’re using a still air box, clean the inside thoroughly, wiping the inside surface and lid with 70% isopropyl alcohol or bleach wipes. If you are not working in a still air box, choose a room with little to no air movement. Clean the surface you’re working on, then clean the outside of the bag including the black injection port.
Once your alcohol or bleach has dried from the bag, attach the needle to your syringe. Make sure that it is completely attached before removing the syringe cap.
Remove the syringe cap and use a lighter to heat the metal syringe tip to red hot. Once red, stop heating, you do not want to overheat this part of the syringe, since the attachment piece is plastic, you do not want to melt the plastic portion.
Allow your syringe tip to cool from red hot. DO NOT WIPE OR TOUCH THE NEEDLE WITH ANYTHING. After the syringe is no longer red, wait about 3 seconds, then insert into the rubber injection port.
Once inside the port, inject 2-4cc of genetic material into your bag moving your needle around as you inject. If you inject more than 2-4cc that is fine, but it is unnecessary. If using only 1 bag for your syringe, you can inject up to 10cc of genetic material, though this is unnecessary.
Withdraw your syringe, recap the needle, and if reusing your genetic material syringe replace the syringe cap. If not reusing, dispose of your syringe and needle appropriately.
Allow your grain to colonize. This can take anywhere from 2-4 weeks depending on the genetics you’ve chosen, and the conditions you’re growing in. You want to keep the bag in an area that is dark and 70-75°. If your grow area is cooler than this, you’ll want to use a heat mat. For heat mats put your grow bag inside of a tote or box, then place that on a towel, then place the tote or box on top of the heat mat. The other option is to put the heat mat inside the box or tote next to your grow bag, avoiding having the bag on top of the mat or having the mat touch your bag. Doing this prevents the bottom of your bag warming up while the top remains cool, and the bottom of the bag drying out. Do not put your bag directly on a heating mat, this will dry your bag out fairly quickly, rendering it useless.
Once your grain is between 50-80% colonized (white) break up the colonized grain thoroughly, and begin mixing into the substrate layer. It may help to lay the bag flat on its side and roll the material to mix. Once thoroughly mixed, hold your bag by the top portion and shake to get the material stuck in the top loose, pat the bottom of the bag to help dislodge anything remaining.
Some material will remain which is alright as long as there’s no grains lingering above. Once all your material is back at the bottom of the bag, place on a surface and slightly press on the top and sides to slightly compact your substrate block.
Patience is key here. If you inject your genetic material and don’t see any growth after 2 weeks, wait 2 more weeks! Don’t fiddle with your bag every other day. Mycelium grows in extremely small fiberous strands, by picking up and moving the bag you risk damaging the strands of growth, repeatedly damaging the growth will cause it to stall and stop growing. After injecting leave the bag alone for a minimum of 2 weeks before looking at it.
We do not warranty other vendor’s genetics except for fullcanopygentics.com If genetics that you added to the bag do not grow or grow poorly, you would want to contact the vendor you purchased the genetic material from.

Allow your substrate to colonize. This can again take anywhere from 2-4 weeks. You want to keep your bag in the same conditions as before, 70-75°F in darkness. Once fully colonized, you can do a few different things.
Between all the methods of fruiting, you want to set your project in an area between 68-70 degrees, with a light on a 12 on 12 off cycle nearby. This will help to initiate fruiting.
The easiest and first recommended way to fruit your bag is to leave it be. Lower the temperature, get a light on a 12/12 cycle nearby, and leave the bag to fruit on its own. No need to modify the bag or handle it, just let the bag fruit. Each subsequent method of fruiting we list can be attempted if fruits are not seen after 2 weeks.
The next method is to cut the top seal of your bag, allowing fresh air to get into your bag. This will signal to your bag where fresh air is coming from, allow CO2 to leave the bag, and give your mycelium fresh air which will initiate fruiting. If you do this, you will need to mist the top portion of the bag at least once a day, and you may want to keep the bag inside of a plastic tote to ensure the mycelium in the bag does not dry out or get too much fresh air. If growing oyster or lions mane mushrooms, the best option is to cut 2 1-2 inch crossing lines forming an X into the short sides of your bag (avoid cutting in too deep, you’re just cutting the plastic, not the substrate itself), then fold the top of your bag over, pushing the air inside out. This will allow your mushrooms to fruit from the holes you cut instead of from the top of the block, resulting in better looking fruits. Doing this method you will want to spray the holes you cut 2-3 times a day with a misting of water to ensure nothing dries out. This method you can do in an area with medium to low air movement, or inside of a tote box.

The next method you can try is removing the bag entirely and fruiting your bag as a cake. Remove the bag, and place your block inside of a tub lined with moist perlite to maintain humidity in the tub. Give your block fresh air at least 2 times a day now by fanning the top of the tote pushing fresh air into it. You don’t want a lot of air movement because this will dry your fruits out, but you want them to be able to breath.
If top fruiting (the top seal of the bag has been cut) you want to have humidity on the sides of the bag above your substrate. If you do not see this humidity, mist the inside of your bag once a day with a spray bottle, but don’t spray the surface directly. If side fruiting, once you see your fruits beginning to form, mist them once or twice daily depending on how much airflow you have. You do not want your fruits to become dry, but you do not want them to be overly wet. For the cake method, make sure humidity is on the sides of the tote, if there’s not mist the sides, but don’t directly spray the block.
The last method and easiest method for fruiting is to do nothing. With this method, you can even skip the substrate mixing step. You can simply inject, wait, and eventually, you’ll harvest. Some varieties won’t fruit well with this method, others will. This method can also take a bit longer, 6-8 weeks is not unheard of, but it is the absolute easiest method!
Typically mushrooms can be harvested by grabbing the base of the fruit, twisting and pulling in one motion. This can cause a bit of the substrate to come detached with your fruits, so some people prefer to use scissors to cut the base of the mushroom. Either method is fine. Once you have harvested, you can dispose of your block in your garbage or (preferably) in a compost pile/container.
Another option is to dunk your substrate. If you top fruited your bag, you can fill your bag with cold water until the top of the substrate is covered, let sit for 1 hour, then drain and repeat step 8. If you side fruited your bag, you can place your bag in a bowl or pan, fill that with water, then let sit for 1 hour, remove the block, then drain through the side hole you previously cut, then repeat step 8. Second flushes are typically much smaller (50% or less) than the first flush.
Yes that is fine, you will want to wipe your surfaces twice, or water down your alcohol by ~1/3rd of the volume of the container.
Just put a piece of tape over the port, this is not a major issue. Tape it sooner than later though, as soon as possible after you see you’ve melted the port.
Sometimes mycelium grows slow! If using a spore syringe, it can take 1-2 weeks to see growth at all because the spores have to germinate.
That’s likely a contaminant. Mold, bacteria, and other funguses are all ubiquitous in the air around us. It’s possible your genetics had something in them they shouldn’t have, you didn’t wipe the injection port well enough, or you did not flame sterilize your needle properly. Best advice here is to dispose of your bag in the trash, or cut it open and dump it in your compost. Contaminants can be dangerous, it’s best to dispose of things when you first identify them rather than let them continue to grow.
We recommend keeping our bags in an environment between 70-75°F. This is the optimal temperature range for mycelium to flourish. If you need to use a heat mat to warm your bags, do not place your bags or tote bin directly on top of a heat mat as this will dry out the bottoms of your bags. Instead, it’s best to place your bags inside of a tote bin, then have a towel under your tote bin to help dissipate the heat. Ideally, you would place the heat mat inside the tote to allow the mat to heat the air in the bin rather than just heating the bottom of the bin. Humidity is not an important factor because the bag is contained. You do not need to worry about maintaining humidity unless you cut open the bag or remove the block from the bag. Lighting is also not an important factor, you can have a light on a timer for 12 hours on 12 hours off, or 18 on 6 off. Mushrooms are not photosynthetic but they are photosensitive, meaning they don’t need light to grow but they will react to light usually in the form of growing towards the light. Do not keep your bag in direct sunlight as strong light can damage mycelium (it’s typically underground or contained within trees).
Sometimes genetics take longer to start than others. When working with liquid culture, you should see growth within 2-4 days of injection. When working with spores, you might not see growth for 2 weeks! Patience is key here. If you wait more than 2 weeks and don’t see any growth, you can either wait another 2 weeks, or you can use new genetics in the bag. It’s very unlikely that after 2 weeks the first genetics will start growing, and as long as the bag hasn’t contaminated, it’s the same as injecting the bag with water and maybe some sugars, so adding new genetics won’t be detrimental.
Myco Labs All in One Grow Bag Instructional Video
FAQ
When to break and shake all in one grow bag?
When the mycelium has grown three to four inches, without opening the bag, carefully break up the colonized substrate and mix it into the uncolonized substrate. This will dramatically speed up the colonization process.
Do I need to mist all in one grow bag?
If top fruiting (the top seal of the bag has been cut) you want to have humidity on the sides of the bag above your substrate. If you do not see this humidity, mist the inside of your bag once a day with a spray bottle, but don’t spray the surface directly.
When to fruit all in one grow bag?
Fruiting Phase: Once you see pinning or the initial formation of mushroom bodies, you’re entering the fruiting phase. At this point, you can choose to fruit right in the bag or transfer the substrate to a fruiting chamber. Harvesting: When the mushroom caps are nearly uncurled, it’s time to harvest.
What is an all-in-one grow bag?
Versatility: The all-in-one grow bag is not just limited to one type of mushroom. Whether you’re keen on using mushroom spores or a live culture, the bag is designed to support the growth and development of mushrooms of various species. Efficiency: The all-in-one approach streamlines the mushroom cultivation process.
What is an all-in-one mushroom grow bag?
An all-in-one mushroom grow bag is a convenient way to cultivate mushrooms. It consists of different substrate layers needed for growing mushrooms, so you won’t need to move the substrate to another bag. You only need to inject the liquid culture into the inoculation port and wait for the mycelium to colonize the grow bag.
What are mushroom all-in-one grow bags?
Mushroom all-in-one grow bags offer a simple, effective, and low-effort way to enjoy fresh mushrooms. Whether you’re a beginner or an experienced grower, these bags provide a fantastic opportunity to dive into the world of mushroom cultivation. Give them a try and see how easy and rewarding mushroom growing can be!
What makes out-grow different from other all-in-one mushroom grow bags?
Diverse Range: Unlike many competitors, Out-Grow offers a wide variety of All-In-One Mushroom Grow Bags, catering to both beginners and seasoned growers. Sustainability and Future: The trend towards All-In-One solutions signifies a move towards more sustainable and efficient mushroom cultivation practices.
What is a grow bag?
A grow bag is a type of container used for mushroom cultivation. It consists of a ground starter substrate and a hydrated layer of grain mixes such as oats, millet, rye or wheat, coco coir, gypsum, vermiculite, and worm castings.
What can I do with a mushroom grow bag?
Post-Harvest Care: Once you’ve harvested your mushrooms, you can choose to use a mushroom grow bag for another round of cultivation or dispose of the substrate. The all-in-one mushroom grow bag simplifies the intricate process of mushroom cultivation, making it accessible even to beginners.