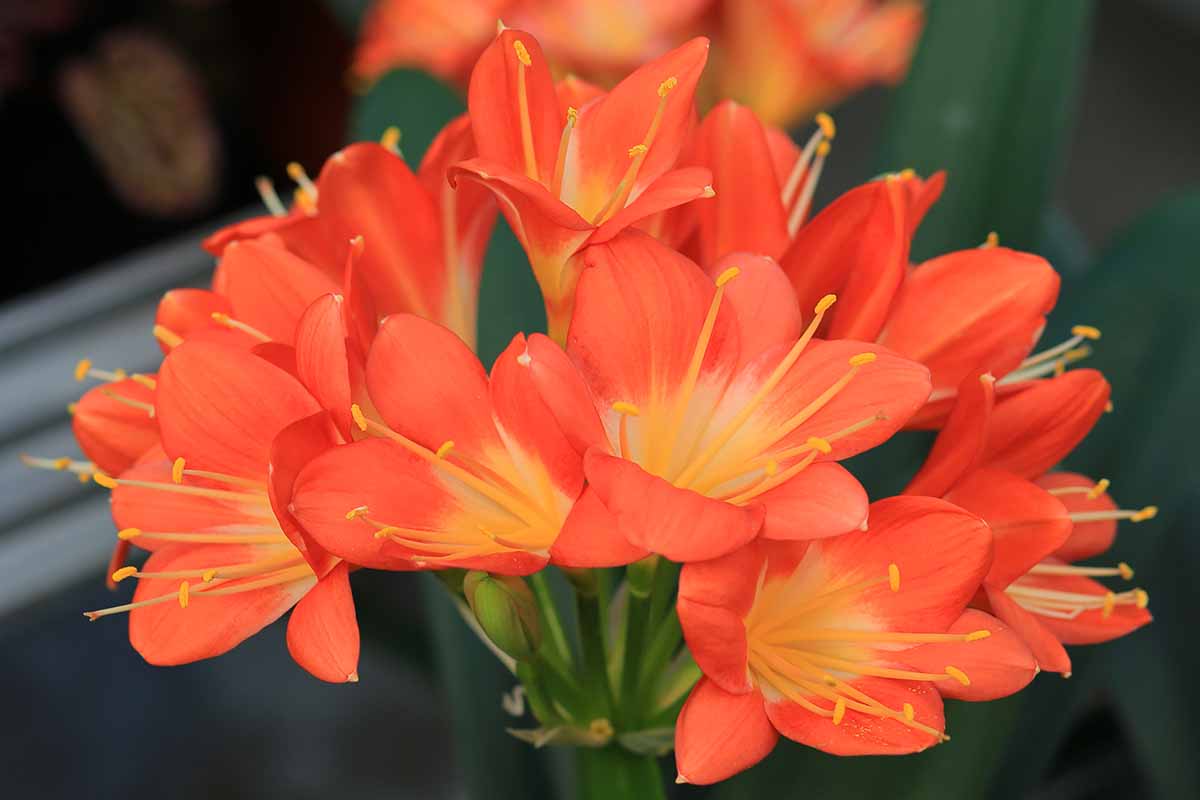
Clivias are absolutely stunning flowering plants that can add a pop of color and vitality to any indoor space. With their vibrant, trumpet-shaped blooms and lush dark green strap-like leaves, they make a striking addition to window sills, tabletops, or any bright spot in your home.
Though native to South Africa, clivias can be grown successfully indoors with the right care and conditions If you’re eager to try your hand at cultivating these beauties, read on for your complete guide to growing clivias in pots!
Before we dive into care and cultivation, let’s start with a quick overview of what exactly clivias are
- Genus: Clivia
- Family: Amaryllidaceae
- Native To: Subtropical regions of South Africa
- Plant Type: Evergreen perennial flowering plant
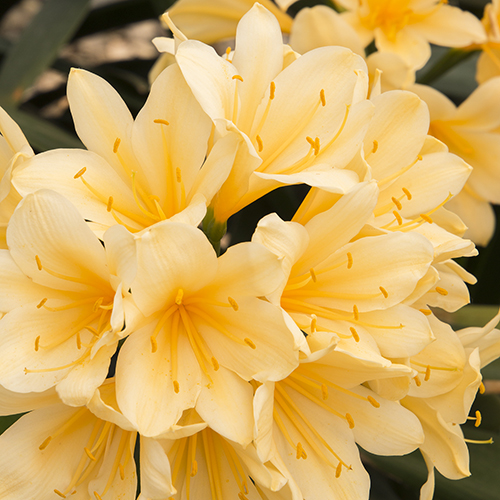
- Features: Clump-forming habit, thick strappy leaves, trumpet-shaped flowers in shades of orange, yellow, red, pink
There are only around 6 species of clivias, with Clivia miniata being the most popular and widely available. These plants are prized as houseplants for their ability to produce showy blooms even during winter months when most other plants are dormant.
Now that you know the basics, let’s explore how to grow theseSouth African natives successfully right in your own home.
Choosing the Right Pot for Clivias
Having the proper pot is essential for healthy clivia growth. Here are the key factors to keep in mind:
- Drainage: Excellent drainage is crucial, so be sure to select a pot with drainage holes at the bottom to prevent root rot.
- Size: Choose a pot that is only slightly larger than the root ball, as clivias like being a bit root-bound. Overly large pots retain too much moisture.
- Material: Terracotta pots allow for evaporation and are suitable. Plastic pots work too as long as they have drainage.
A 6-8 inch terracotta or plastic pot with drainage holes is ideal for getting started. You can always repot into a larger container down the road as the plant grows.
Crafting the Perfect Potting Mix
Using the right potting medium lays the foundation for growing healthy, thriving clivia plants. Here are the key ingredients to look for:
-
Light and airy: Incorporate lightweight components like perlite, coco coir, or bark chips to ensure proper drainage and aeration. This helps prevent root rot.
-
Nutrient-rich: Mix in organic material like compost, peat moss, or worm castings to provide nutrients for growth.
-
Slightly acidic pH: Target a pH between 6.0-7.0, as clivias prefer slightly acidic soil.
An ideal potting mix for clivias contains equal parts peat moss, perlite, and coco coir. You can adjust the ratios to suit what you have on hand. Just be sure it drains well and has nutrients.
Step-By-Step Planting Process
Once you have the pot and soil mix prepared, it’s time for the fun part – planting your clivia! Just follow these simple steps:
-
Fill the pot about 1 inch from the top with prepared potting mix.
-
Gently remove the clivia from its nursery pot, handling the plant by the base to avoid damaging the roots and leaves.
-
Place the clivia in the new pot. The top of the root ball should be level with the pot’s rim.
-
Add more potting mix around the roots and gently firm it down to eliminate air pockets.
-
Water thoroughly until it drains from the bottom drainage holes.
And your clivia is all potted up and ready to grow!
Providing the Right Lighting Conditions
When grown indoors, clivias require bright but indirect light to mimic their native growing environment. Here are some tips:
-
Place in an east or west-facing window where they’ll get gentle morning or afternoon sun.
-
South-facing windows work if you sheild from direct hot midday sun, which can burn the leaves.
-
North-facing windows may not provide enough light, so supplement with a grow light.
-
Avoid direct sunlight on the foliage which can scorch the leaves.
-
Rotate the pot periodically for even growth.
Bright indirect light keeps clivias looking lush and vibrant. Monitor the plant and adjust the location as needed throughout the seasons.
Maintaining Ideal Temperature and Humidity
Warmth and moderate humidity are also keys to growing happy indoor clivias:
-
Daytime temperatures between 65-80°F (18-27°C) are ideal.
-
Nighttime temps around 55-65°F (13-18°C) give the plant a chance to rest.
-
Humidity between 40-60% provides a comfort zone.
-
Air circulation from a fan prevents fungal issues.
-
Avoid temperature extremes below 50°F (10°C) or above 90°F (32°C).
Use a humidifier if your home air is very dry. Monitor conditions and make adjustments to keep your clivia thriving in its preferred environment.
Mastering Watering for Healthy Clivia Plants
Proper watering technique helps prevent common issues like root rot:
-
Check soil moisture by touching the top 1-2 inches. Water thoroughly when it is dry to the touch beneath the surface.
-
Allow the soil to dry out partially between waterings. Err on the side of under watering rather than overwatering clivias.
-
Always water until it drains from the drainage holes at the bottom, ensuring it penetrates the entire root zone.
-
Cut back on watering frequency in fall and winter during the plant’s dormant period, but don’t let it completely dry out.
-
Yellow or limp leaves often indicate overwatering. Brown crispy leaves generally signal underwatering.
Getting the balance right when it comes to watering takes some practice. Pay close attention to your plant and make adjustments as needed.
Fertilizing for Optimal Growth
Feeding your clivia nutrients throughout the growing season gives it fuel for lush growth and abundant blooms:
-
Use a balanced liquid fertilizer diluted to half strength. Look for a formula in the ratio of 10-10-10 or 20-20-20.
-
Fertilize every 2-4 weeks during spring through early fall when the plant is actively growing.
-
Avoid fertilizing in winter when clivias are dormant. It’s a time of rest, not vigorous growth.
-
Always water before and after applying fertilizer to avoid root burn.
With a light feeding regimen timed for the growing season, you’ll nourish your clivia perfectly.
Providing a Rest Period for More Flowers
A winter dormancy period is crucial for clivias to bloom their best:
-
Allow the soil to dry out further between waterings and water minimally.
-
Stop fertilizing and move to a cooler location around 50-60°F (10-15°C).
-
This resting phase typically lasts from November through January.
-
Resume normal care in early spring and enjoy the flush of flowers that follow!
By replicating clivia’s natural cycle, you’ll reap the rewards of bountiful blooms.
Repotting for a Healthy Root System
Clivias don’t mind being a bit snug in their pots. But they eventually need repotting into fresh soil:
-
Repot every 2-3 years in spring before growth resumes.
-
Choose a pot one size larger and replenish with fresh potting mix.
-
Carefully remove from the old pot and loosen any circling roots before repotting.
-
Position at the same soil depth, with the top of the root ball level with the pot’s rim.
-
Water well after repotting and allow to recover in a shady spot before moving back to its regular home.
occasional
With room to stretch out, your clivia will grow vigorously following repotting.
Combating Common Pests and Diseases
Though quite resilient, clivias can fall victim to some common houseplant pests and diseases:
-
Mealybugs – White fuzzy insects that leave a sticky residue. Remove manually and treat with insecticidal soap.
-
Scale – Small immobile insects that look like brown bumps on leaves and stems. Wipe off manually and use neem oil or horticultural oil as needed.
-
Root rot – Caused by overwatering. Allow soil to dry out between waterings and provide good drainage.
-
Bacterial leaf spot – Angular brown spots on leaves. Improve air circulation and use copper fungicide.
With close observation and prompt action, you can keep your clivia free of these potential problems.
Enjoying the Splendor of Clivia Blooms
The payoff for all your diligent care will be the incredible flowers clivias produce, especially during dreary winter months:
-
Blooms typically appear in late winter through spring. The flowering period can last 3-5 weeks.
-
Flowers arise from bracts nestled between the leaves in shades of orange, red, yellow, peach or multi-colored.
-
Varieties and hybrids offer diversity, like yellow Clivia miniata and double-flowered cultivars.
-
Remove spent blooms to tidy up the plant and concentrate energy into lush growth rather than seed production.
-
Mature, healthy clivias can give an impressive floral display year after year with proper care.
The vivid blossoms will surely brighten any room and add natural beauty to your indoor garden.
Troubleshooting Common Clivia Problems
Of course, issues can sometimes crop up when growing any houseplant. Here are some common clivia problems and solutions:
Yellow leaves – Usually indicates overwatering. Allow soil to dry out between waterings.
Leaf drop – Can signal too little water. Check soil and water when dry beneath the surface.
Failure to bloom – May need a rest period, more sunlight, less nitrogen fertilizer, or simply be too young.
Leggy growth – Not enough light. Move to a brighter location.
Root rot – Waterlogged soil. Improve drainage and cut back on watering frequency.
Pests – Treat mealybugs, scale, spider mites as soon as noticed before they spread.
With attentive care and swift action when needed, you can keep your clivia growing strong and looking its best.
Bringing Clivia’s Dramatic Beauty Indoors
With their striking flowers and lush tropical foliage, it’s easy to see why clivias have become a popular houseplant. By following this comprehensive growing guide, you’ll be able to successfully cultivate these South African beauties right in your own home.
The effort is well worth it when your clivia rewards you with an intoxicating flower display. Just be sure to provide the proper potting mix, light, temperatures, water and care that clivias thrive on.
Before long, you’ll have your own gorgeous clivia specimens bringing vibrant life and color indoors even on the dreariest winter day. So why not give clivia a try and bring a touch of the tropics home?
Belgian Hybrid Orange Bush Lily(Clivia miniata ‘Belgian Hybrid Orange’)
Rounded clusters of up to 60 vivid orange flowers on tall stems. This is an absolutely gorgeous accent, border plant or container specimen. Great plant for dry shade settings. Evergreen. Up to 30″ tall and wide. Zone: 9 – 11
CLIVIA Houseplant – How to Grow & Flower, Root Prune (C. miniata) – Do this in Fall
FAQ
How do you get clivia to bloom?
Plants should get no water between October 1 and January 22. It is critical that during this time the plants are chilled at temperatures between 35 and 55 degrees F for a minimum of 5 weeks to initiate bloom. If this cold treatment is not provided, the plants may not bloom until late summer.
Do clivias do well in pots?
Clivias grow well in containers. Choose a pot large enough to keep them happy for several years as regular repotting may impact on flowering.
Do clivias like sun or shade?
-
Shade Preference:Clivias are shade-loving plants, and their natural habitat is in shaded areas of forests. They are often recommended for shady gardens or locations where they can receive bright, indirect light.
-
Dappled Shade:Dappled shade, where sunlight is filtered through leaves, is ideal for Clivias.
-
Direct Sun Exposure:Direct sunlight, especially during the hottest parts of the day, can cause leaf scorch and damage.
-
Morning Sun:A few hours of morning sun can be tolerated, but prolonged exposure should be avoided.
-
Indoor Clivias:Indoor Clivias thrive in bright, indirect light, such as near an east or west-facing window. They can also be summered outdoors in a shady location.
-
Low-Light Tolerant:Clivias are considered low-light plants and can grow even in dimly lit areas, but they will need some light to flower.
-
Outdoor Clivias:Outdoor Clivias prefer dappled shade or locations that receive a few hours of morning sun, with protection from the midday sun.
-
Winter Care:During the winter months, Clivias may need a cooler, more sheltered location, and should not be exposed to frost.
-
Soil and Drainage:Clivias prefer well-drained, fertile soil, and adding mulch around the base can help maintain moisture.
How do you grow clivias for beginners?
- Water clivia once a week in summer. …
- Make sure your clivia are planted in well-draining soil. …
- Don’t plant your clivia in a very deep hole as this can also lead to plant rot. …
- Clivia fare best in dappled sunlight or early morning sun.
Can Clivia grow in pots?
The first step in growing clivia in pots is selecting the right container. Clivia prefer pots that are slightly snug, as this encourages more blooms. Here’s what to consider: Size: Choose a pot that’s just slightly larger than the plant’s root ball. A pot that’s too large can lead to excessive moisture and root rot.
How do you grow Clivia in a garden?
The plants grow best in containers filled with coarse, well-drained potting mix or an orchid mix. The best time to plant clivia in the garden is spring or summer. Outdoors, plant it in a spot that has well-draining soil and receives dappled shade, such as under a tree. Dig a hole slightly wider but at the same depth as the nursery pot.
How do I choose a Clivia pot?
Clivia prefer pots that are slightly snug, as this encourages more blooms. Here’s what to consider: Size: Choose a pot that’s just slightly larger than the plant’s root ball. A pot that’s too large can lead to excessive moisture and root rot. Material: Terracotta pots are a good choice for clivia as they allow for better drainage.
How do you propagate a Clivia plant?
A lot of popular varieties of clivias available today are hybrids or cultivars. Therefore, if you want to ensure that the propagated plants are identical to the parents, the best way to propagate them is by division. This should be done once the plant has finished flowering in late spring or early summer.
How do you care for Clivia in a pot?
Don’t mist spray the leaves. Apply liquid fertiliser every two weeks from when flower stalks are half developed and continue until autumn. One of the best ways to care for clivia in a pot is to fertilise it immediately after flowering with a general purpose fertiliser plus top ups until mid summer. Avoid moving when in flower.
How big should a Clivia pot be?
Good drainage is key to prevent soggy soil. Clivias thrive in pots at least 20cm (8 inches) wide. Choosing too small a container can restrict growth and flowering. I recommend terracotta or unglazed terracotta pots, as these ‘breathe’, allowing moisture to evaporate from the sides and preventing waterlogging.