Seed starting season is one of my favorite times of the year. It allows me to start gardening indoors several weeks before my garden beds wake up for the year, and it holds the promise of the growing season to come. In this week’s podcast, I am sharing the seed starting essentials for successfully germinating seeds and caring for seedlings.
Seed starting is the perfect cure for cabin fever. Granted, those of you who live farther north than I do probably experience cabin fever more severely than we in Georgia do, but things are dormant outside, and by this time of year, I am craving something green.
My favorite months of the year are April and October, as the seasons are changing, but since I’ve become a seed starter, February has become my third favorite month. I’m not a fan of snow or cold weather, but here in the Atlanta, Georgia, area, February is when I am in the thick of starting edibles, ornamentals and native perennials from seed.
I actually get started even sooner each year, in January. Peppers always take a bit longer to germinate, so those are the first I sow. Already, I have 20 seed flats of peppers up and growing.
Seed starting indoors allows you to enjoy gardening months ahead of when things naturally start occurring outside. In my case, I have an indoor seed starting room that gets completely filled up with seed trays and greenery from February until the seedlings are ready to be moved outdoors.
My seed starting room is a warm, comfortable place to hang out. I spend a lot of time there staring at little tiny seedlings and trying to notice them growing. I check on them as often as every 15 minutes sometimes, because that’s how quickly they can change.
So much happens before your eyes: The transformation from a tiny little seed that you tuck into the soil to a bonafide good-sized seedling six to eight weeks later that goes outside and takes off from there. That’s a lot of growth in a short period of time, and it’s under your watch. You’re noticing the subtle changes from day to day and week to week, and you’re playing a big role in that. You’ll notice if the things you’re doing — or not doing — are resulting in the seedlings having positive or negative changes.
A couple of years back, I started a course in my Online Gardening Academy™ called Master Seed Starting, a comprehensive series of lessons on starting seeds of all types through various techniques and on understanding the many facets of successful seed starting, from light science to maintaining the correct moisture level.
We are now in launch week for Master Seed Starting — enrollment opened on January 25th and continues through January 30th at midnight — and I am simultaneously offering a free live webinar, Seed Basics & Beyond: 9 Things to Know Before You Start Plants From Seed. You can register to join one of the remaining webinar sessions: Thursday, January 26, at noon EST, Friday, January 27, at noon EST and Saturday, January 28, at 10 a.m. EST. Space is limited, so if you would like to join us, don’t hesitate to register.
There is so much to learn about seed starting before you feel like you’ve got a handle on it and know how to troubleshoot and adapt midstream. In this week’s podcast, I distill seed starting down to the basic information you need to feel confident whether or not you take an in-depth course with me or elsewhere. I can get you started here today with some really solid, sound information, and you can go from there at your pace or as your budget permits.
Seed starting really is fun, and you don’t have to be advanced at it to be successful. If you provide seeds with some basic necessities, they’re going to germinate. They’ve got it in their DNA to do that.
Before going any further, I want to remind you that I have a new book out, “The Vegetable Gardening Book: Your complete guide to growing an edible organic garden from seed to harvest.” It’s chock full of insider tips and new-to-you information that will help you step up your gardening game and tackle challenges.
A big benefit of starting your own seeds is the opportunity to grow countless varieties that are not sold as seedlings at your local nurseries. When you start your own seeds, you are never at the mercy of what plants the big box stores or garden centers choose to carry.
Also consider the price difference between buying seeds and buying plants. Both seed packet prices and seedling prices are up from what they used to be not long ago, but seed packets continue to offer huge savings compared to seedlings. For pennies on the dollar, you can have your own plants from seed with many more options to pick from. And these days, saving an extra buck is a welcome opportunity.
You can start anything you want, as long as the variety is suited to your local climate and growing conditions. Order the seeds you want from one of the many reputable seed companies out there that specialize in the niche that you want to focus on.
Raising plants from seed also allows you to take control of how you grow your food and flowers. If you are an organic gardener like me, you can raise plants while confident that organic growing practices were enforced from day one.
You may be thinking about all the things you have to buy to start seeds and if you’ll really save money in the end. I have good news: You can start seeds with items that you already have around the house, with the exception of maybe one or two things that won’t break the bank.
As an avid gardener, I know that starting plants from seeds can be a fun, rewarding, and cost-effective way to grow beautiful flowers, delicious vegetables, and other plants. But one critical factor determines the difference between success and failure – maintaining the proper soil moisture levels. Learning how moist soil should be for seeds is essential to get your plants off to a healthy start. In this article, we’ll explore why the right moisture matters, how to achieve it, and some troubleshooting tips.
Why Soil Moisture Matters
Moisture is absolutely essential for seed germination. Inside a viable seed is an embryo plant waiting for the right conditions to sprout. When planted in moist soil, seeds absorb water which kickstarts metabolic processes and provides hydration. Water activates enzymes and hormones needed for growth. As cells elongate and multiply, it supports structural development. Simply put, without adequate moisture, seeds won’t germinate.
However too much moisture can also cause major problems. Soggy soil leads to fungal diseases mold growth, and seed rotting. And if soil completely dries out, germination will stall. So getting the moisture level just right is crucial for healthy germination.
How Moist Should Soil Be?
A good rule of thumb is to keep soil moist but not saturated. Many gardeners recommend moisture levels equivalent to a wrung-out sponge – damp but not sopping wet. Seeds only need a thin film of moisture around them to sprout.
Some tips for achieving ideal soil moisture:
-
Use a seed starting mix that drains well. Or make your own with peat moss, vermiculite and compost.
-
Water with room temperature water which is absorbed better. Cold water evaporates too quickly.
-
Use a seedling heat mat or plastic dome to retain moisture.
-
Bottom water pots to pull up moisture without oversaturating.
-
Mist gently between waterings if surface is drying out.
-
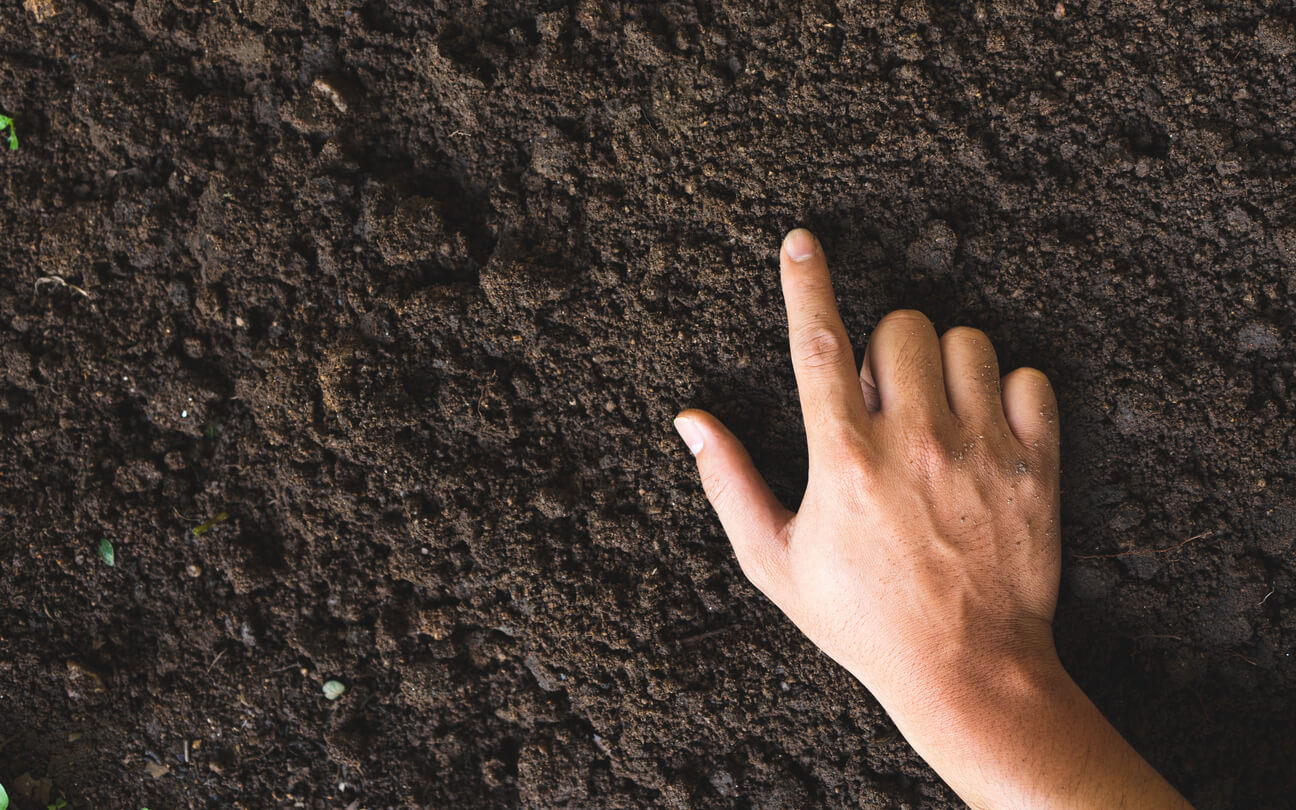
Check moisture daily by sticking a finger 1-2 inches deep into soil.
-
Water when the top layer feels dry but don’t soak the soil.
-
Err on the side of under-watering which is safer than overdoing it.
How to Tell if Seeds Have Enough Moisture
It’s important to closely monitor both seeds and seedlings to ensure proper moisture levels. Signs seeds have sufficient hydration include:
-
Seeds appear plump as they absorb water.
-
Germination occurs normally.
-
Seed coats shed open.
-
Seedling stems stand upright.
-
Leaves look healthy.
-
Soil feels moist 1-2 inches down.
-
No visible wilting or drooping.
Whereas low moisture causes:
-
Seeds remain small and hard.
-
Lack of germination.
-
Seed coats don’t open.
-
Thin, weak seedling stems.
-
Shriveled or dried leaves.
-
Dry soil on surface and at depth.
-
Noticeable wilting and drooping.
While overwatering leads to:
-
Mushy seeds.
-
Flopped over or discolored seedlings.
-
Wet, clumped soil.
-
Presence of surface mold.
Adapting Moisture as Seeds Develop
It’s important to adapt moisture levels as seeds sprout and grow. Here are some tips:
Germination Stage:
-
Keep soil consistently moist.
-
Water at least daily or when surface dries.
-
Use warm water and plastic domes to boost hydration.
Sprouting Stage:
-
Continue frequent watering.
-
Remove dome once sprouted.
-
Let surface dry slightly before re-watering.
-
Switch to bottom watering method.
-
Mist if needed between waterings.
Growth Stage:
-
Water deeply but less often as roots develop.
-
Allow soil to dry 1-2 inches before rehydrating.
-
Prioritize consistency in moisture levels.
-
Fertilize to support growth per label instructions.
Hardening Off Stage:
-
Gradually reduce watering frequency/amount.
-
Expose to sun and wind to transition outdoors.
-
Move to garden once moisture needs match outdoor conditions.
So observe closely and adapt moisture as required since needs vary between seed types. Amending soil with coco coir or perlite can also help regulate moisture.
Key Tips for Keeping Seeds Hydrated
Here are some additional tips for maintaining ideal moisture levels when starting seeds:
-
Use small pots that dry out slower.
-
Bottom water after seeds sprout.
-
Water early in the day to prevent fungi growth.
-
Add perlite or vermiculite to seed starting mix.
-
Group plants together to create a greenhouse effect.
-
Check new seedlings daily and don’t let soil dry out completely.
-
Use your finger to check moisture at 1-2 inch depth.
-
Lift pots to check weight – light means too dry.
-
Allow some surface drying as plants establish deeper roots.
Proper hydration is absolutely critical to seed starting success. By keeping soil moist but not soaked, avoiding extremes, and adapting practices to plant growth stages, you’ll see thriving seedlings ready for the garden!
Troubleshooting Common Moisture Problems
Even experienced gardeners struggle sometimes to get moisture right. Here are some common issues and fixes:
Seeds Not Germinating:
-
Increase watering frequency/amount if too dry.
-
Reduce watering and allow more drying if soggy.
Leggy or Spindly Seedlings:
-
Give more light if stretching for sun.
-
Cut back on high-nitrogen fertilizer.
Wilted or Drooping Plants:
-
Water immediately if dry to perk up.
-
Move to cooler area or increase air circulation if too warm.
Fungus or Mold:
-
Allow more drying time between waterings.
-
Increase air circulation.
-
Remove any infected plants immediately.
Seedlings Falling Over:
-
Gently firm up soil to stabilize.
-
Increase light exposure to strengthen stems.
Pay close attention and adjust moisture at the first sign of any problems. With experience, you’ll get a feel for that perfect moisture balance.
Starting plants from seeds is an extremely gratifying process. Just remember, proper soil moisture is the key to success. Learn your seeds’ needs, stay observant, and maintain ideal hydration. Your seedlings will thrive and reward you with a bountiful, beautiful garden.
More from my site
Some links in the posts on this website may be affiliate links. I receive a commission every time you purchase a product through an affiliate link. As an Amazon Associate, I earn from qualifying purchases.
Upcycled Seed Starting Containers and Trays
If you are looking to save money while seed starting, well, it’s really easy. Anything that can hold about 2 inches of soil and has drainage holes can be used as a seed starting container. Takeout containers with holes punched in them are typically perfect options for seed starting, especially the clamshell-type containers with clear plastic lids. I’ve even used pizza boxes as containers for an experiment on how much I could grow while spending the least amount of money possible.
In addition to drainage holes, containers need humidity domes. These are transparent covers that will hold moisture in while allowing light through. Light exposure is essential to prevent seedlings from getting stretched and leggy — or spindly, as some people call it.
A lot of seed starting kits come with humidity domes because if the soil dries out too quickly, the seeds may never germinate. But if you are using repurposed containers that don’t have clear covers, you can make your own home with clear plastic wrap.
Once germination is complete, you can remove the covers.
Germination mats, also known as propagation mats or heat mats, are something I put in the category of nice to have but not need to have.
If the room you are starting seeds in never gets warm enough to heat the soil up to 70° or so, your seeds may never germinate. That’s where germination mats come in. Some mats are thermostat controlled to be dialed into a preferred temperature, while less expensive mats are preset to around 75° and the temperature cannot be changed.

If you think you don’t need any lights because you have a sunny south-facing window to put your seeds in, I have to disabuse you of that notion. Rare is the case that you’ve got perfect exposure from a south-facing window that gets all-day sun and is going to give you the light that you need for those plants to be sturdy and stout.
Seedlings will stretch for the light if they’re not getting the amount of usable photosynthesis that they need. They must have abundant light to stay compact, and if you’re just relying on a window for that, they’re going to get tall and leggy — and that’s not a desirable outcome.

The good news is, you don’t have to spend a fortune on lights. You can buy a shop light or you might already have a shop light with twin 4-foot-long 40-watt fluorescent lubes that you’ve had around the basement or the garage for a long time. Those light tubes that fit into the fixture probably aren’t going to be as effective as they used to be because over time the less usable light they put out. So you might need to invest in some new light tubes, but that’s really an inexpensive investment.
These days, if you set out to buy new shop lights you’ll probably find LED shop lights that will work a bit better and be more efficient.
If you’re a gadget person like me and appreciate how light frequency can impact a plant’s ability to grow properly, then you’re going to be interested in a more sophisticated lighting system. That typically includes LED lighting, which can be inexpensive. You can spend $20, $30 or so and go up from there into the couple-hundred-dollar range. But again, you get what you pay for. So the more you spend, the more usable light it’s putting out and plant performance will be enhanced. This is a big subject that we go into in great depth in Master Seed Starting.

Another purchase you may want to make is a really good seed starting rack. I use stainless steel wire baker’s racks that are found at big box stores. They run about $110 or $120 these days. These come on wheels, you can hang lights from them, and they typically hold four standard seed starting trays. I love these, and the seed starters I know who get them feel the same way.
You can use the top of a bookcase or a table if you don’t have room for a rack or don’t want to spend the money right now.
Once you find the sweet spot in watering, it will come easily to you. But until then, you are probably going to overwater or under water. Overwatered seeds can’t breathe and then die, and under-watered seeds don’t get enough moisture in the seed embryo to start and complete the germination process.
Watering can be time-consuming, so one of the techniques I teach in Master Seed Starting is a self-watering system that I show you how to make. It’s a hands-free way to make sure that your plants get just the water they need without getting too much.
If you look at the top of the seed tray where the sprout emerges and it looks very dry there, that doesn’t necessarily mean that it’s dry all the way down. When you have lights on top, they can generate some heat that can cause evaporation right at the surface of the small cells where the seed starting mix lives and the seed lives. There may still be adequate moisture below the surface — so you can’t judge if your plants need more water just by looking at the surface.
You can water from above, which is called top watering. It just means using your watering can and pouring water back and forth until you feel like you’ve watered it enough. I tend to shy away from that, especially when the seedlings have emerged and they’re still tender. Those drops of water, depending on how finely they’re broken up, can beat up those seedlings a little bit or a lot. And so I like to bottom water, which means allowing the solid tray underneath the cell tray to hold water. The seed starting mix will wick up the moisture through the holes in the cells and will continue to pull it up to the surface.

When seedlings get leggy or spindly, it could be that they are getting too much fertilizer, but the culprit is almost always that they are not getting enough light. The seedlings may need to be closer to the light source, and how close that is depends on the type of light you have.
As mentioned, too much water or not enough water is another common issue.
Going back to why we use sterile seed starting mix, another problem you may encounter is that seedlings can potentially die overnight due to a fungal condition called damping off. The seedlings will be fallen over and the part of the stem right at the soil line will look like is dissolved. This happens most often when using a nonsterile seeding starting medium.
To prevent damping off — in addition to using sterile mix — ensure that air is circulating around the surface of the trays from the time the seeds germinate until a few weeks later. You can do that with a small fan.
When seeds never germinate no matter what you do, there could be a few reasons. They may just be too old and no longer viable, or the problem could be they were planted too deeply or not deeply enough. (The correct depth varies from seed to seed.) If the soil temperature is too cool or too warm, that would also explain why the seeds failed to sprout. Different seeds have different optimal soil temperature ranges for germination, and they also have different light requirements. Some seeds need light to germinate while others will only germinate in darkness — but remember that all seedlings need light once they germinate.
The type of seed starting mix you use can also explain why seeds failed to germinate. For example, a heavy mix may be too wet for successful germination.
I really get going with my seed starting in February because it’s when I am roughly eight weeks out from my last risk of frost in spring. I can’t put anything outside until that frost-free date has passed, and the plants need six to eight weeks of indoor growing time to get up and going.
You can quickly learn the first and last frost dates for your area at almanac.com by typing in your zip code. Then count back from your last frost date to determine when to start your seeds indoors.

I hope you learned a few things from listening to the podcast that will make you feel more confident starting seeds this year. If you haven’t listened yet, you can do so now by scrolling to the top of the page and clicking the Play icon in the green bar under the page title.
What are your seed starting essentials? Let us know in the comments below.
Some product links in this guide are affiliate links. See full disclosure below.
joegardener.com/seedwebinar – Register for Seed Basics & Beyond: 9 Things to Know Before You Start Plants From Seed
joegardener Online Gardening Academy™: Popular courses on gardening fundamentals; managing pests, diseases & weeds; seed starting and more.
joegardener Online Gardening Academy Master Seed Starting: Everything you need to know to start your own plants from seed — indoors and out. Enroll by January 31.
joegardener Online Gardening Academy Beginning Gardener Fundamentals: Essential principles to know to create a thriving garden.
joegardener Online Gardening Academy Growing Epic Tomatoes: Learn how to grow epic tomatoes with Joe Lamp’l and Craig LeHoullier.
joegardener Online Gardening Academy Master Pests, Diseases & Weeds: Learn the proactive steps to take to manage pests, diseases and weeds for a more successful garden with a lot less frustration. Just $47 for lifetime access!
joegardener Online Gardening Academy Perfect Soil Recipe Master Class: Learn how to create the perfect soil environment for thriving plants.
Indestructible seed trays from Neversink Farm
Territorial Seed Company – Our podcast episode sponsor and Brand Partner of joegardener.com
Greenhouse Megastore – Our podcast episode sponsor and Brand Partner of joegardener.com – Enter code JOEGARDENER for 15% off your order
Disclosure: Some product links in this guide are affiliate links, which means we get a commission if you purchase. However, none of the prices of these resources have been increased to compensate us, and compensation is not an influencing factor on their inclusion here. The selection of all items featured in this post and podcast were based solely on merit and in no way influenced by any affiliate or financial incentive, or contractual relationship. At the time of this writing, Joe Lamp’l has professional relationships with the following companies who may have products included in this post and podcast: Rain Bird, Corona Tools, AeroGarden, Milorganite, Soil3, Greenhouse Megastore, PittMoss, Territorial Seed Company, Earth’s Ally, National Wildlife Federation and TerraThrive. These companies are either Brand Partners of joegardener.com and/or advertise on our website. However, we receive no additional compensation from the sales or promotion of their product through this guide. The inclusion of any products mentioned within this post is entirely independent and exclusive of any relationship.

Joe Lamp’l is the creator and “joe” behind joe gardener®. His lifetime passion and devotion to all things horticulture has led him to a long-time career as one of the country’s most recognized and trusted personalities in organic gardening and sustainability. That is most evident in his role as host and creator of Emmy Award-winning Growing a Greener World®, a national green-living lifestyle series on PBS currently broadcasting in its tenth season. When he’s not working in his large, raised bed vegetable garden, he’s likely planting or digging something up, or spending time with his family on their organic farm just north of Atlanta, GA.

Sign up for my blog updates and never miss a post. The bonus? I’ll send you a free eBook as a “Thank You”!
How to Know When Your Indoor Seed Starts Need to be Watered & How to Water Them Perfectly Every Time
FAQ
Should you moisten soil before planting seeds?
Soil should be drenched for the first time (usually before putting in the seeds) because it needs to absorb a lot of water to become wet enough so that watering from the bottom would be enough. If you only watered from the bottom, is the top of the pot moist or dry?
Should I wet soil before seeding?
Ensure your lawn thrives from the start by relying on professional services to prepare and maintain it. Experts will correctly water the soil before planting grass seed, ensuring the ideal moisture level—6 to 8 inches of water several days ahead is optimal.
How moist should seed starting mix be?
A good way to know if your seed starting mix is moist enough is to compare the dry weight of the mix to its weight when it has reached field capacity, which is as much water as it can hold. Aim for a moisture level, and weight, about halfway between totally dry and field capacity.Jan 25, 2024