Peas are an easy and rewarding vegetable to grow in your backyard in-ground or raised bed vegetable garden. They are a hardy, cold tolerant plant, making them a great addition for the zone 3 garden. They grow to maturity quickly and are often one of the first crops to be harvested from backyard gardens.
Peas are always the first veggie on the list of what my kids want to plant in their garden plots! Because pea seeds are one of the larger vegetable seeds, they are easy to plant and space, making them the perfect vegetable to have your kids plant themselves.
Hey there fellow gardeners! I’ve been growing peas in my raised beds for over 5 years now, and lemme tell you – there’s nothing quite like picking fresh peas right from your garden. Today, I’m gonna share everything I’ve learned about growing these wonderful vegetables in raised beds Trust me, once you get the hang of it, you’ll be swimming in sweet, crispy peas all season long!
Why Choose Raised Beds for Growing Peas?
Before we dive into the nitty-gritty let’s talk about why raised beds are awesome for growing peas
- Better drainage (peas hate wet feet!)
- Warmer soil in spring
- Easier to maintain and harvest
- Better soil control
- Less bending = happy back!
Planning Your Pea Bed
Bed Dimensions and Setup
I’ve found that 4-foot-wide raised beds work perfect for peas. Here’s what you need to know:
- Width: 4 feet is ideal (you can reach the middle from both sides)
- Length: 16-25 feet (depending on your space)
- Depth: At least 6-8 inches
- Soil: Well-draining, compost-rich mix
Spacing and Layout Options
There are several ways to arrange your peas Here are my favorite layouts
Option 1: The Full Bed Method
- Plant peas 2-3 inches apart throughout the entire bed
- Great for dwarf varieties like Sugar Ann
- Maximum yield per square foot
Option 2: The Double-Row Trellis Method
- Place trellises 6-8 inches from each edge
- Plant peas on both sides of each trellis
- Leave 2 feet in the middle for other crops
Planting Your Peas
When to Plant
Timing is everything with peas! Here’s when to get started:
- Early Spring: As soon as soil can be worked
- Fall Crop: 8-10 weeks before first frost
- Soil temp should be at least 45°F (7°C)
Planting Process
- Soak seeds overnight (optional but helps germination)
- Plant seeds 1-1.5 inches deep
- Space seeds 1.5-2 inches apart
- Water well after planting
Supporting Your Peas
Trellis Options
Different varieties need different support:
Dwarf Varieties (2-3 feet tall)
- Simple string trellis
- Short bamboo stakes
- No support needed for some super-dwarf types
Tall Varieties (6+ feet)
- Cattle panels (my personal fave!)
- Strong wooden or metal trellis
- Heavy-duty netting
Pro Tips for Trellising
Here’s what I’ve learned the hard way:
- Install supports BEFORE planting
- Make sure they’re sturdy – peas get heavy!
- Consider wind exposure
- Leave enough space between trellises for harvesting
Companion Planting
Peas play nice with lots of veggies! Here’s what works great in that 2-foot middle space:
- Beets
- Turnips
- Radishes
- Lettuce
- Spinach
Maintenance and Care
Watering
Peas are pretty low-maintenance, but they do need consistent moisture:
- Water deeply 1-2 times per week
- Mulch to retain moisture
- Avoid overhead watering when possible
Common Problems
Watch out for these issues:
- Powdery mildew (give plants good air circulation)
- Root rot (don’t overwater!)
- Pea moths (use row covers if needed)
- Birds (they love pea shoots!)
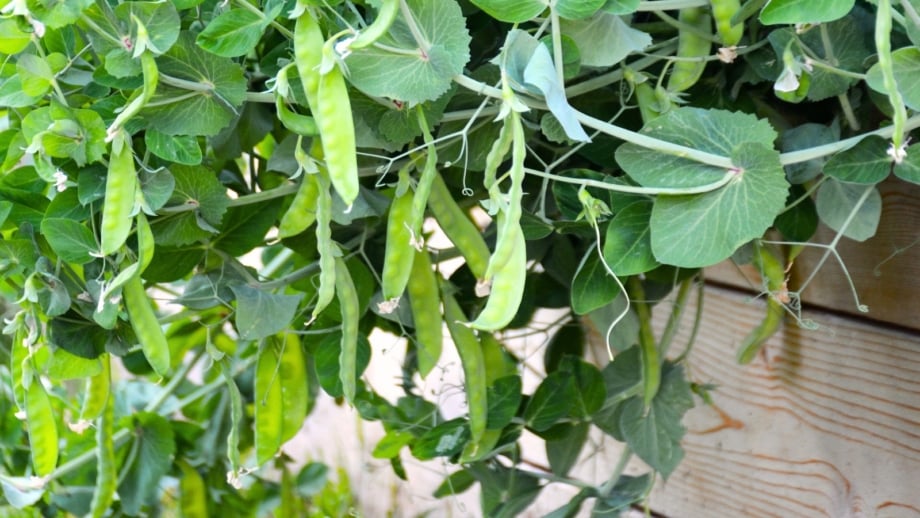
Harvesting Your Peas
When to Harvest
Different types need different timing:
Snow Peas
- Pick when pods are flat
- Before peas start swelling
Sugar Snap Peas
- Wait until pods are plump
- Should snap when bent
Shell Peas
- Harvest when pods are full but still bright green
- Test a few to get timing right
Harvesting Tips
- Use both hands (one to hold vine, one to pick)
- Pick regularly to encourage more production
- Morning harvest = crispiest peas
- Don’t pull! Use scissors if needed
My Secret Tips for Success
- Plant thick! Seeds are cheap, and peas will sort themselves out
- Succession plant every 2-3 weeks for continuous harvest
- Save space by growing dwarf varieties for early crop
- Follow with pole beans when peas finish
Maximizing Your Yield
Here’s my intensive planting strategy:
- Plant seeds almost touching in rows
- Space rows 6-8 inches apart
- Use vertical space with proper trellising
- Interplant with fast-growing crops
Growing peas in raised beds is totally worth the effort! With proper planning and care, you can get amazing harvests from even a small space. Remember, peas love cool weather, so get them in early and plan for a fall crop too.
I’d love to hear about your pea-growing adventures! What varieties work best in your garden? Got any tips to share? Drop a comment below!
Happy Gardening!
P.S. Don’t forget to save some seeds from your best plants for next season – they’ll be perfectly adapted to your garden conditions!
[Note: Some variances in exact measurements and timing might occur depending on your specific climate zone and conditions. Adjust accordingly!]
Would you like me to explain any part of this guide in more detail?
How to Plant Peas
Plant peas in a location that gets full sun or at least 6 hours of direct sunlight each day. If planted in a part sun location, peas may not be as abundant or sweet and will take longer to mature. Plant in loose soil with compost worked into it.
Pea seeds can be soaked anywhere from 30 minutes to 24 hours prior to planting to speed up germination. This is not necessary but if you want to grow your peas to maturity quickly, consider soaking your pea seeds until you see them begin to sprout. Change water as needed to keep it fresh.

Lets take a look at how far apart to plant peas and how deep to plant your pea seeds. Plant peas 1 inch apart and 3/4 to 1 inch deep. I like to plant mine on the deeper side to discourage mice and birds from finding and eating peas. Keep soil damp until seeds have germinated. Birds tend to love snacking on sprouted peas. Keep an eye out on birds and if necessary, consider covering your young peas with netting.
Although it is possible to transplant peas, they do not always transplant well. I recommend planting pea seeds outdoors in their permanent location rather than starting them indoors.
When to Plant Peas
If you have read other posts of mine, you will know that at one time I used to plant all of my garden the third week in May, right around my last frost date. Since then, I have learned through the advice of seasoned gardeners, along with experimenting myself, that cold hardy crops can be planted up to a month prior to last expected frost with great success. (Find my full planting schedule here.) Peas tolerate snow and freezing temperatures up to -7°C (20°F) and snow well up until the time of blooming. Pea blossoms are tender and frost during blooming will harm the plant. If you find some of your peas do not germinate with early planting you can fill in what is missing and still have plenty of time to grow your peas to maturity.
If you have a large area to plant peas in, consider succession planting your peas. Plant peas every 3 weeks during spring months for a continuous supply of fresh garden peas to snack on all summer long.
Sugar Snap Peas “Growing & Harvest Tips” wish I knew before #gardening #garden #greentgarden
FAQ
Do peas do well in raised beds?
Growing peas in a raised bed is another way to protect the germinating seed from rot. The soil will also warm up faster, which is desirable in a cold climate such as ours, where the temps can drop below freezing into the first week in June.
What should not be planted next to peas?
Peas: Don’t plant near chives, garlic, leeks, onions, peppers.
What vegetables should not be grown in a raised bed?