Are you looking for an easy and eco-friendly way to enhance your garden beds? Look no further than your lawn clippings! Yes, those grass trimmings you often discard can be a valuable resource for your garden. In this comprehensive guide, we’ll explore the benefits of using grass clippings in garden beds and provide you with practical tips on how to make the most of this natural resource.
Mums are one of the most popular fall flowers. Their colorful blooms can brighten up any garden. While most gardeners buy nursery-grown mums, it is possible to grow them yourself from seeds. But what do mum seeds look like?
In this article, we’ll explore the appearance of mum seeds. We’ll look at their shape, size, color, texture, and any distinguishing features. Understanding the characteristics of mum seeds can help ensure success when starting them.
Shape of Mum Seeds
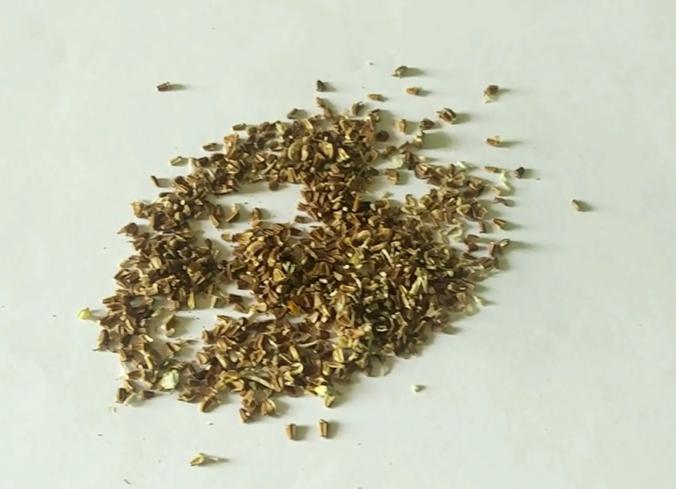
The shape of mum seeds is generally rounded They tend to be oval or oblong rather than perfectly circular Their rounded shape helps the seed coat protect the embryo inside, The seed shape can vary slightly depending on the mum variety,
Overall the rounded, oblong shape makes the seeds easy to handle and sow The smooth shape means they can move freely through seed sowing equipment without getting stuck
Size of Mum Seeds
Mum seeds are quite small. They are usually 1 to 2 millimeters in diameter. Some may be slightly larger or smaller depending on the variety. Anything larger than 2mm would be considered large for a mum seed.
The tiny size allows many seeds to fit in a packet. But it also makes them challenging to handle. Care must be taken not to spill mum seeds while sowing. Tweezers can help pick up individual seeds.
Color of Mum Seeds
The most common color for mum seeds is a light brown. However, the exact shade can vary from golden brown to reddish brown. Darker brown or black seeds can also sometimes occur.
Occasionally white or cream colored mum seeds may be seen. But brown is the predominant color. The brown color comes from compounds in the seed coat that help protect the seed.
Texture of Mum Seeds
Mum seeds have a hard outer shell or seed coat. This gives them a smooth, glossy texture. They feel firm and solid when handled, similar to a grain of sand.
The seed coat needs to be hard and tough to protect the seed embryo inside. Soil particles won’t easily damage it during germination. The smoothness allows the seed to slide into soil cracks without sticking.
Distinguishing Features
Under magnification, small ridges or lines may be visible on the seed coat surface. These help distinguish mum seeds from other similar sized seeds.
Another distinguishing feature is the location of the embryo. In mum seeds it sits lengthwise, following the oblong shape. A tiny new plant is visible inside the seed.
Key Takeaways
-
Mum seeds are oval or oblong in shape with a rounded profile. This helps protect the embryo.
-
The seeds are small, usually 1-2mm in diameter. Larger seeds over 2mm are uncommon.
-
Light brown is the most common seed color, but shades vary from golden to reddish brown.
-
A hard, glossy seed coat gives mum seeds a firm, smooth texture. This protects the embryo inside.
-
Distinguishing features include tiny ridges on the coat and an oblong embryo inside.
Knowing what to expect when starting mum seeds helps ensure proper sowing and care. Their tiny size and specific shape signal techniques needed for success. With this knowledge, growing mums from seeds can expand the garden palette.
Why Use Grass Clippings in Garden Beds?
Grass clippings are a rich source of nutrients that can benefit your garden beds in several ways:
- Nutrient-Rich: Grass clippings contain essential nutrients like nitrogen, phosphorus, and potassium, which are vital for plant growth and soil health.
- Soil Conditioner: As grass clippings decompose, they add organic matter to the soil, improving its structure, water retention, and aeration.
- Weed Suppression: A thick layer of grass clippings can act as a natural mulch, smothering weed growth and reducing the need for herbicides.
- Moisture Retention: Mulching with grass clippings helps to conserve moisture in the soil, reducing the frequency of watering.
- Cost-Effective: Using grass clippings as a natural fertilizer and mulch is a cost-effective alternative to buying commercial products.
Will grass clippings attract pests or rodents?
When applied properly, grass clippings should not attract pests or rodents. However, it’s important to avoid creating thick, matted layers that can harbor unwanted visitors.
Sifting Mum seeds 1
FAQ
How do you get the seeds from mums?
It’s important you never pick green seed heads because the seeds will not finish ripening once removed from the plant. Snip off the mum seeds with pruning shears and break them apart, spreading the seeds on a sheet of paper towel to dry out for a day or two before storing them in airtight jars.
Can you save seeds from mums for next year?
Did you know you can save and replant mum seeds? It’s true! One of the best ways to save big on your fall planting and decorating budget is to save the seeds from your mums this fall. Not only is it possible, but it’s also easier than you might ever think to plant and grow new mums next year from seed!
How do you grow mums from seeds to sell?
-
1. Sow seeds:Sow mum seeds indoors 6-8 weeks before the last expected frost or directly in the garden in spring.
-
2. Provide warmth and light:Mum seeds prefer a temperature of 70°F (21°C) for germination, and bright light is essential for stocky seedlings. Use a heating mat, if desired, and supplement with fluorescent grow lights if necessary.
-
3. Maintain moisture:Keep the soil evenly moist but not soggy during germination. Use a spray bottle to mist the soil surface.
-
4. Thin seedlings:After the first set of true leaves emerge, thin the seedlings, leaving 10 inches (25 cm) between them.
-
5. Transplant:Once seedlings are a few inches high, transplant them into small pots.
-
6. Harden off:Gradually acclimate the seedlings to outdoor conditions before transplanting them into their final location.
-
7. Fertilize:Mums are heavy feeders, so provide a balanced fertilizer during early growth, and adjust the fertilizer based on soil testing.
-
8. Care:Ensure proper watering, weed control, and pest and disease management.