This post contains affiliate links, which means I make a small commission from the purchase of these products at no additional cost to you. You can find my full disclosure here.
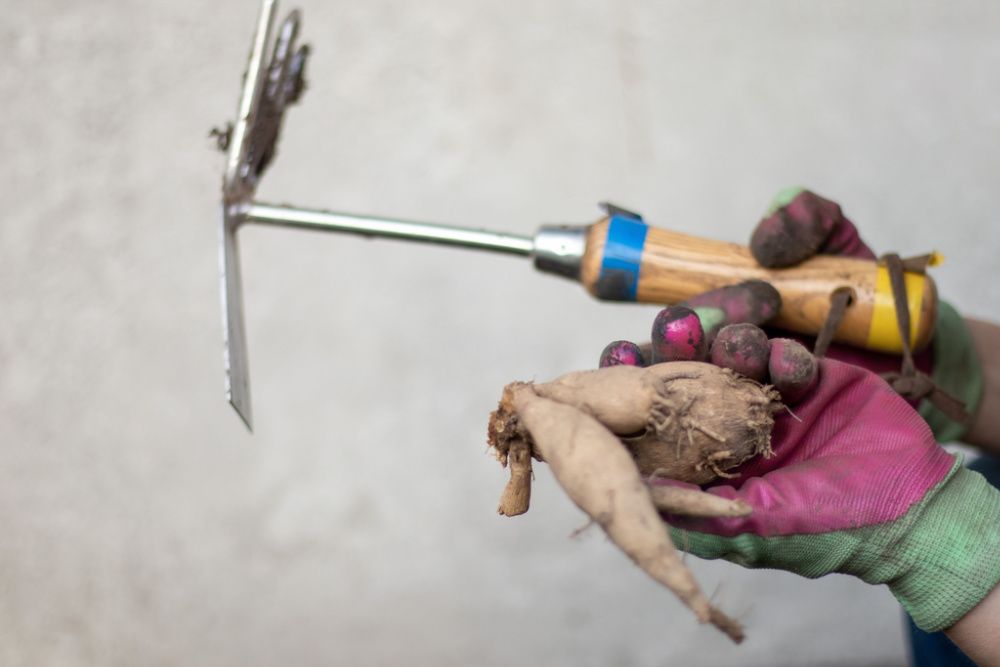
Dahlias stole my heart early on in my flower growing journey. When I first discovered dahlias and learned about the process required to grow them I questioned why they were worth all the effort (especially in colder zones where they need to be dug up and stored every winter). However, after seeing all the beautiful pictures of the perfect looking flowers I decided to give them a try.
I should have tested out just one or two, but in my typical fashion the first year I went all in and purchased just over 300 plants and tubers. I was just establishing my garden space at our farmhouse and didn’t have a great space to plant them so I painfully dug through layers of gravel from what I’m guessing was an old driveway and planted my tubers.
Not only were there soil conditions not favorable (dahlias like loose, well-drained soil), but we had a drought that year and every single one of my dahlias died except for ONE! That single dahlia flower I grew was enough; I was hooked and determined to learn more and do better the next season.
The next year I downsized and only planted about 30 tubers, all in the raised beds I made the year prior. The growing conditions were ideal and it was a year of success for my dahlia plants. I had several stems of the most beautiful flowers in the most beautiful pastel shades.
I successfully grew dahlias but was quickly met with the reality of the challenges of storing dahlia tubers over the winter.
Dahlias form tuberous roots during their growing season. These roots are perennial plants in warmer climates. However, for those who live in colder climates dahlia tubers need to be dug out every year, stored, and replanted the following year. Since I live in USDA hardiness zone 5b/6a, this is what I do to ensure I maintain my dahlia stock over the colder months.
I wait until about two weeks after the first frost to dig my tubers, but as long as they have been planted for a minimum of 120 days they can be dug up for storage. It’s believed that letting them go through the first frost signals the tubers to go into dormancy and store better, so that is why I wait. It also means less time I need to store them and worry about them dying in storage. However, if timing is challenging then anytime after 120 days in the ground is okay!
Storage can be really tricky when it comes to dahlia tubers. I will share what has worked best for me but this isn’t a one size fits all. There are several factors (the main of which being temperature and humidity levels) that impact tuber storage.
We have an old stone basement that remains relatively cool and humid over the winter. I’ve found the best way to keep my tubers viable is by just shaking off the dirt after digging rather than washing it off and storing them in a cardboard box separated by pine wood chips.
This year I had multiple clumps of the same variety so I experimented with storing the clumps in paper grocery bags separated with wood shavings and then into a cardboard box. This method worked well and made keeping the different varieties organized much easier.
Another common storage method required dividing the clumps in the fall and wrapping each individual tuber in plastic wrap. Many people swear by this method; however, I have not had good success with it. It’s best to try a few different ways and see what works best for you in your specific environment.
It’s key to check on your tubers every few weeks over the winter. This way you can assess for mold, signs of rot, or dryness and address any potential issue early on. Tubers may need a little water during storage if they look dry or shriveled. I’ve found misting the wood chips they are stored in with a spray bottle every few weeks works well.
Since I have a few hundred clumps to divide I start the dividing process in February. In March I bring my tubers in the house to start “eyeing up.” In the past I wait until all danger of frost has past to plant out my tubers, but this year I will be experimenting with planting them out a bit earlier to hopefully extend my bloom period.
Dividing dahlias can feel a but intimidating, but the more you do it the easier it gets. I now look forward to the process. It’s a fun way to prepare for the upcoming garden season in the dead of winter when there isn’t much else you can do garden wise.
Take your tuber clumps out of storage and check them over. They should look plump and healthy, almost like potatoes. Some may have started to shrivel during storage. They still have hope of surviving as long as the crown and neck didn’t dry out. Toss anything that looks fully dried out or diseased.
Common diseases that show up on dahlia tubers are crown gall and leafy gall. They are characterized by over growths on the tubers. Imported dahlias are more likely to be contaminated, so I only purchase from small farms that grow their own dahlia stock. It’s also important to continue to assess the health of the plant throughout the growing season.
Once you’ve determined the health of your tubers you can start dividing or you can let them eye up first to make dividing a bit easier. When you divide your dahlia clumps, every tuber needs to have a viable eye. The eye is where the dahlia’s sprout will be. It can be a bit challenging to spot this eye when it’s dormant, so letting them eye up first can make this process much easier. To do this, I just bring my tubers up from the basement in early spring and store them in a spare room of our house for a few weeks. The key here is raising the temperature to signal to the plant to break dormancy.
Check on them every week or so to make sure they are remaining healthy (i.e., not drying out or molding). Once you start seeing eyes you can get ready to divide.
Start by doing a general clean up of your dahlia tuber clump. Cut off any hair like dahlia roots and tubers that have broken off. A tuber with a broken “neck” will not grow.
Next assess your clump and determine if there are easy cuts. If your clump is large you may need to make a few potentially sacrificial cuts to create smaller clumps that are easier to work with. A small hand saw, sharp knife, or Oscillating Tool can also be helpful for very large, compact clumps.
Find tubers that are at least the size of a AAA battery and contain a neck, crown, and eye. A small tuber will grow just fine as long as the neck of the tuber is intact and it has an eye. The eye is where the tuber will form a sprout. Even the most perfect looking healthy tuber won’t be viable if it doesn’t have an eye.
*Simply cutting off the tuber from the clump will not produce viable tubers. Each tuber needs a body, neck, crown, and eye to be viable.
Continue this process of dividing the individual tubers until you’ve worked your way through the clump.
Many recommend discarding the “mother tuber”when dividing. The mother tuber is the original tuber that was planted the year prior. The mother tuber is often identifiable by darker, more wrinkly skin. It’s also more prone to rotting during storage. I assess the health of my mother tuber and use my best judgement. If it looks plump and happy, I keep it to regrow. If it looks sad and/or rotten I toss it.
Be sure to sanitize your shears with bleach water between clumps to prevent the spread of any potential disease or sickness.
A single tuber will grow a new plant and produce it’s own clump of tubers by the end of the growing season if given at least 120 days to grow in the ground. You can end up with a lot of tubers from just one plant in a growing season.
If you are a visual learner like me, please watch my video to see how I work my way through dividing a clump of dahlia tubers. I share about dividing dahlias at 6:14. 
Some like to divide their dahlia clumps in the fall after digging and before storage.Personally, I find it more challenging to successfully store tubers after they have been divided.I have had much better success by leaving my clumps whole and dividing them in late winter/ early spring. This has become one of my favorite garden tasks to do in those late winter months when I’m dreaming of warmer days in the garden.
Dividing isn’t necessary to grow beautiful and healthy dahlias. Dividing is only necessary for increasing the number of plants you have. If you’re concerned about dividing your clump, you can plant the full clump in the ground and still grow a beautiful plant!
You can also just divide a large clump in half. This will at least give you two plants rather than one and decrease the chance of messing up a more intensive division.
To make it easier, you can wait until your dahlia clumps begin to form visible eyes. This makes it easier to ensure that when you spit your clumps you are leaving a viable eye on each tuber.
Yes, smaller tubers will grow flowers. A general rule is that a tuber should be at least the size of a AAA battery. However, a battery sized tuber and a large potato sized tuber will both grow healthy plants with lots of blooms given the right environment.
After I divide my dahlia clumps into tubers I take inventory of them and place them back into their paper bag with pine wood shavings until I am ready to plant them.
In the past I’ve waited until any threat of frost has past before planting them out. This year I’m going to experiment with pushing those limits a bit in attempt to extend my bloom time.
Dahlias are also pretty easy to propagate by cuttings. To do this, plant the tubers you wish to propagate in potting soil and leave the crown of the tuber above soil level. One the sprout reaches 2-3 inches and has at least one set of true leaves you can carefully wiggle the baby plant at the base until it separates from the tuber. This is optional, but I like to dip my dahlia cuttings in rooting hormone before planting them in soil.
Create a hole in potting soil (a pencil works great for this) and place your cutting. Gently press the soil in around the cutting and water. Keep the soil damp but not too wet to prevent the delicate cutting from rotting.
Cuttings should produce tubers by the end of the growing season if they are propagated early enough.
I recommend buying dahlia tubers from reputable farms or other dahlia growers. It’s also a good idea to check the American Dahlia Society website to see if you have a club near you. Our local dahlia society puts on several amazing sales each spring and this is where I buy several of my tubers. I do not recommend buying tubers from importers or big box stores in an effort to prevent disease.
Another way to grow a lot of dahlias for very little money is to plant dahlia seeds. I could go into great detail on this topic, in fact there is an entire book written explaining in detail dahlia seeds and how to grow them(which I highly recommend if dahlia breeding is something that interests you).
Basically, dahlia seeds will produce beautiful flowers that will even form their own tuber clumps by the end of the season.
However, here is the caveat, dahlia seeds will not produce the same flower as it’s parent plant. Each seed has it’s own unique genetics and it’s bloom will be a surprise.
What does this mean? For example, when you grow heirloom tomatoes you can save seeds from the tomato and be quite confident that the seeds will produce tomatoes just like the one it was saved from, especially if pollination was controlled. This is not the case with dahlias.
The only way to grow a dahlia identical to the original mother plant is by growing from tubers. When seed is saved you are more likely to get something similar to the parent plants, but never identical.
Also, majority of the seedlings will produce flowers with open centers. These are still beautiful and the pollinators LOVE them, but if you are growing seeds expecting plants with those beautiful lush full blooms, you will be very disappointed.
Dahlia seeds should be started 4-6 weeks before your last frost date and planted out after all threat of frost has past.
Growing dahlias from seed is how new dahlia varieties are formed. This process is long but also fun and rewarding. You never know what you will get and if you grow a bloom you love, you will be the only person in the world with that exact dahlia. If you want to learn more about how to breed dahlias this book by Kristine Albrecht is an amazing resource.
Dahlias are the divas of my garden but gosh are they worth it! Their blooms are unlike any other flower I grow.
Let me know what questions you have about dahlias in the comments and follow for more garden tips and updates!
Spring is an exciting time for gardeners as we start preparing our gardens for the upcoming growing season. If you grow dahlias, spring is a critical period for caring for the tubers to ensure beautiful blooms later in the year. In this article, I’ll provide a comprehensive guide on what to do with dahlia tubers in spring.
Inspect and Prepare Tubers
The first step is to take out your stored dahlia tubers and inspect their condition Carefully remove any excess soil and debris from the tubers. Look for signs of damage, rot, or pests Damaged tubers likely won’t survive planting, so it’s best to discard them. If you find some rot, cut it away with a clean, sharp knife. Allow any cut tubers to dry for a day or two before planting.
Proper winter storage is key for healthy dahlia tubers. Cool temperatures between 40-50°F in a dark, well-ventilated area prevent rotting and diseases. If tubers seem soft, shriveled, or moldy, they may not sprout well. Consider purchasing new tubers for planting.
Planting Dahlias
Once spring arrives it’s go time for planting your dahlia tubers. Select a sunny spot with at least 6 hours of direct sunlight. Dahlias need well-draining soil so add compost or manure to improve drainage and nutrients.
Dig holes 12-18 inches apart and 2-4 inches deep depending on tuber size. Place the tubers with the eyes pointing up. Cover with soil and water thoroughly after planting. Add more soil if needed after watering to prevent tubers from being exposed.
Spring Care Tips
Here are some tips for caring for newly planted dahlias:
-
Watering: Dahlias need consistent moisture, so water tubers regularly, especially right after planting. Avoid overwatering.
-
Fertilizing: Use a balanced fertilizer at planting time. Switch to a fertilizer higher in phosphorus as plants mature to promote blooming.
-
Pests/Diseases: Watch for signs of aphids, spider mites, powdery mildew and other issues. Treat promptly to avoid spread.
-
Staking: Add stakes or supports for dahlias once they reach 10-12 inches tall to prevent damage from wind/rain.
Dividing Dahlia Tubers
Dividing tubers in spring helps increase your dahlia stock for this year’s planting and beyond. Here are the steps:
-
In early spring, carefully dig up the entire clump of tubers from last year.
-
Gently remove any excess soil and separate tubers, making sure each piece has at least one “eye.”
-
Allow the divided tubers to dry for 1-2 days. This prevents rot and aids healing of any cuts.
-
Dust cut surfaces with a fungicide powder before replanting.
-
Replant the divided tubers following the guidelines above. Water thoroughly after planting.
You can also propagate dahlias from cuttings for more plants. Take 4-6 inch stem cuttings in spring, remove lower leaves, and dip in rooting hormone before planting in potting mix.
Troubleshooting Issues
Even if cared for properly, dahlia tubers can still run into problems in spring:
-
Rot – Caused by excessive moisture. Improve drainage and avoid overwatering. Cut away any rotten parts of the tuber before planting.
-
Poor germination – Could be from cold temps, damage, or improper storage. Try new tubers if issues persist.
-
Slow growth – Usually due to insufficient water or nutrients. Ensure regular watering and fertilizing.
-
Pests/diseases – Treat any issues promptly to avoid spread. Be vigilant about monitoring plants.
Important notes about dividing dahlias:
- Make a solution of bleach water and sanitize your pruners between every clump to prevent the spread of potential disease.
- Discard any suspect clumps. It’s hard to throw away a prized tuber, but it’s not worth risking the spread of sickness and disease in your soil and other tubers. A small loss now is nothing compared to a major loss later.
- There are some dahlia diseases, like gall, that are pretty clear to identify. Other times, tubers can look strange from what is known as lenticels. If you are ever unsure you can call your local extension office for further advice and possible testing.
Dahlia Tuber Check / Dividing Dahlia Tubers in Spring / Dahlia Storage
FAQ
How do you prepare dahlia tubers for spring?
Dig them up before the first frost, shake of the soil and let them dry – a dry paintbrush helps to remove soil. I then put mine on newspapers in cardboard boxes in the garage. As long as they stay dry, they’ll not rot. By “growing” them now, you will build up the tubers a bit, and make them stronger for next season.
How do you wake up dahlia tubers?
So how do you it? It’s very simple- Take your tubers from their storage location and move them to a frost free place that’s around 65-70 degrees.Mar 14, 2024
Can I plant a whole clump of dahlia tubers?
Does Tuber Size Matter? The short answer is no. As long as you plant a clump or tuber that has at least one eye, it will grow into a plant.
Should I soak dahlia tubers before planting?
Before planting, soak the tubers in a bucket of tepid water for an hour so they can fully rehydrate.Mar 2, 2025
How do you care for dahlia tubers?
Care of tubers starts with proper treatment during the growing season. While most dahlias start producing tubers in the spring, the roots do not mature until late in the growing season. Before digging, go through the garden and throw away any weak stock.
When is the best time to divide dahlia tubers?
The best time to divide dahlia tubers in spring is when new shoots begin to emerge and the soil has warmed up. This is usually around late March to early April, depending on your climate. How do you divide dahlia tubers in spring? To divide dahlia tubers in spring, start by carefully digging up the dahlia clump with a garden fork.
How do you divide dahlias in spring?
To divide dahlia tubers in spring, start by carefully digging up the dahlia clump with a garden fork. Once the clump is out of the ground, gently separate the tubers by carefully pulling them apart. Be sure to keep some stems attached to each tuber as this will help with identification and planting.
How do dahlia tubers survive winter?
Dahlia tubers are the storage organs that the plants use to survive winter. In spring, they must be coaxed to wake up from dormancy and begin actively growing again. Pre-sprouting tubers indoors gives them a head start on the season. It allows the small new shoots to establish before being planted outdoors.
How do you divide dahlia tubers?
Dividing dahlia tubers involves separating these storage structures into smaller sections, each of which can grow into a new dahlia plant. The best time to divide dahlia tubers in spring is when the plants have started to emerge from the ground, but before the new shoots have grown too large.
Do dahlia tubers keep well?
However, tubers from some dahlia varieties tend not to keep well, and some cultivars tend to give very sparse tubers. For these varieties, one should consider planting extras and growing pot roots. Care of tubers starts with proper treatment during the growing season.